Home
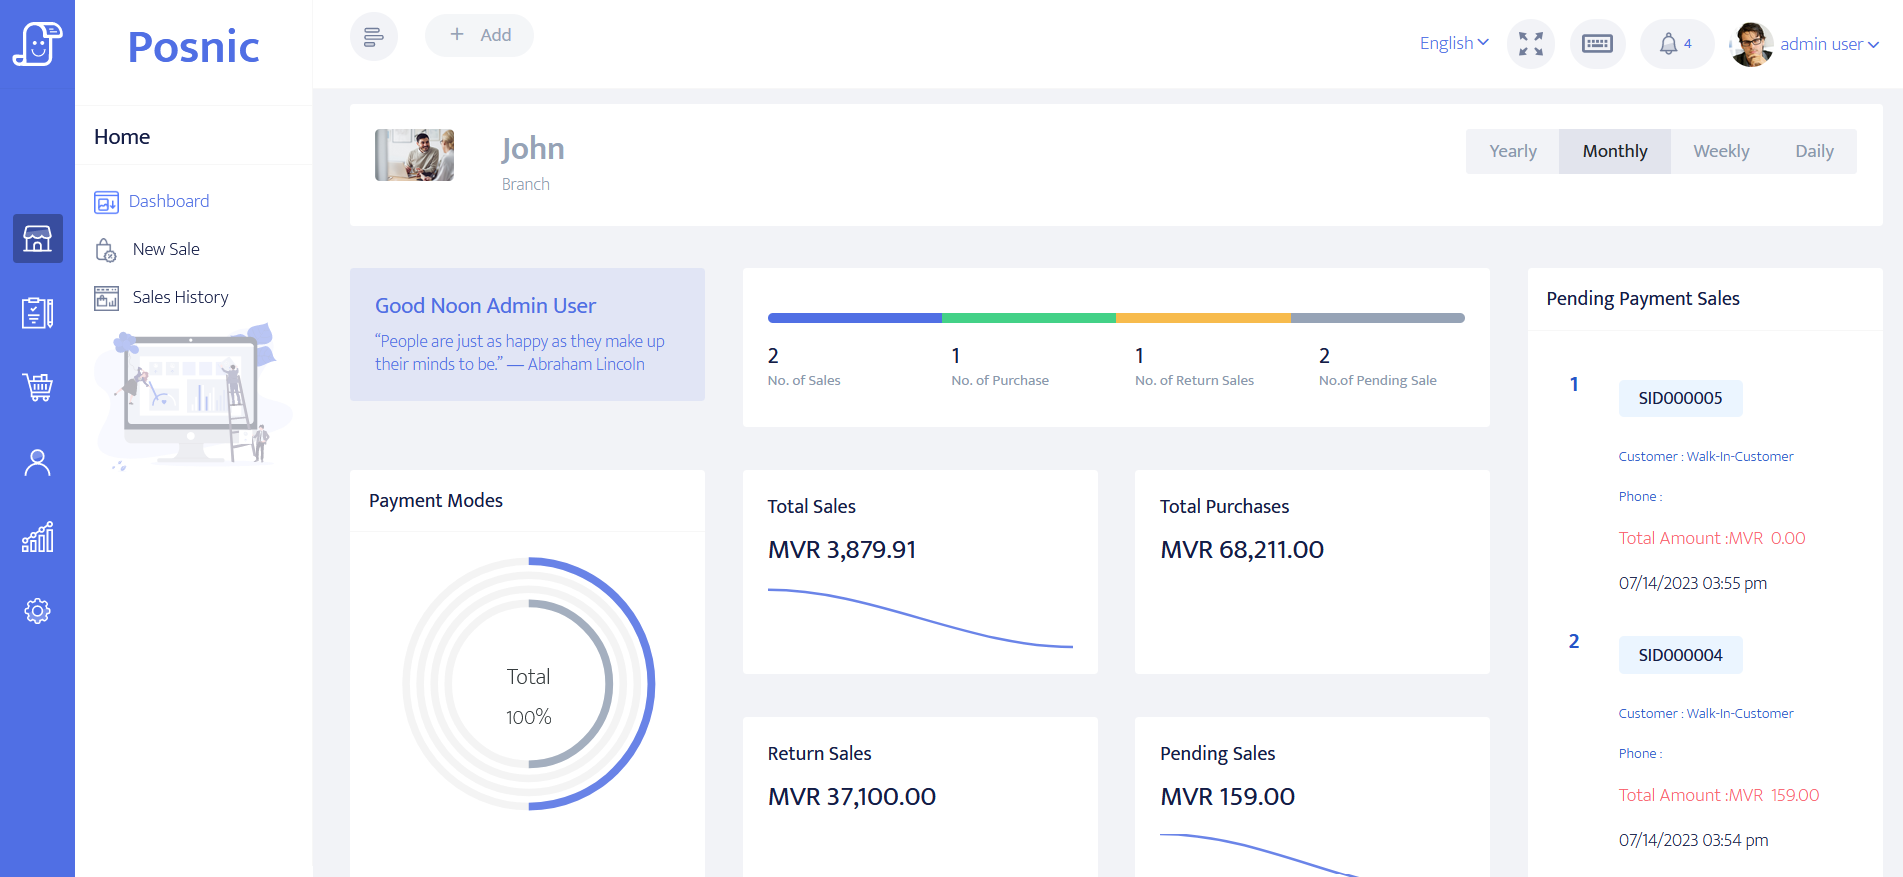
This option enables you to view various business highlights, such as daily happenings, stock notifications, product status, and more. Let's take a brief look at this.
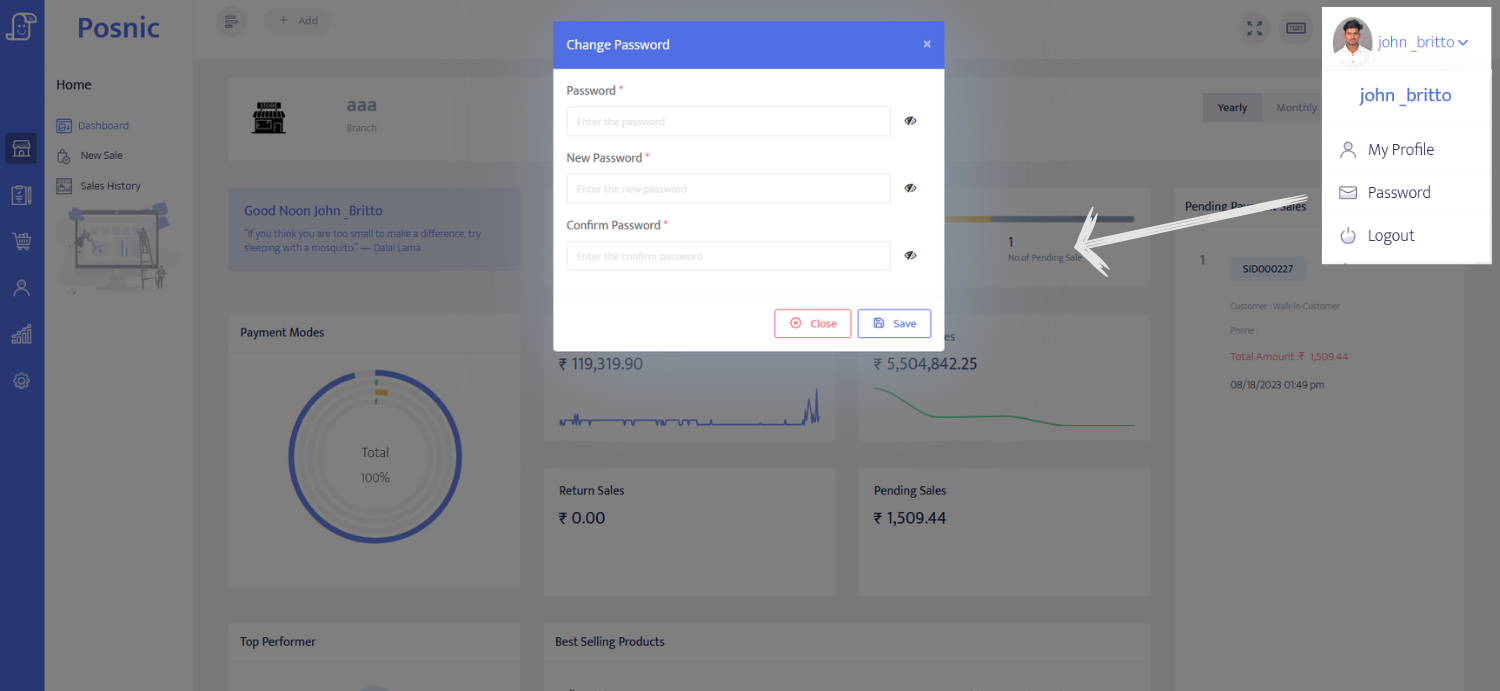
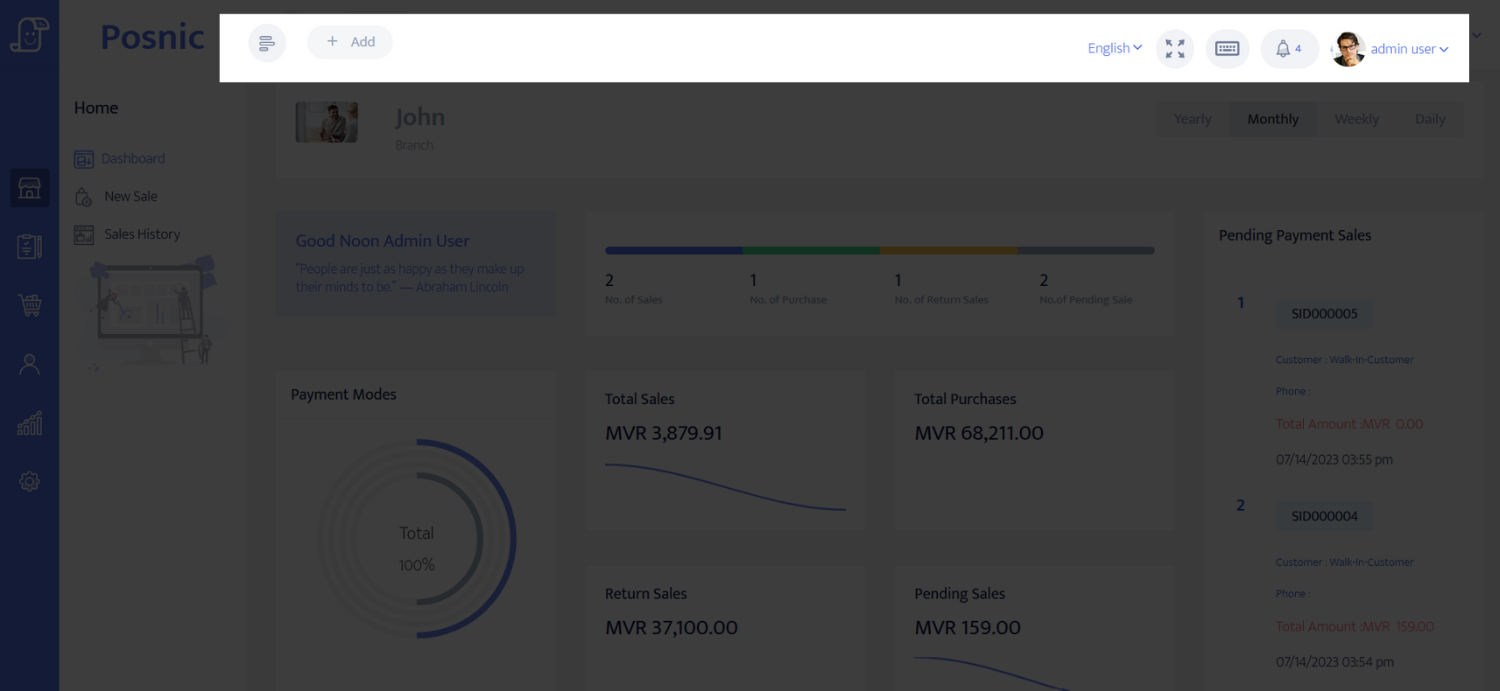
- Top bar : Viewing the user details, changing their password, viewing profile details option are available through the top bar. This section can alert you if your business is running low on stock, change the language of your software, and quickly add anything new(user, sales, customer, purchase, etc) to your business.
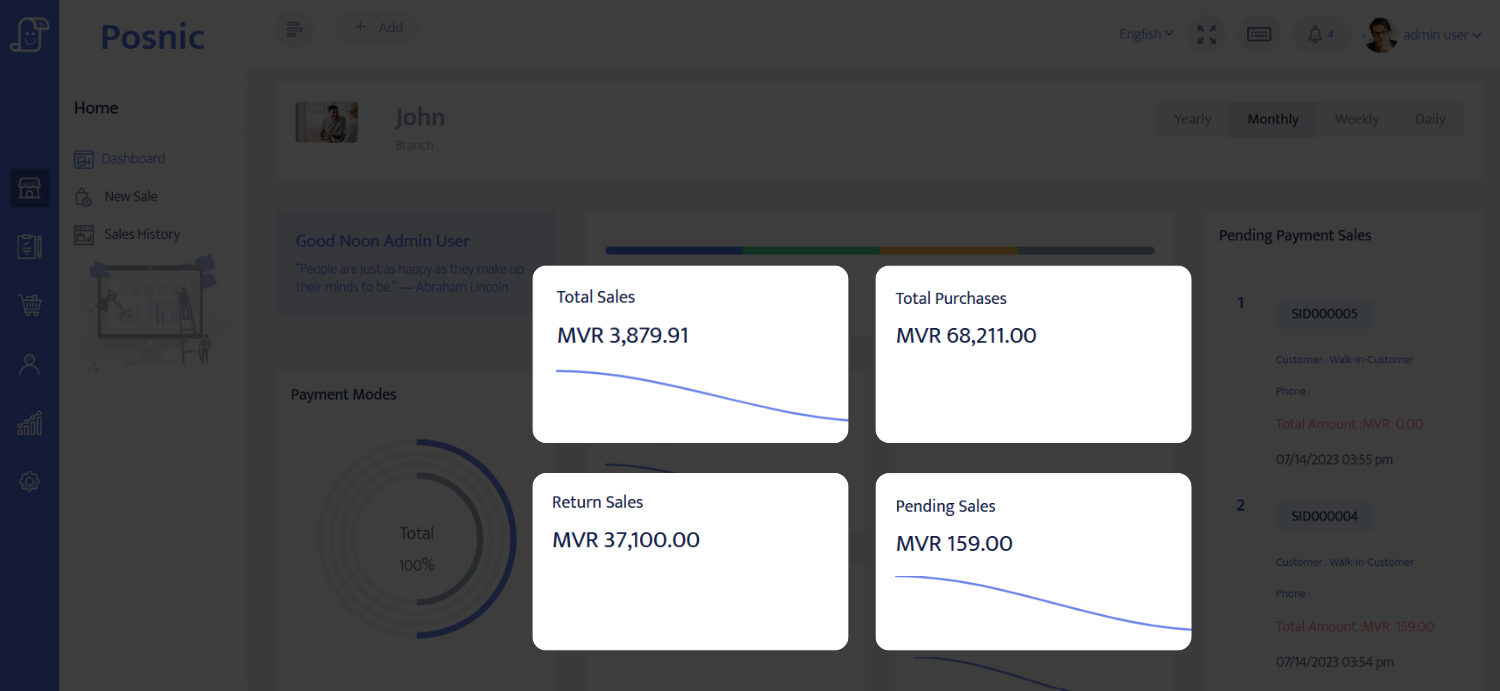
- Sales transaction : In this section, the total sales, purchases, returns and pending sales are highlighted by daily, weekly, monthly and yearly basis. Thus the company's performance can be evaluated easily.
- Payment Modes : The transaction made through various modes like cash, credit card, checks and balance can be tracked by the payment modes graph.

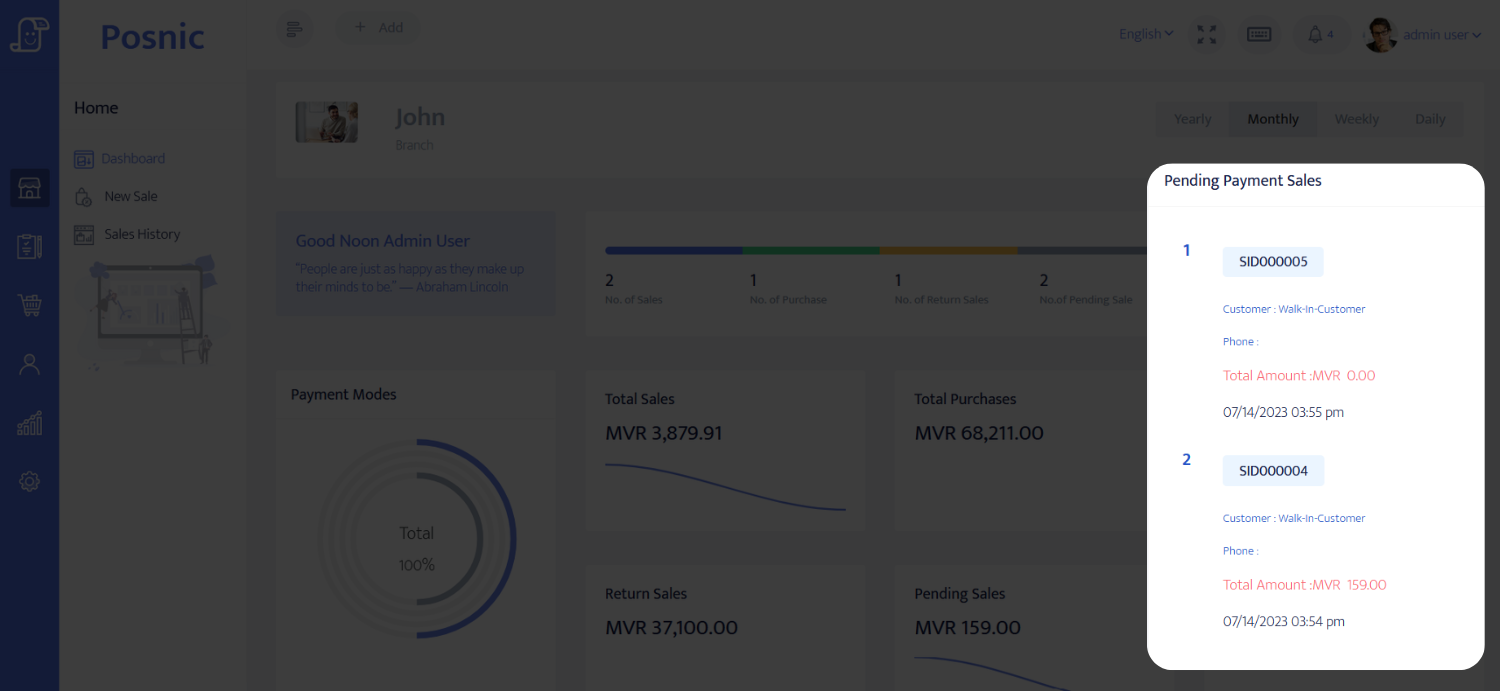
- Pending Payment : You can use these payment methods to keep track of transactions made through various modes, including cash, credit cards, checks, and balances.
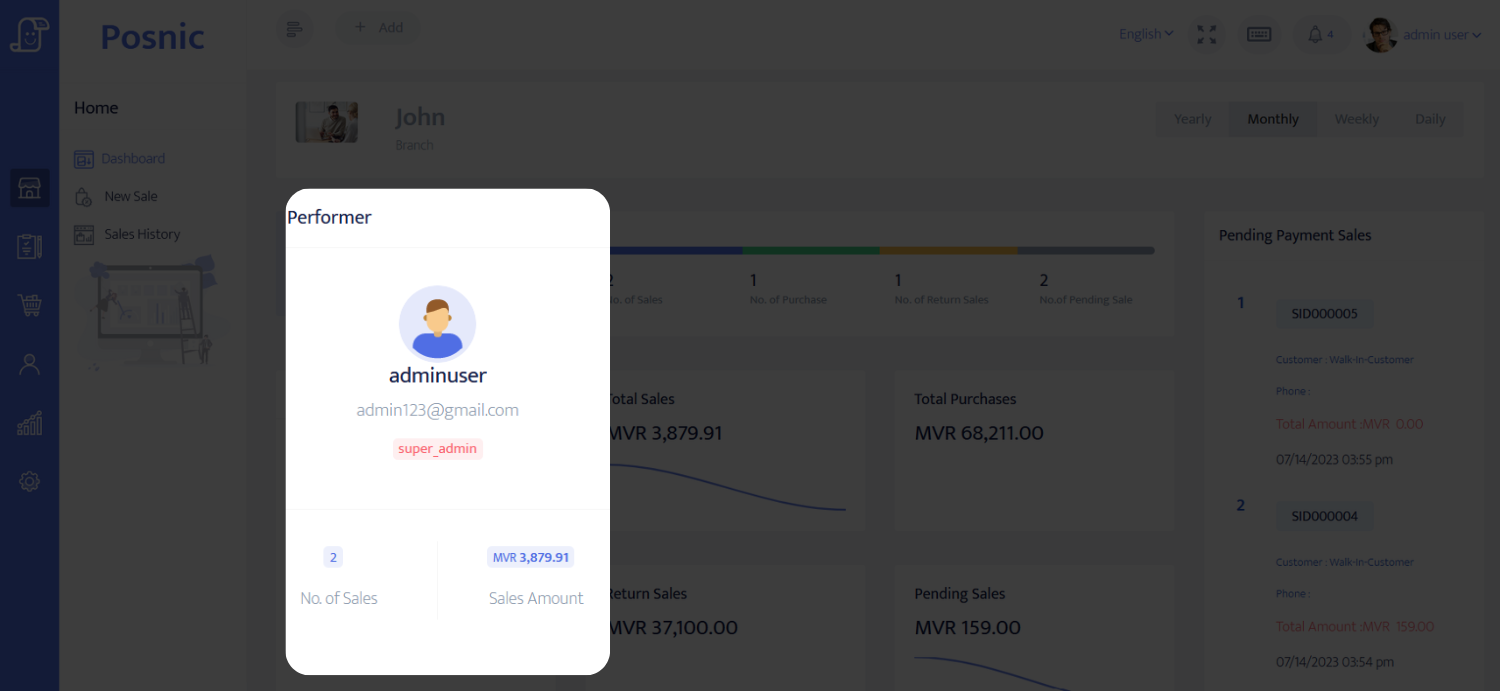
- Top Performer : Which of the created users has the best performance in sales (no of sales, sales amount)will display their details in this section.
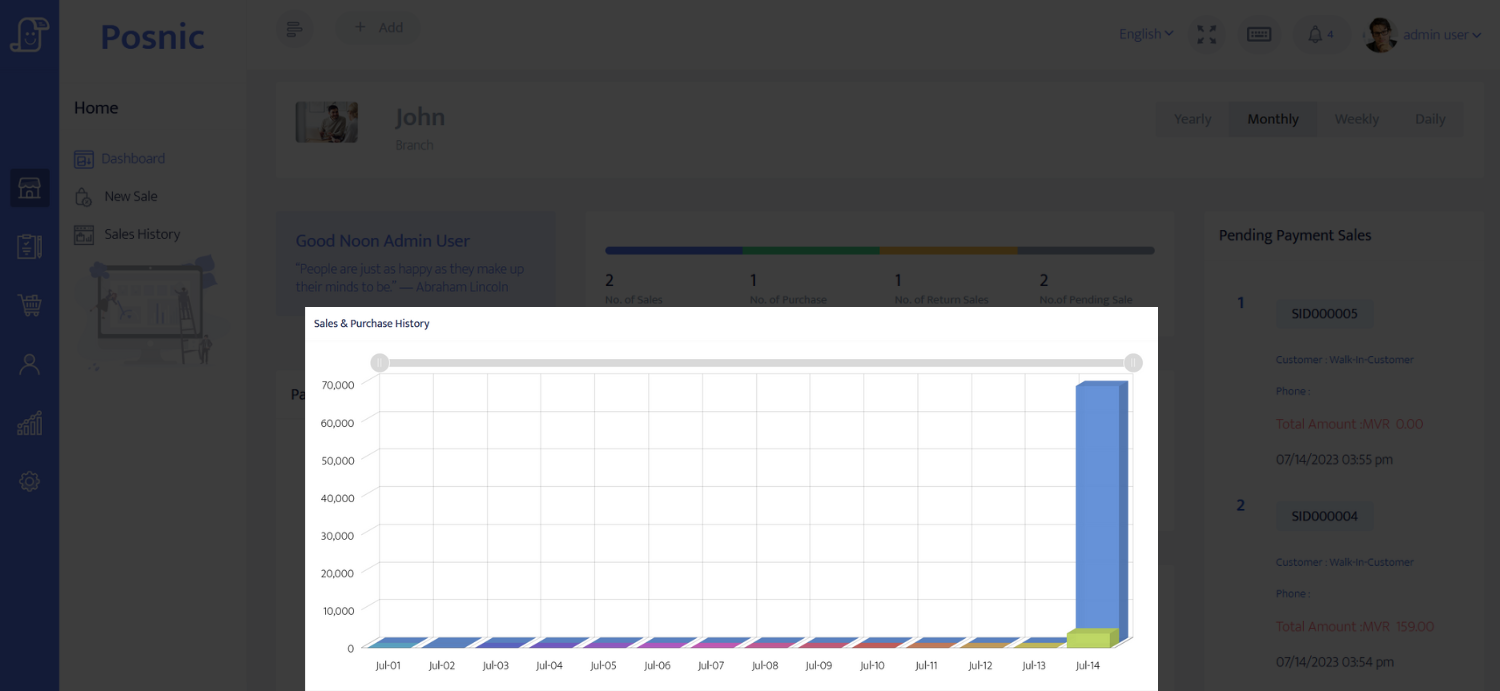
- Sales & Purchase History : This section shows the sales and purchase details of the business from the date the user registered in the software to the current date, every month and every year separately.
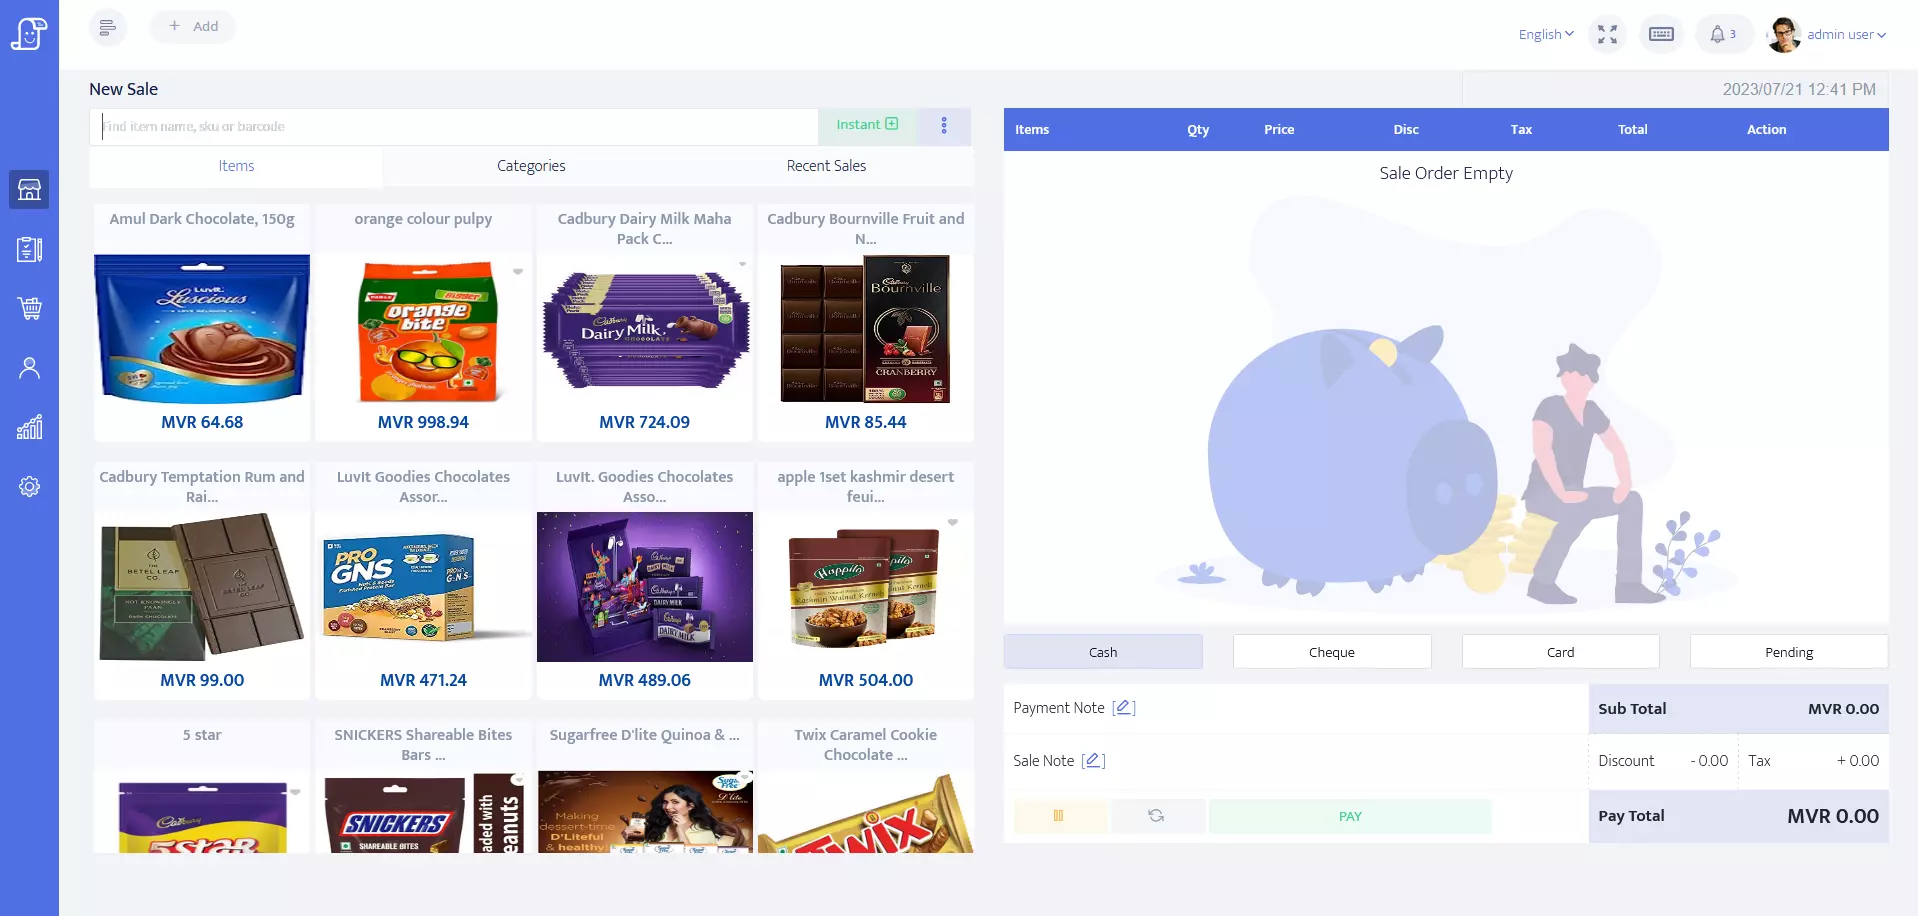
- Add page : Add sale section will display all items. By clicking on an article on the screen, you can move it to the cart or checkout tables. This way, you can sell your items using payment methods.
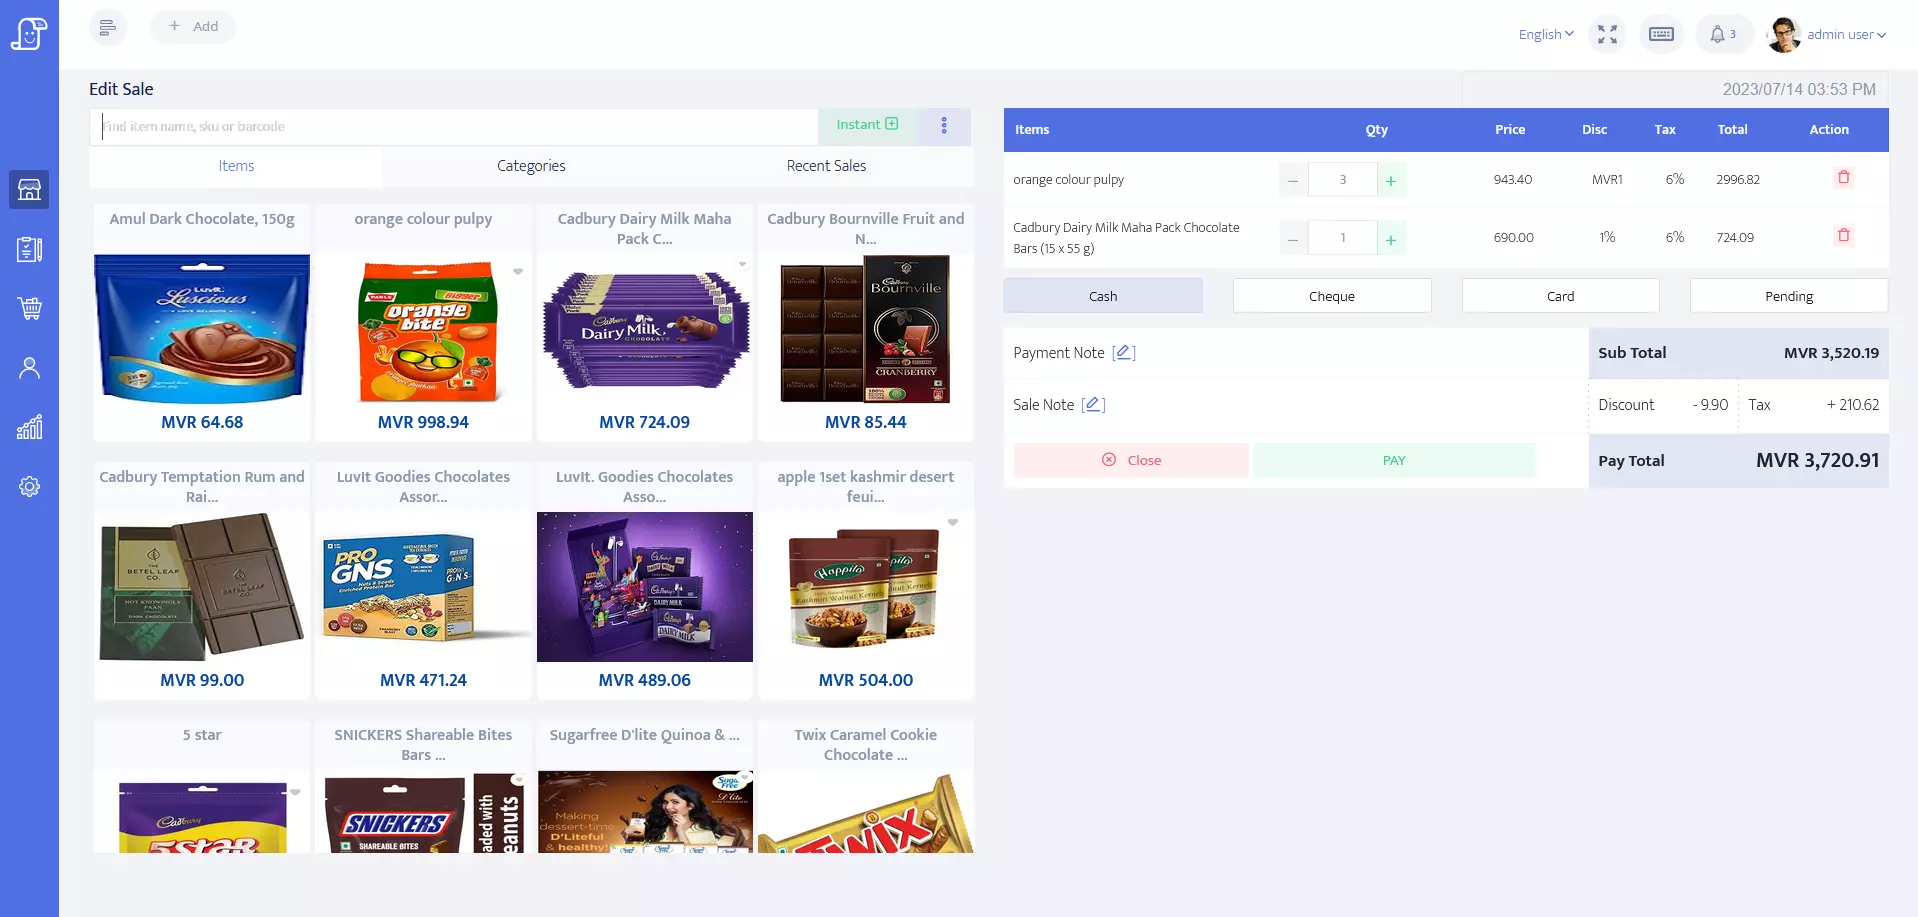
- Edit page : If you click the edit button, it will display the edited sales item detail in the list table. Then you can edit the sale details.
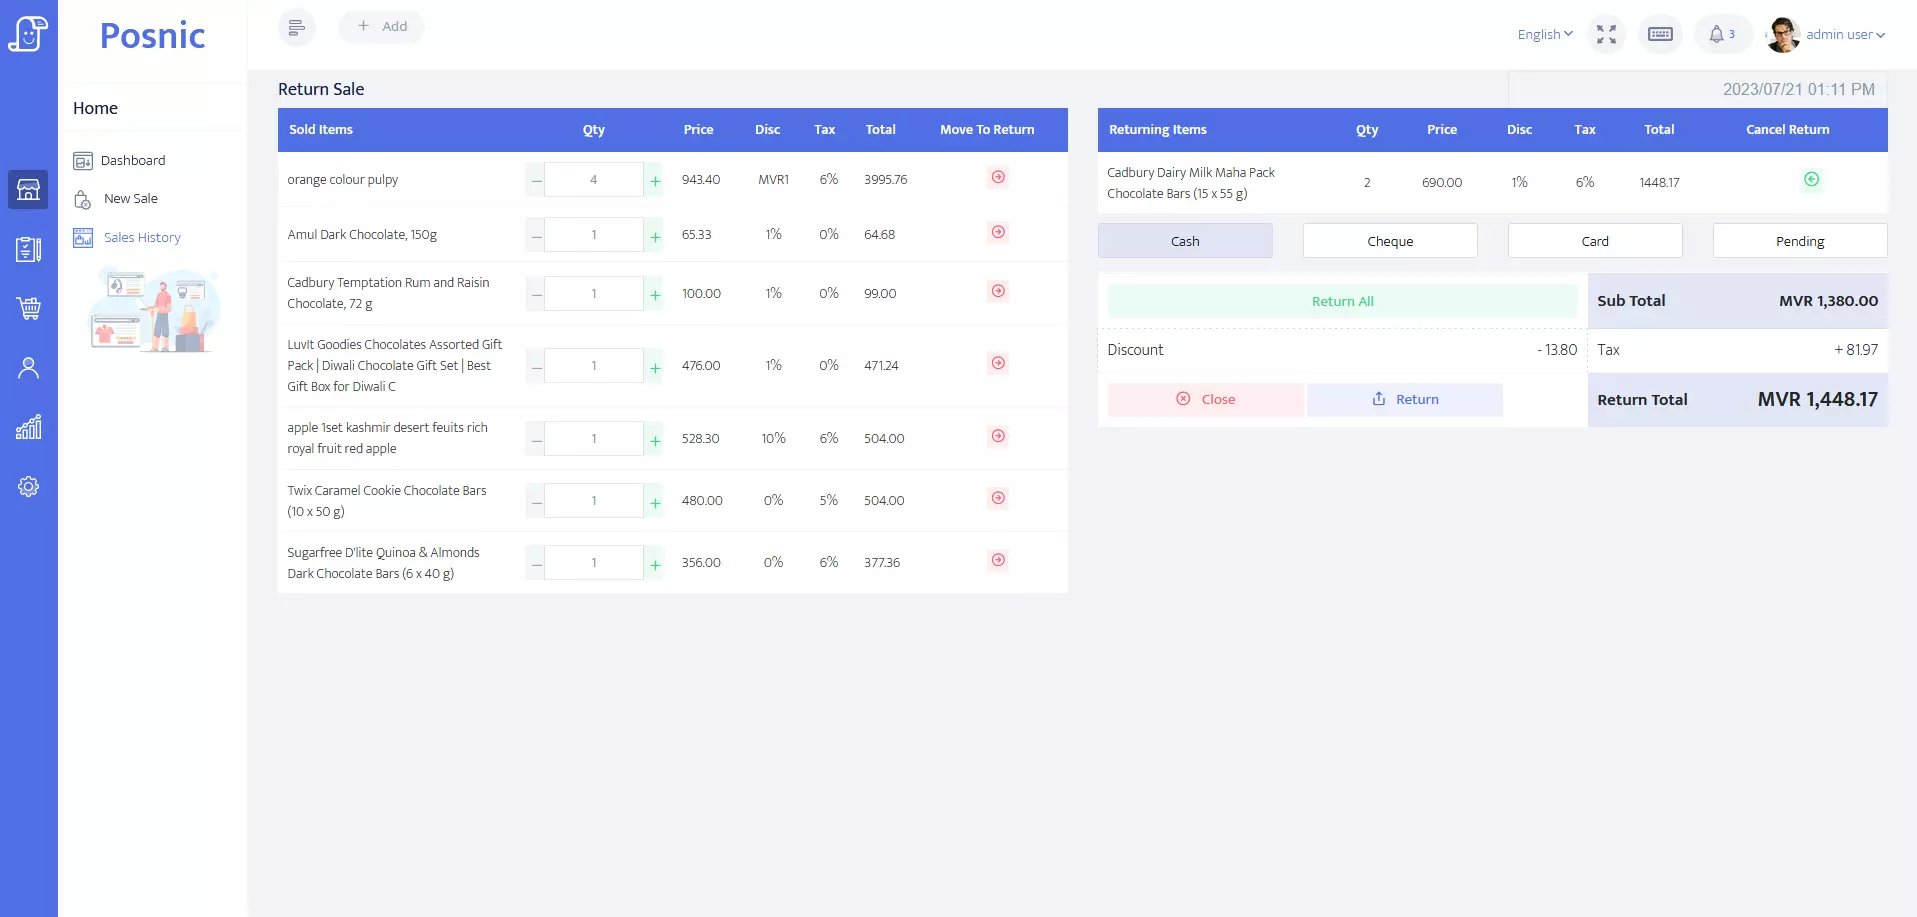
- Return page : Click on the "Return" button to initiate the return process. You can choose to return a specific item or all items in your order.
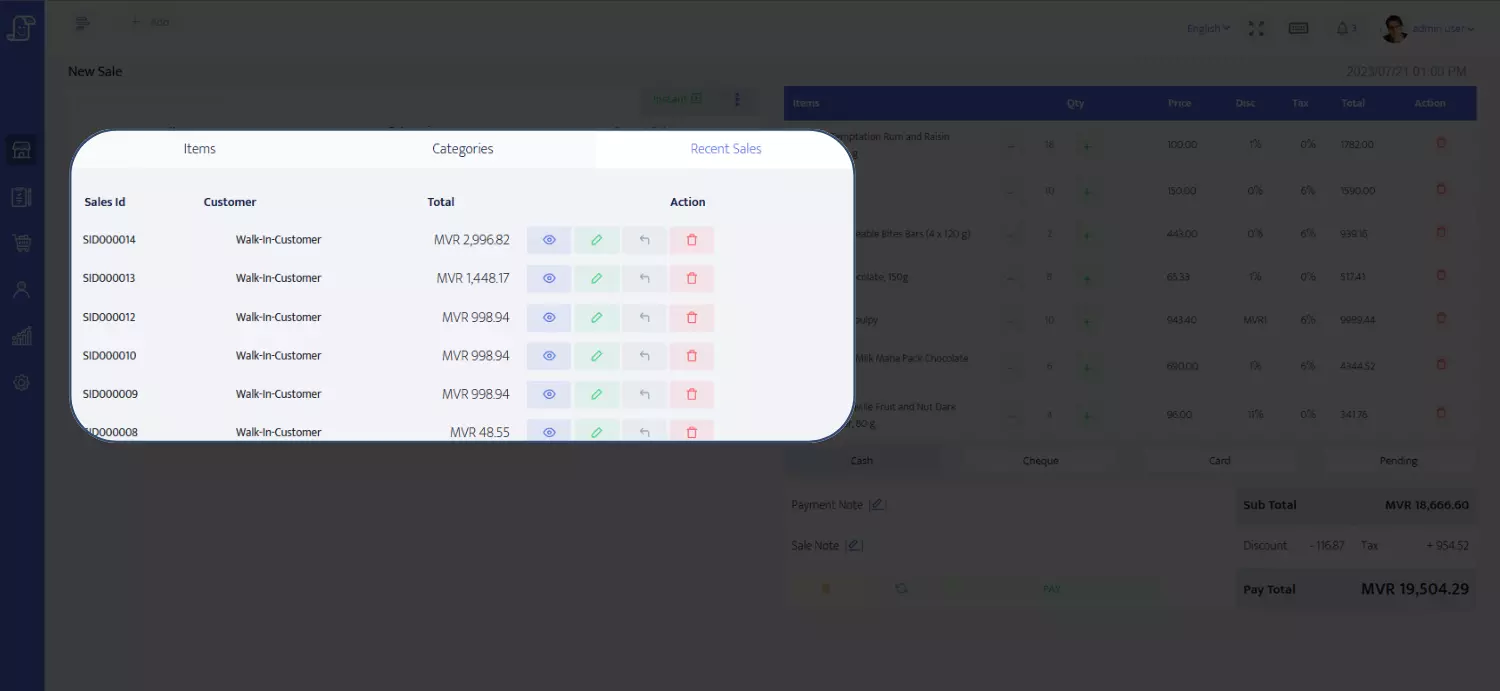
- Recent menu : The recent sales menu displays current sales and allows for correcting already sold items.
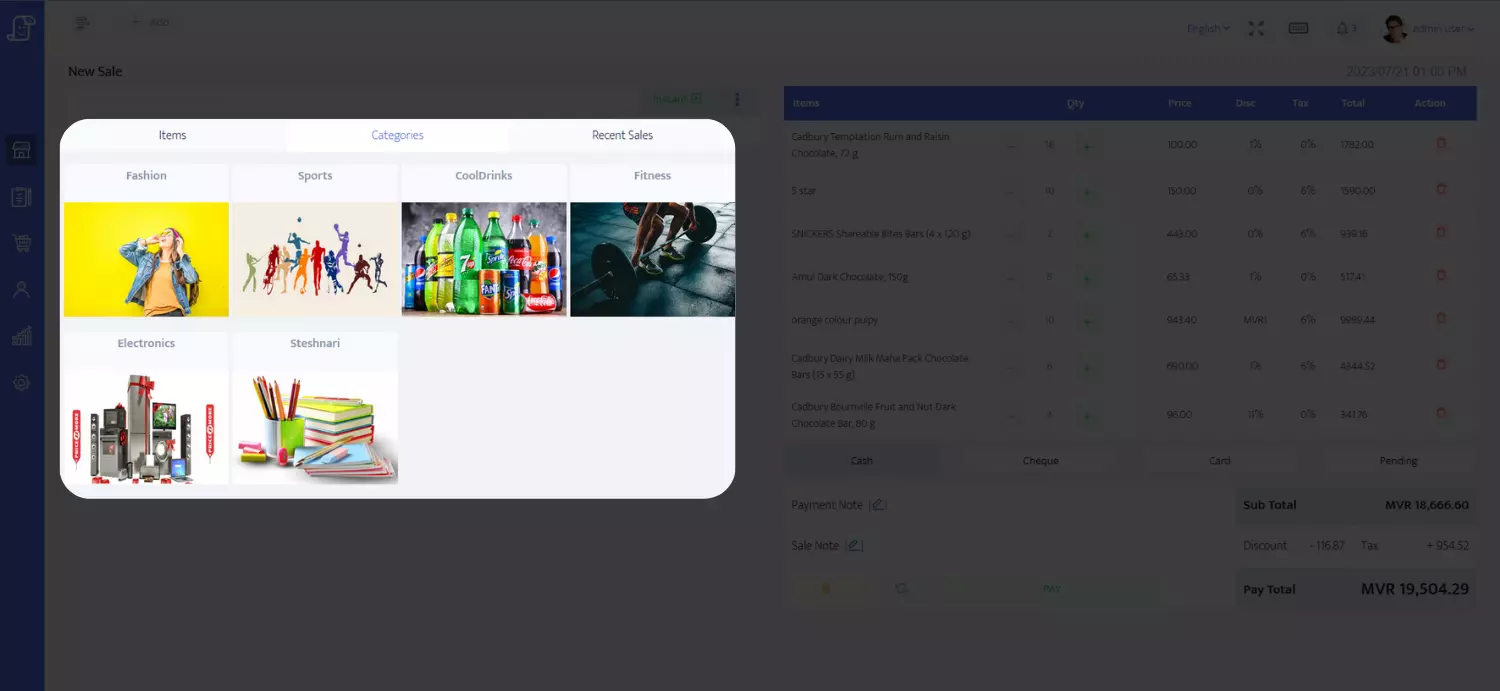
- Category list : If you have difficulty in searching for an item, selecting a category will display the items by type in this section.
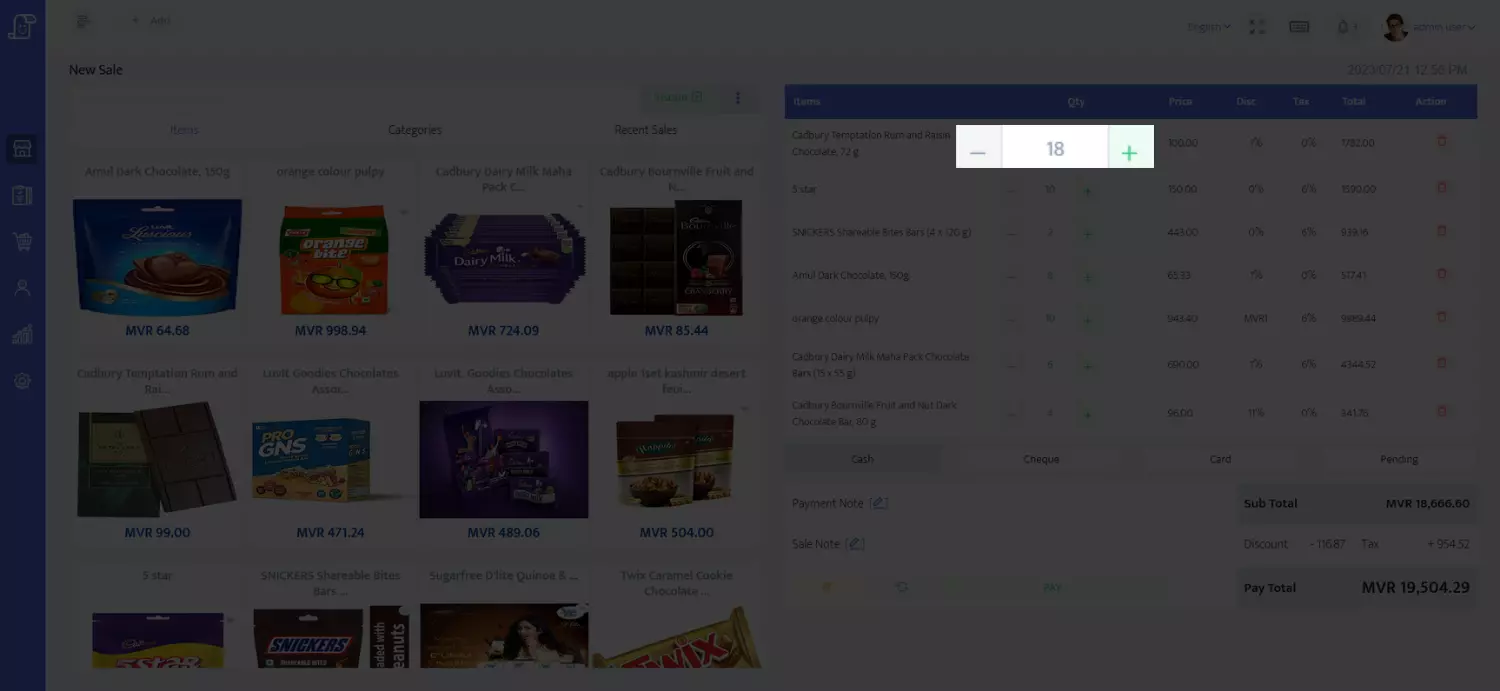
- + ( or ) - Button : The plus and minus buttons can increase or decrease the item quantity. If you don't need an item, you can remove it.
- Instant item page : You can add an unlisted item to the sale and choose the customer's name. It won't appear in the inventory.

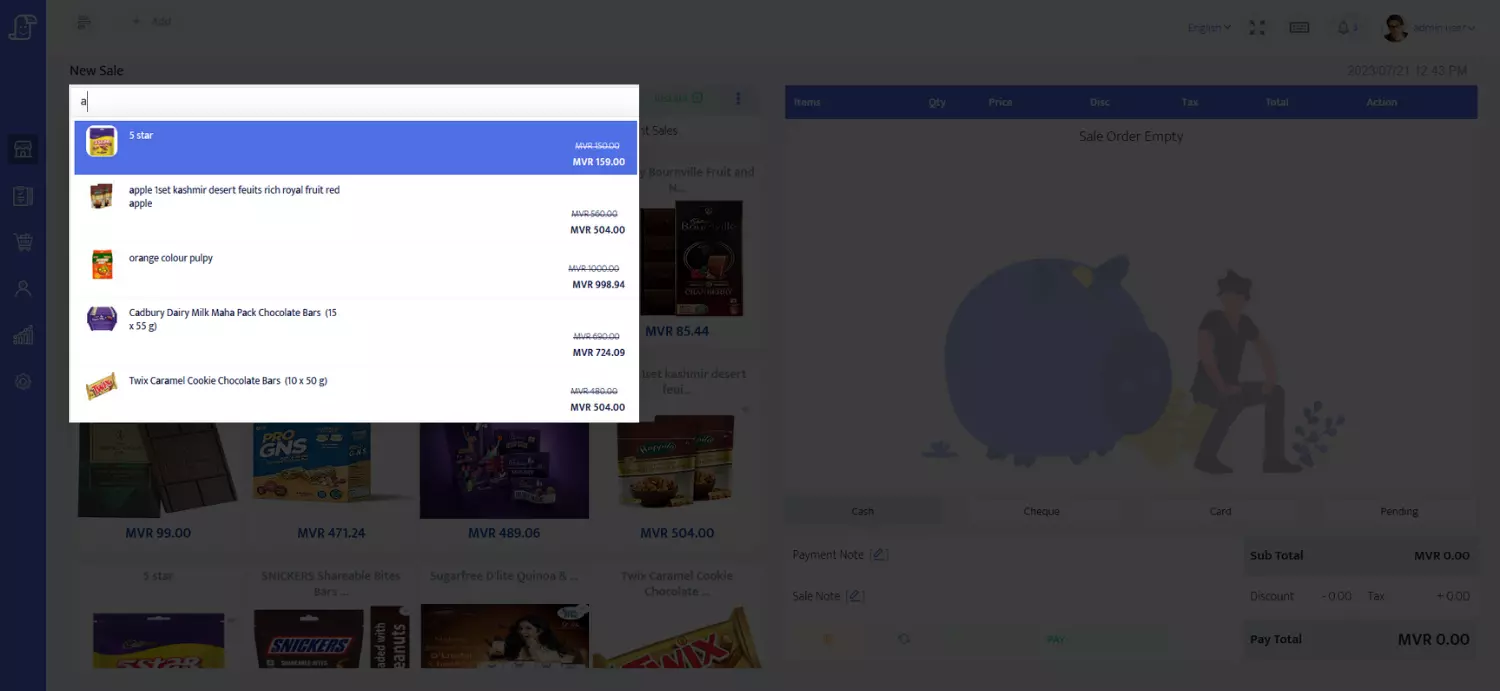
- Search Option : Use the search function to find items by using name, SKU, or barcode and add them to your table or cart for faster and more efficient shopping.
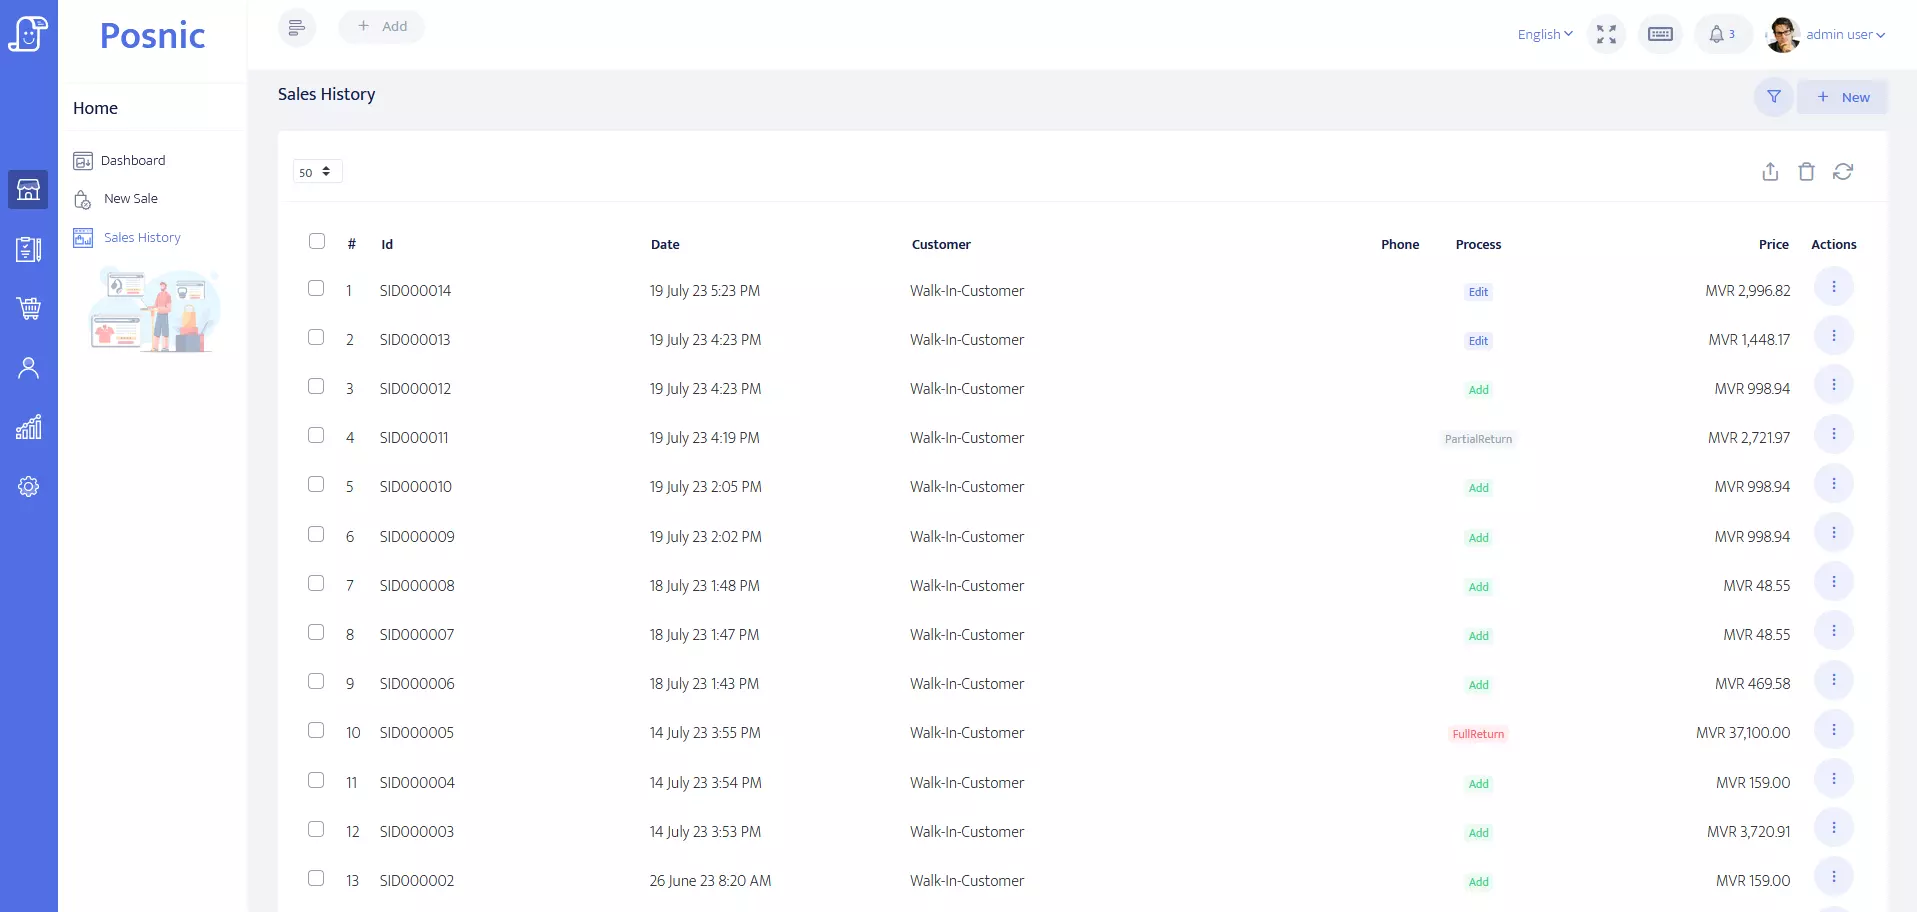
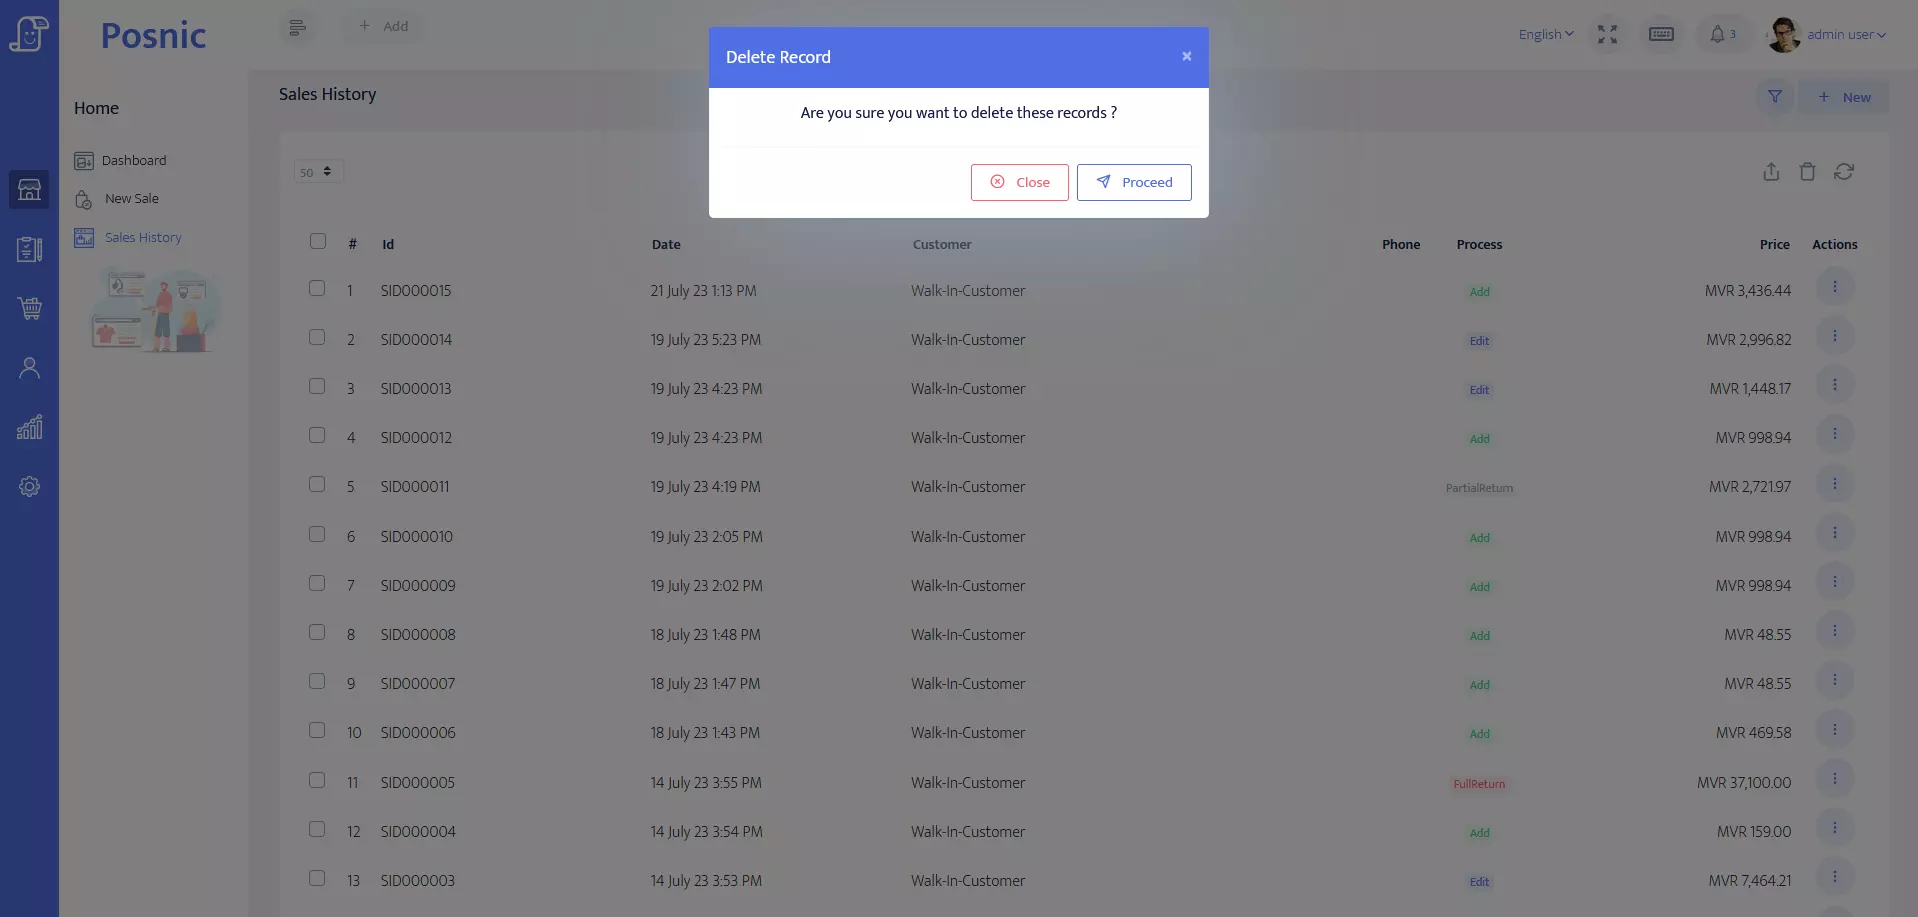
- History : The sales view will display the sales list and special features like new, return, print, and edit sales available in sales history.
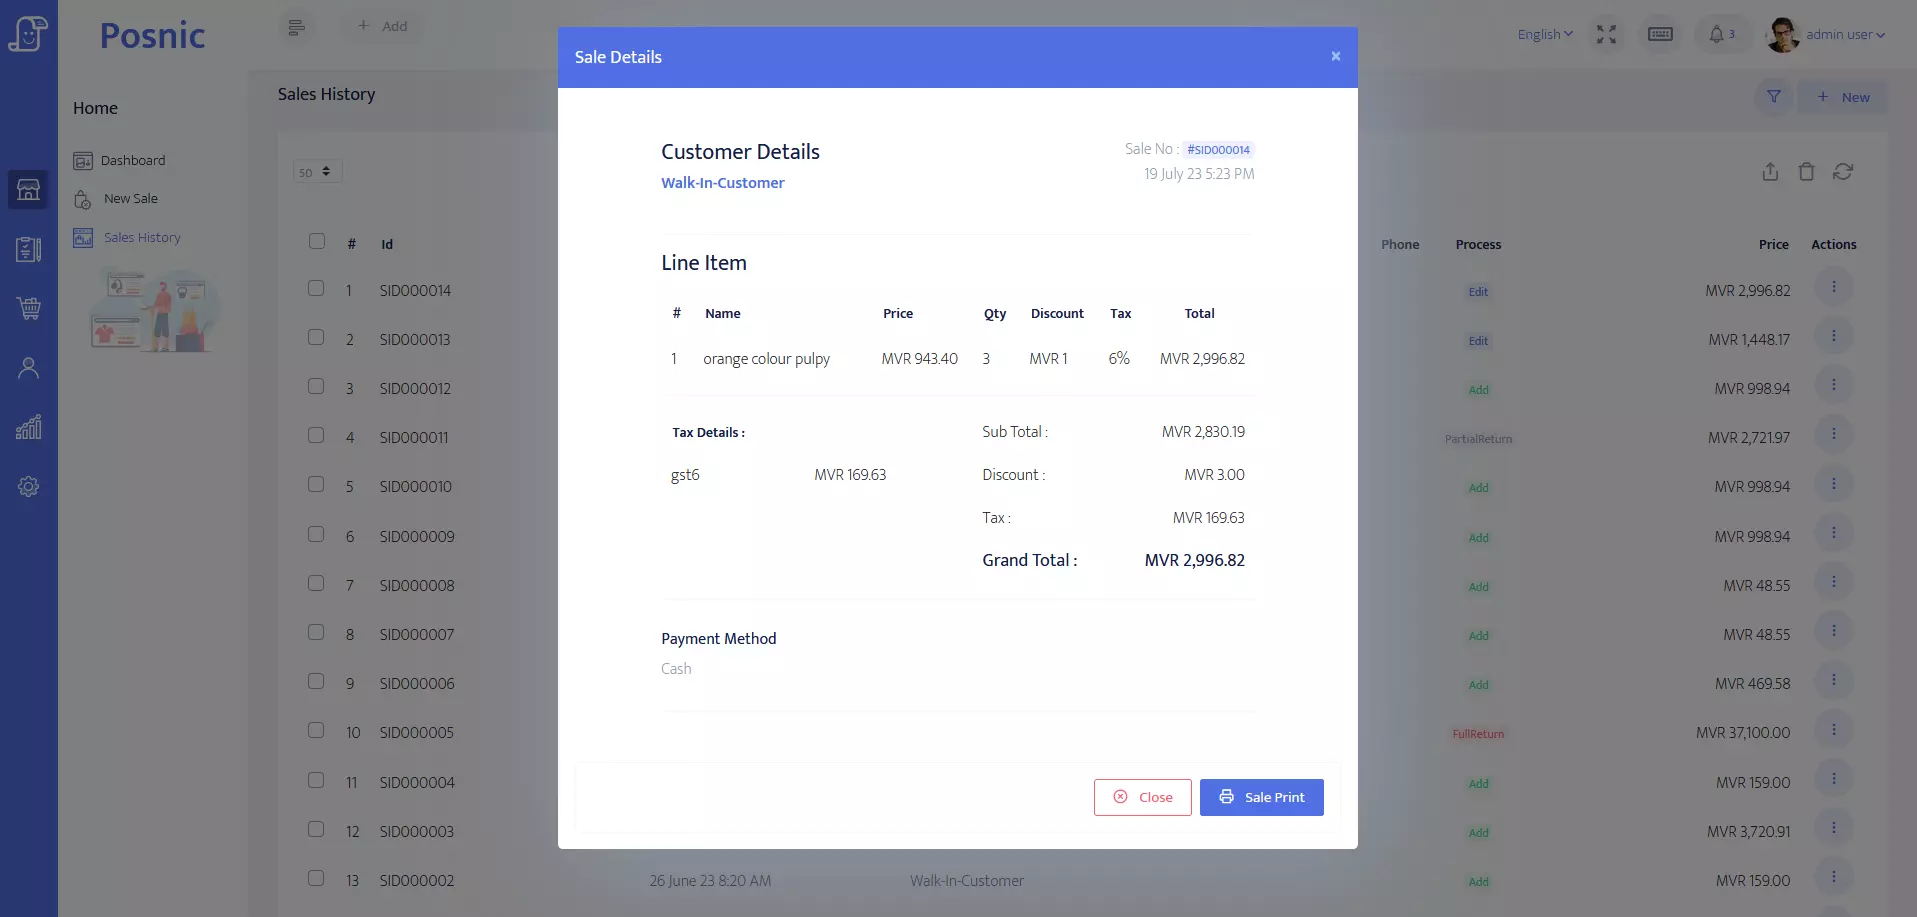
- View page : If you click the view button, it will display the sales details.
- Delete page : The delete button is clicked. It will remove the sales item details.
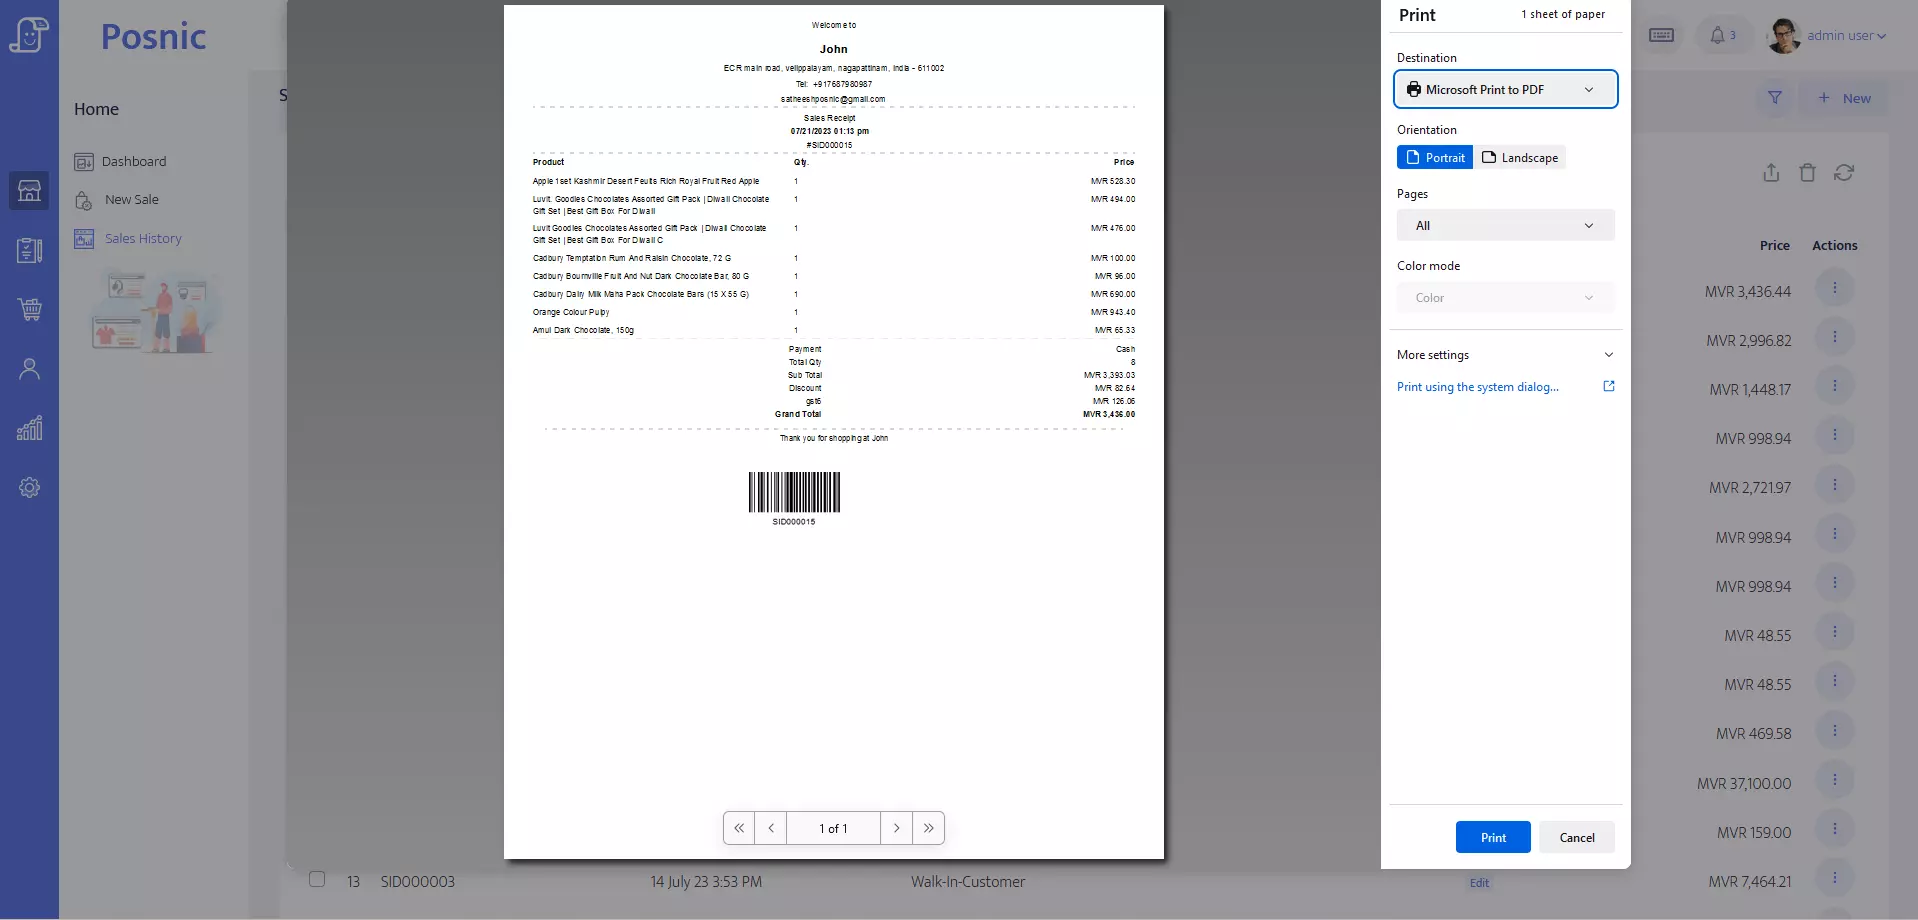
- PDF page :By Clicking the PDF button it will automatically download the sales item details in PDF format.

- Print page : If you click the print button, it will print the sale details.
Inventory
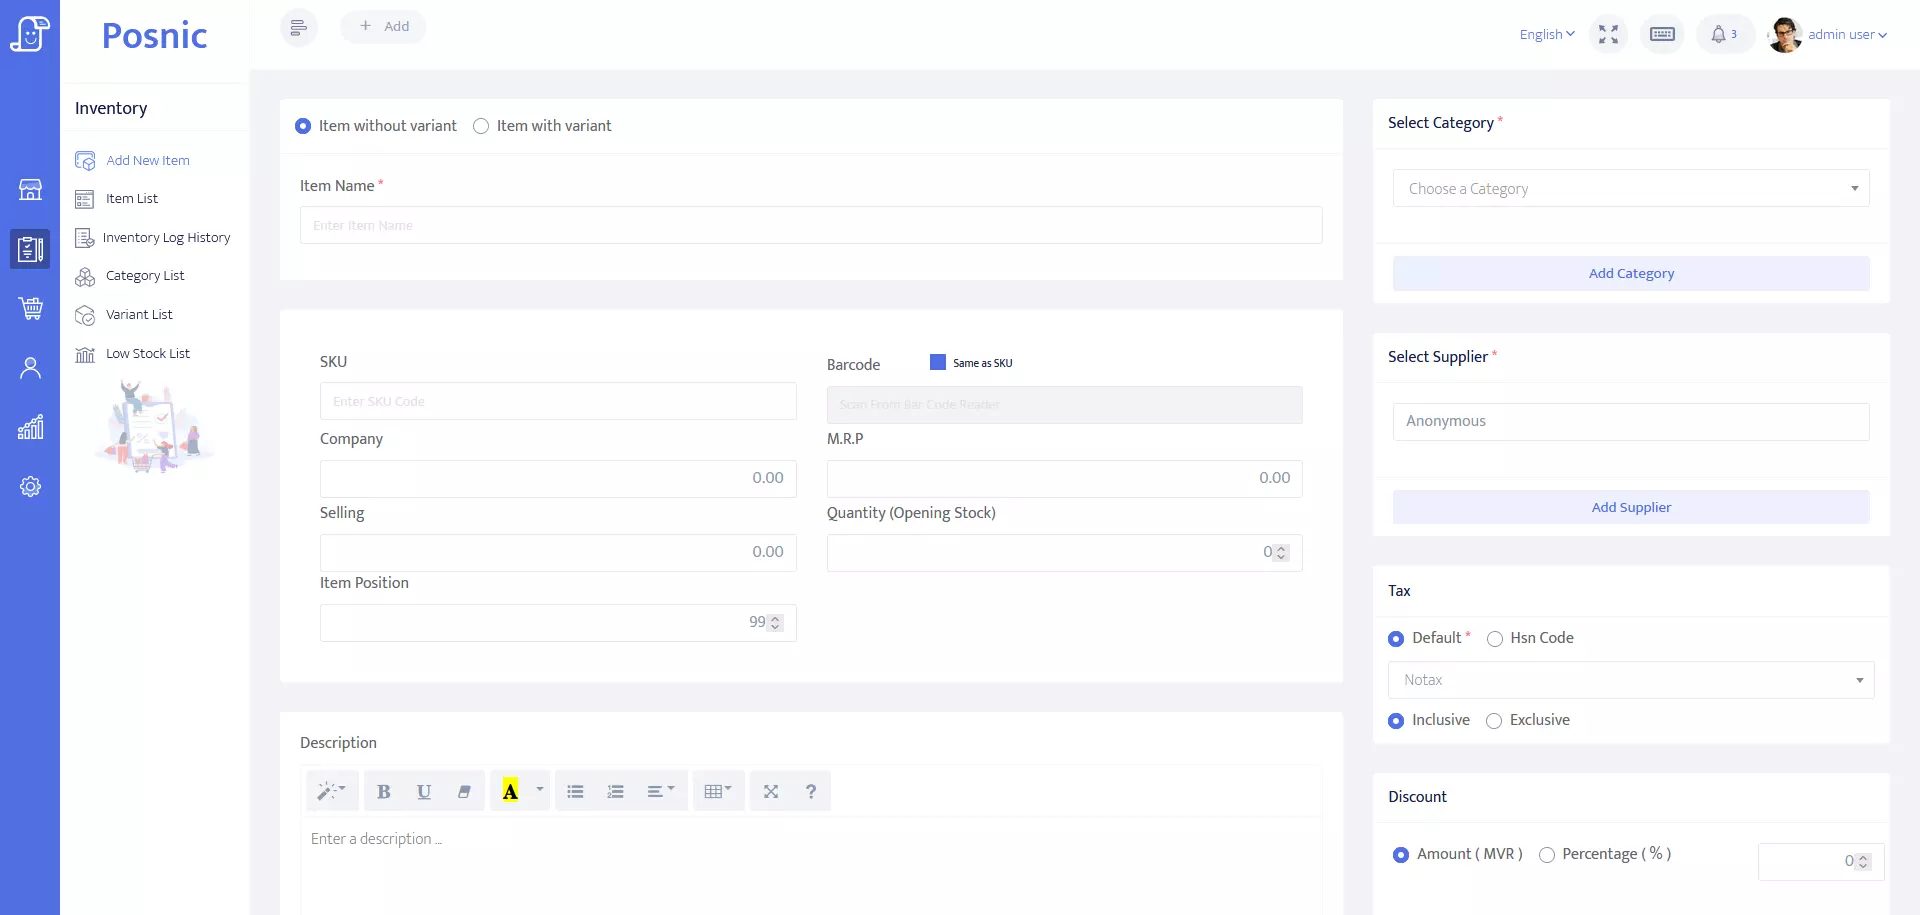
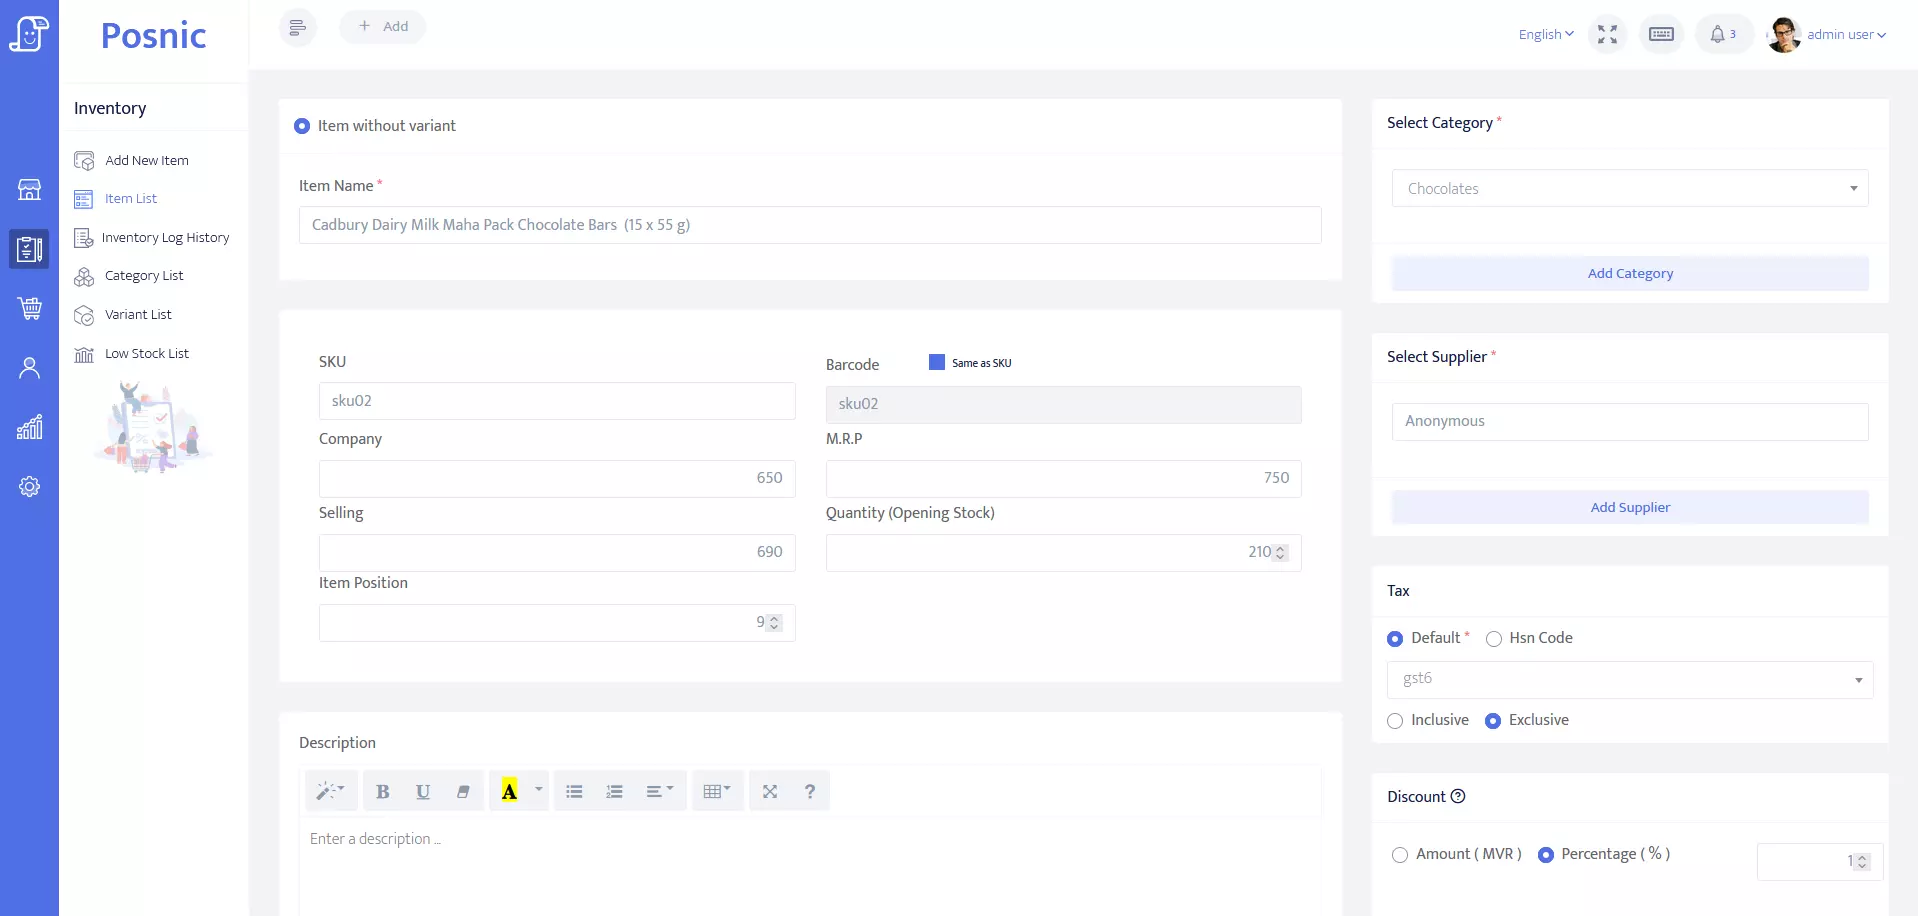
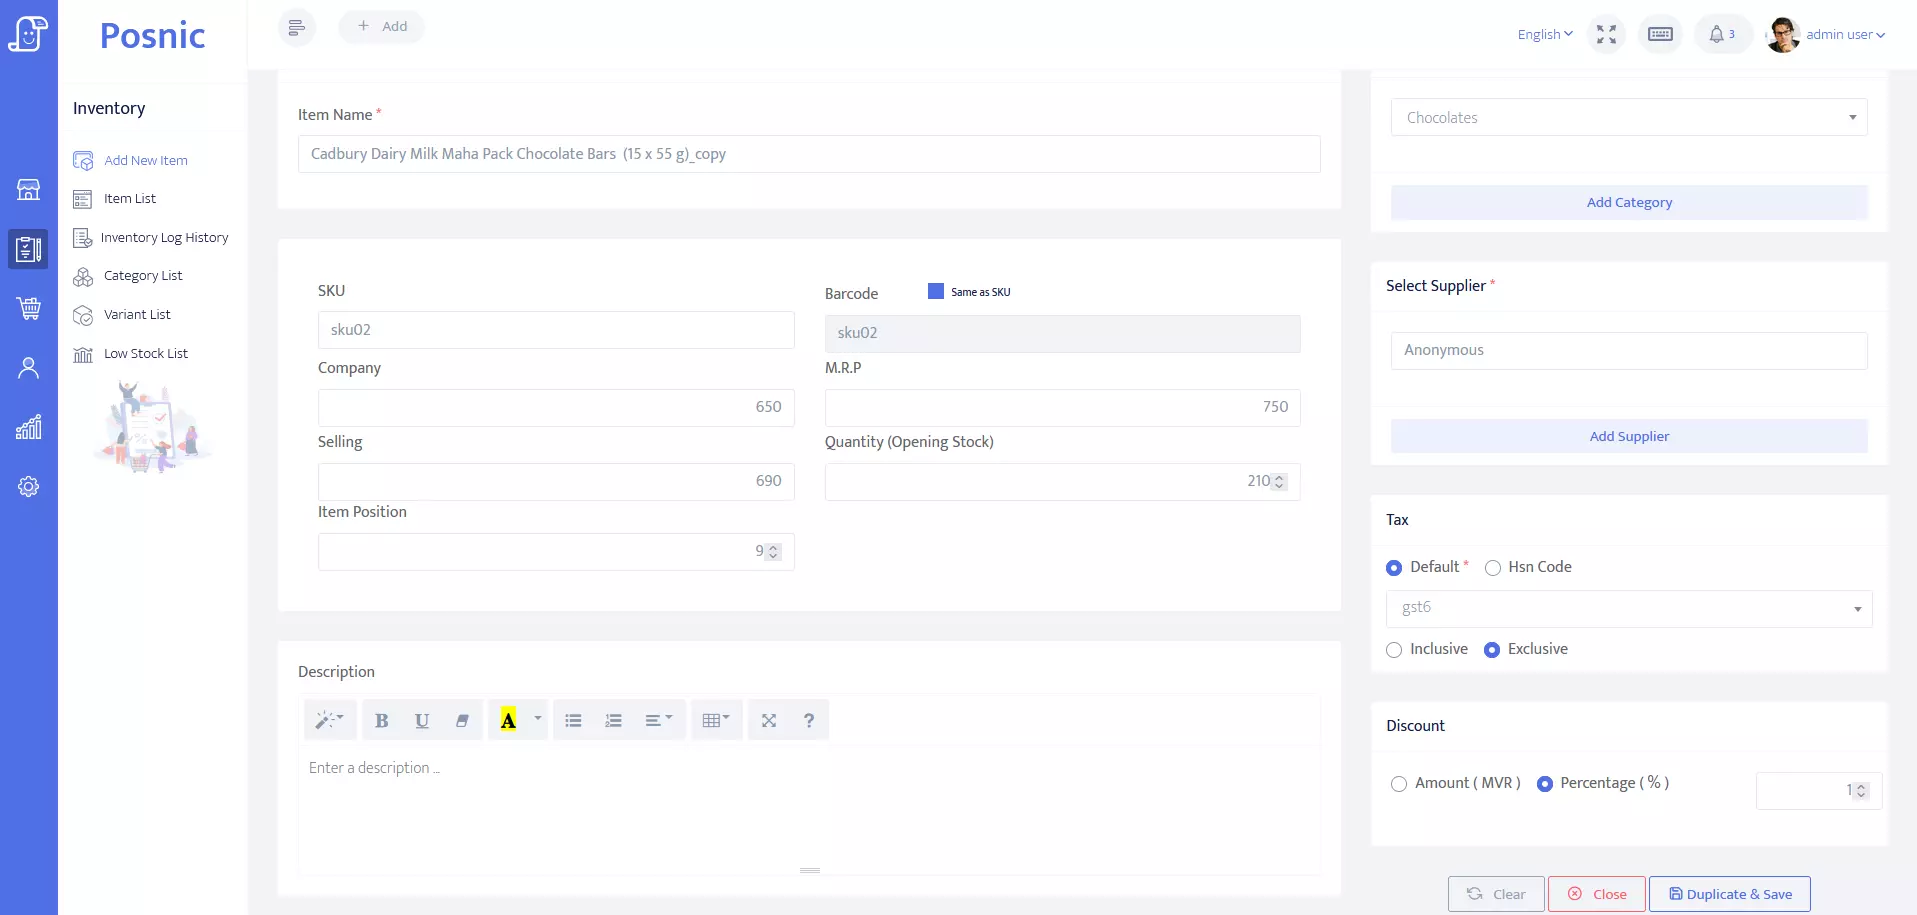
- Add page : To create a new item, provide its name, SKU, and barcode details. Select a supplier, category, and branch. Fill in price details and quantity. Specify its position in the sale and save.
- Edit page : To edit the item's details, click the item option button in the item history and select the edit item button.
- Clone page : This section creates an item like a copy of another item. To use this, click the item option button in the item history and choose the clone item.
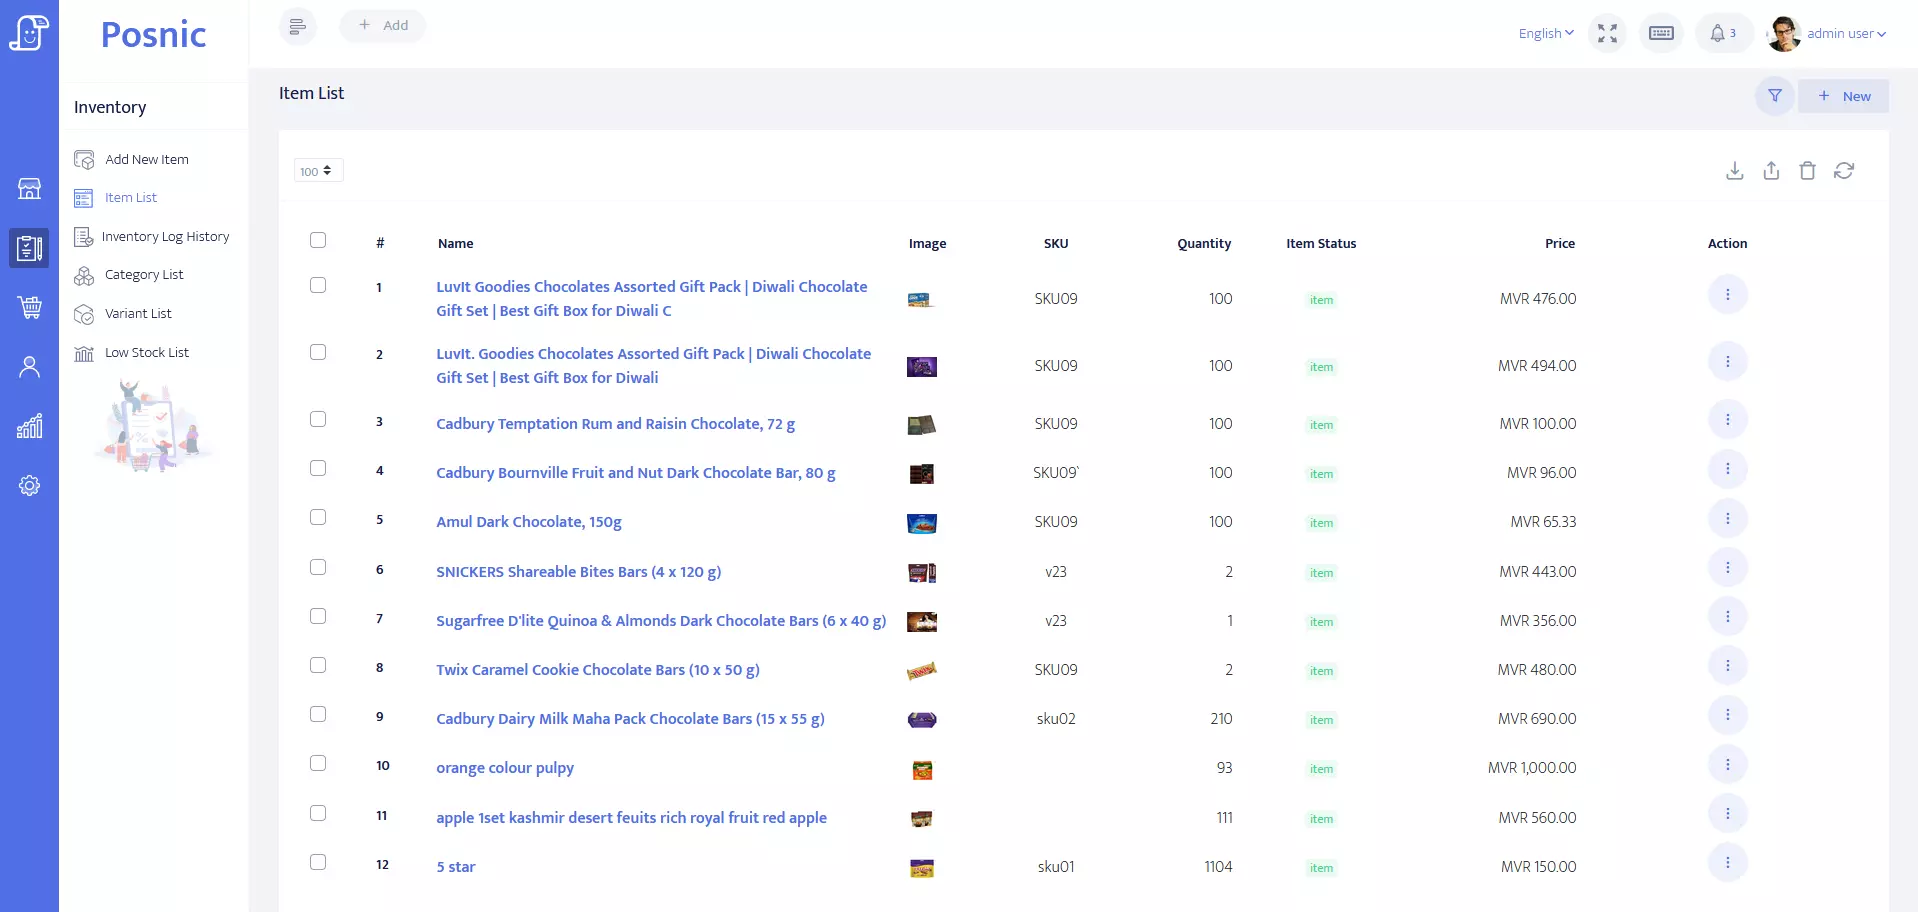
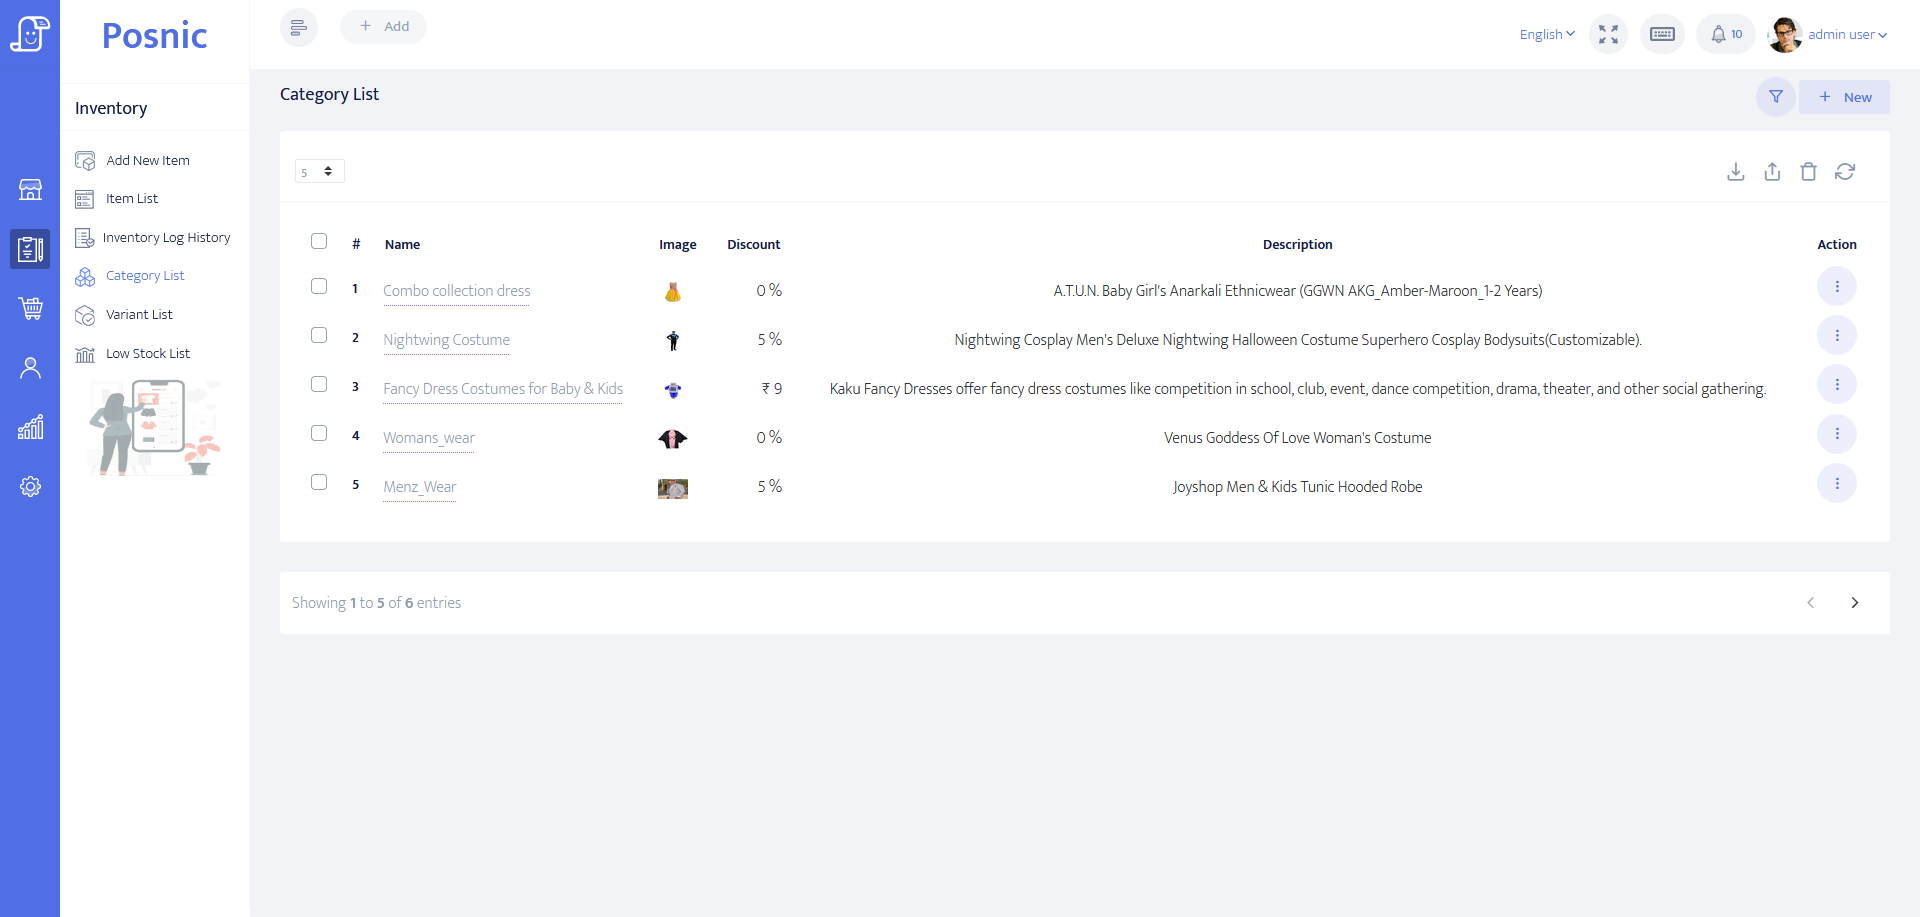
- Item list : The item list displays all the items and provides features like view, edit, clone, and delete facilities. These features are briefly explained as follows.
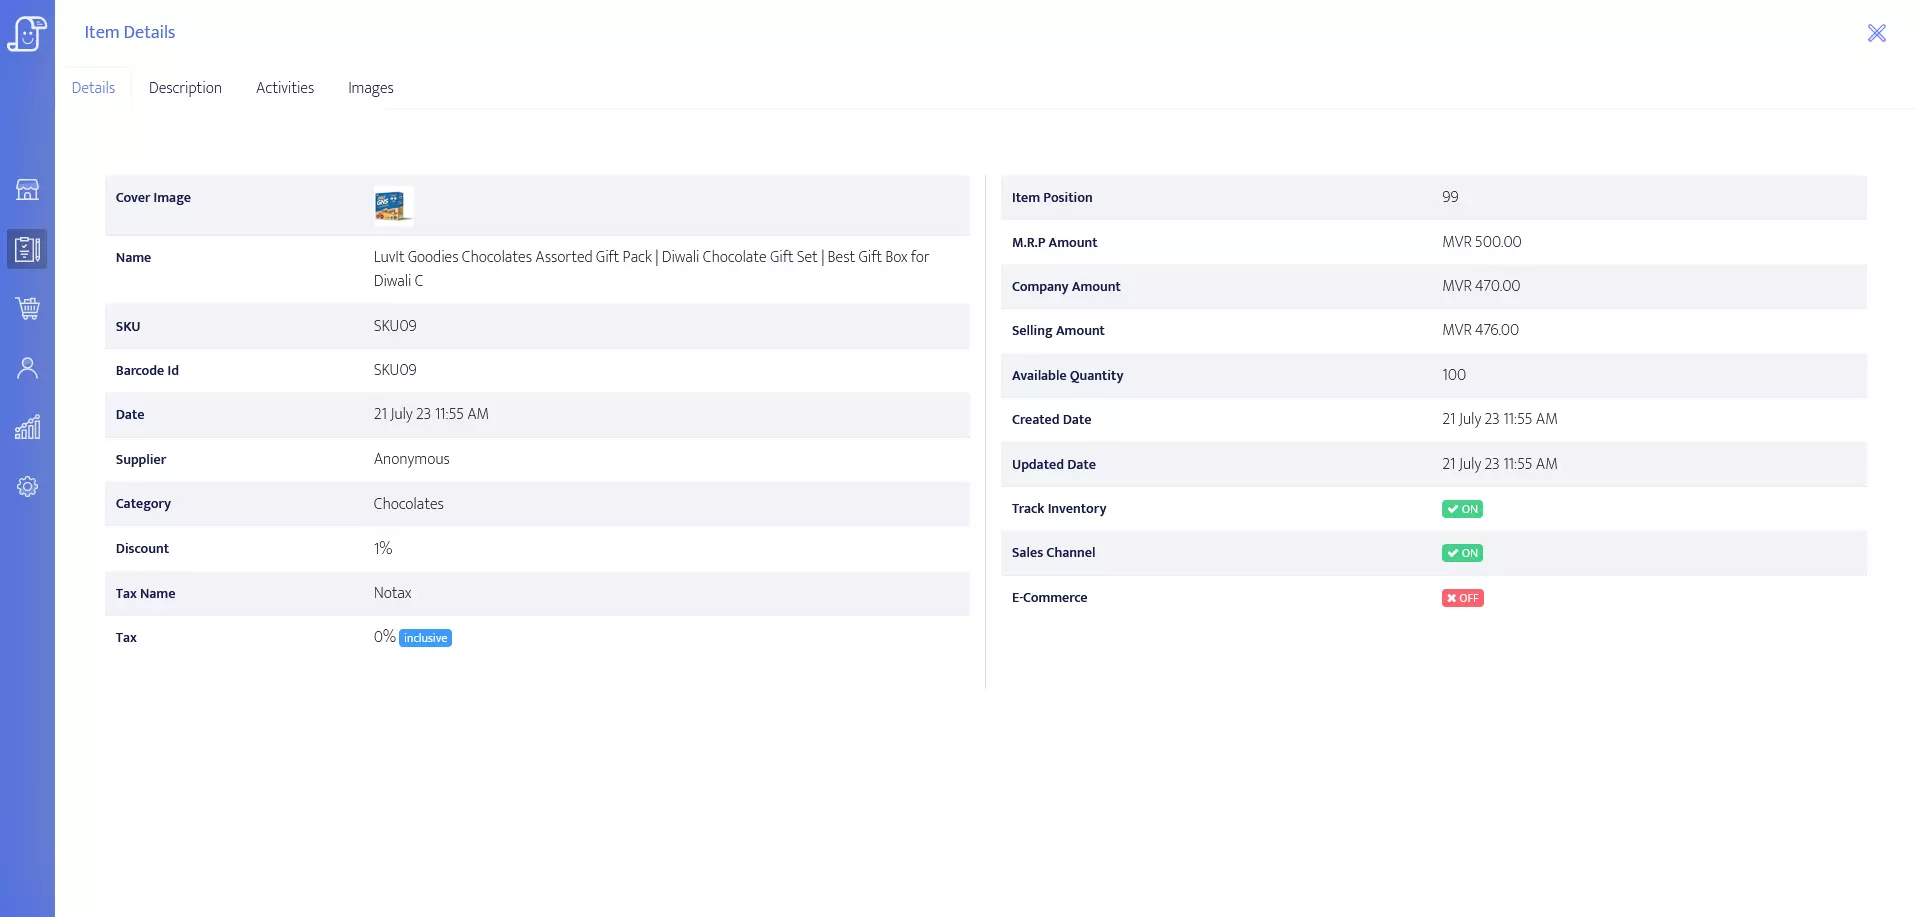
- View page : To view the item's details, click the item option button in the item history and choose the view button.
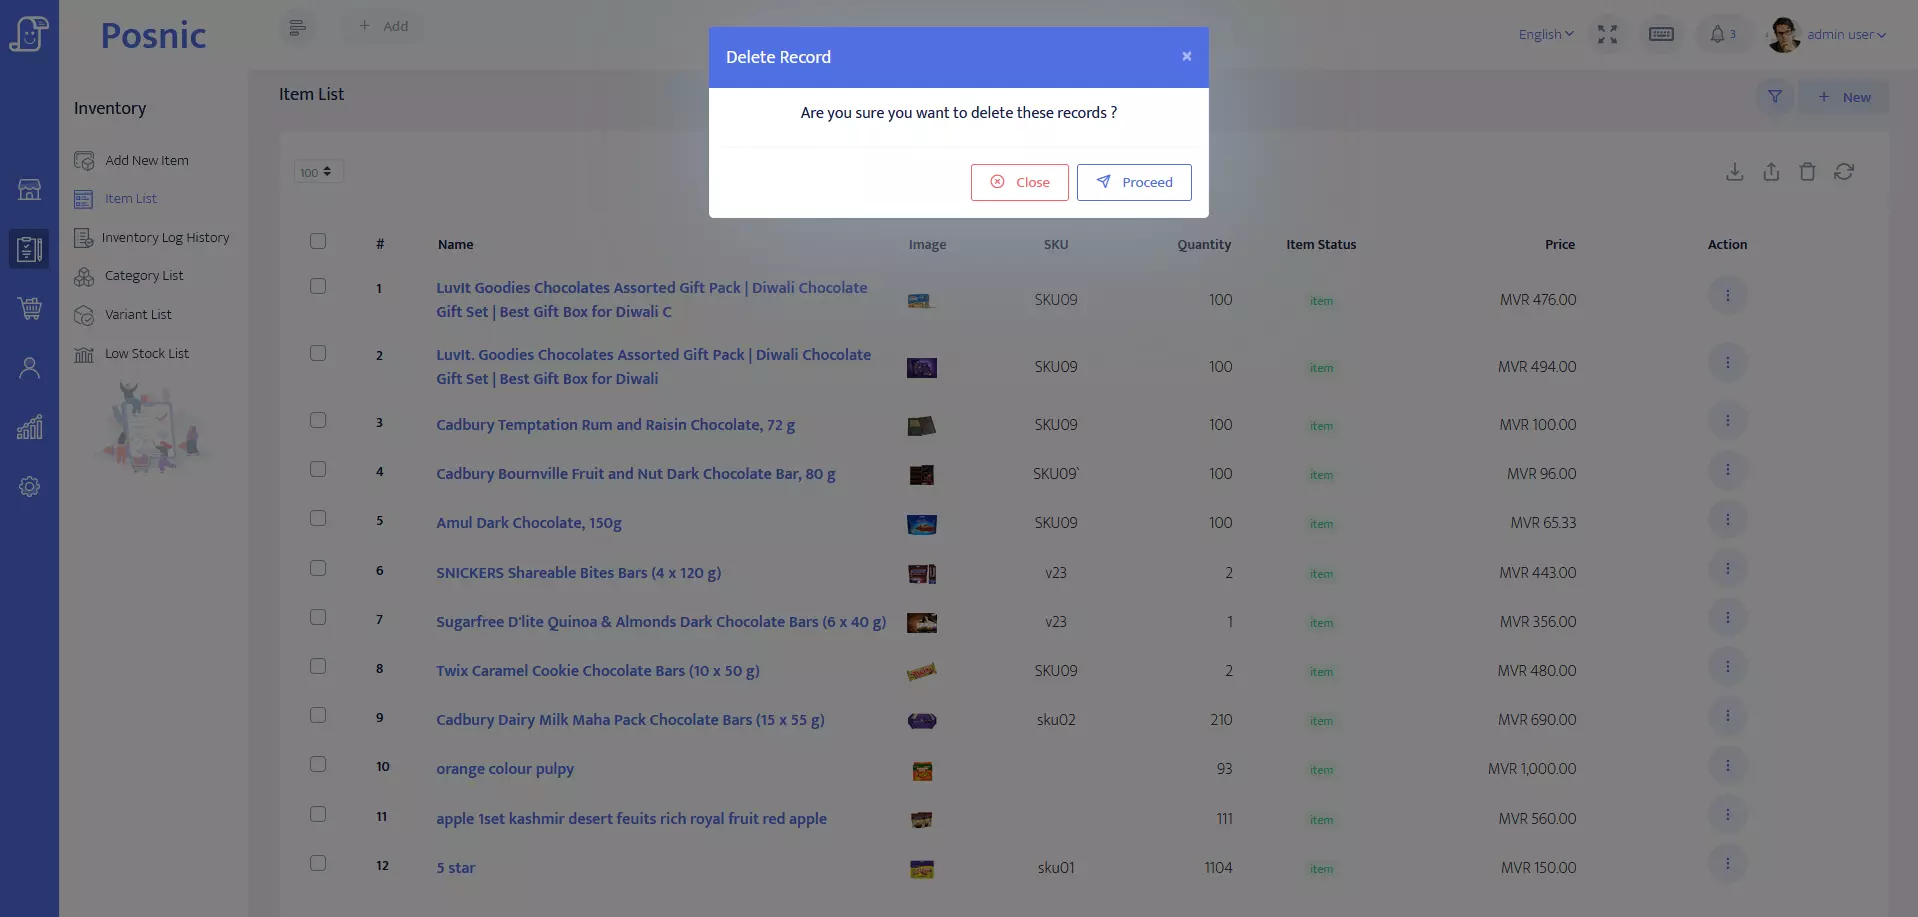
- Delete page : To delete an item, click the item option button in the item history and select the delete button.
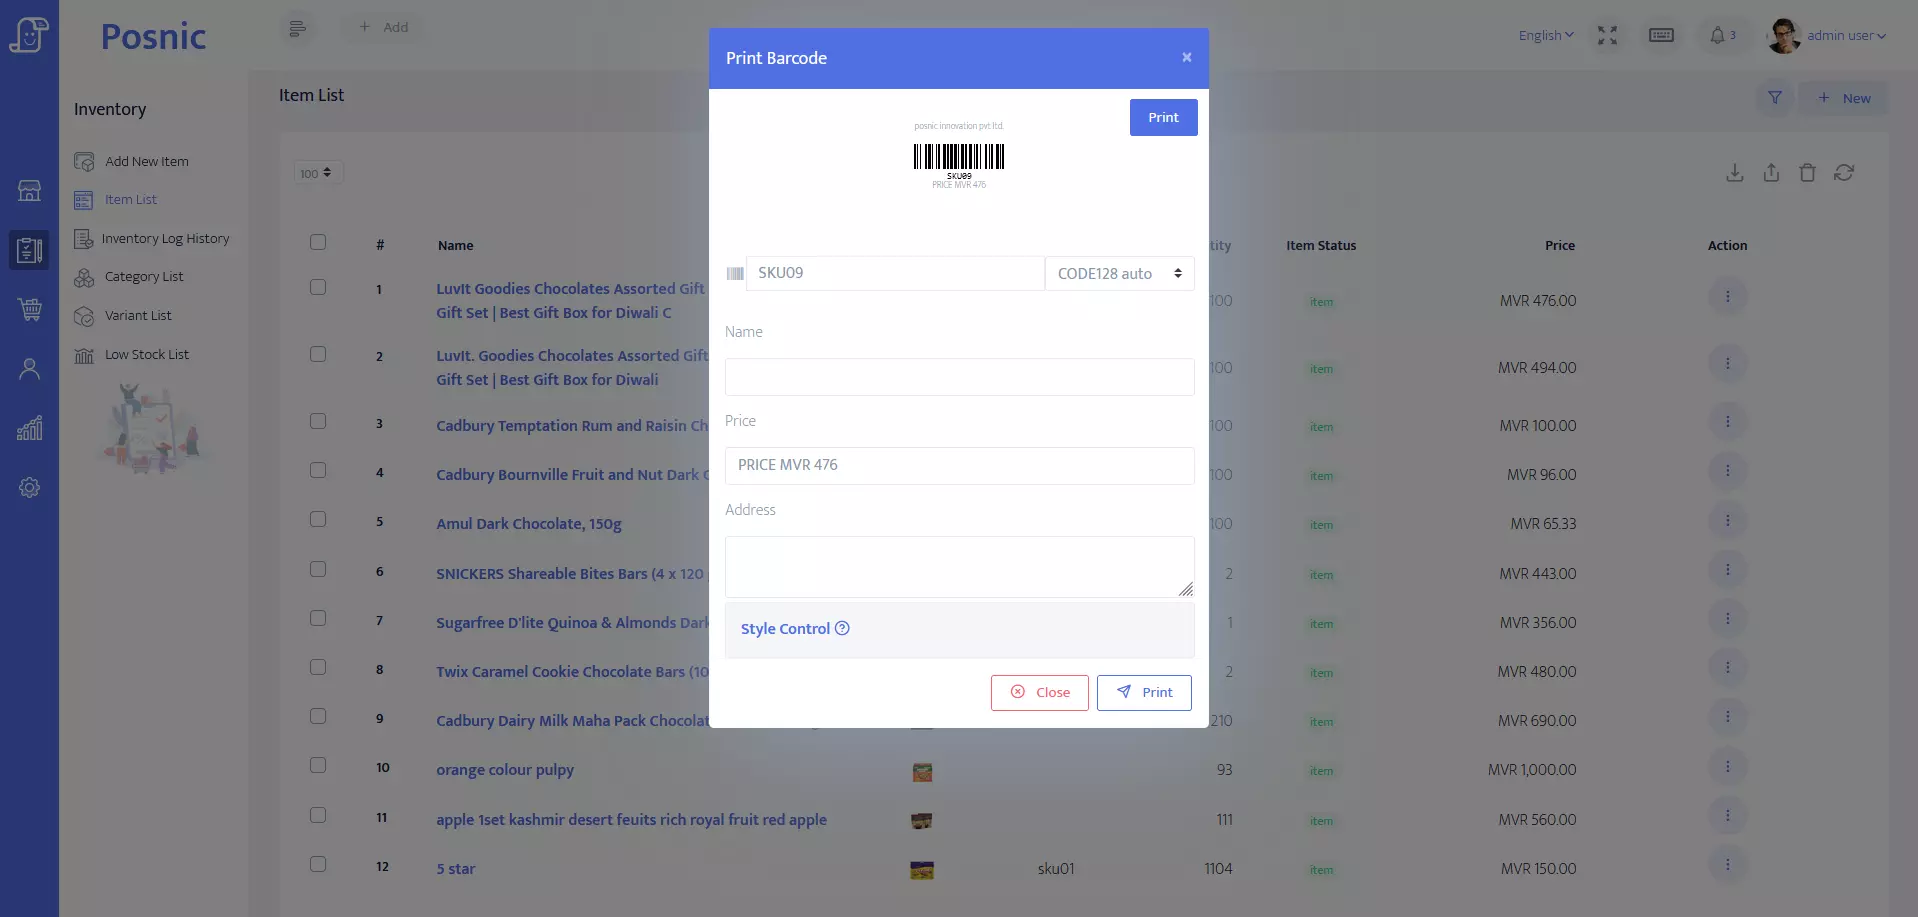
- Barcode page : To view an item's barcode, click the item options button in the item list and select the item barcode button.
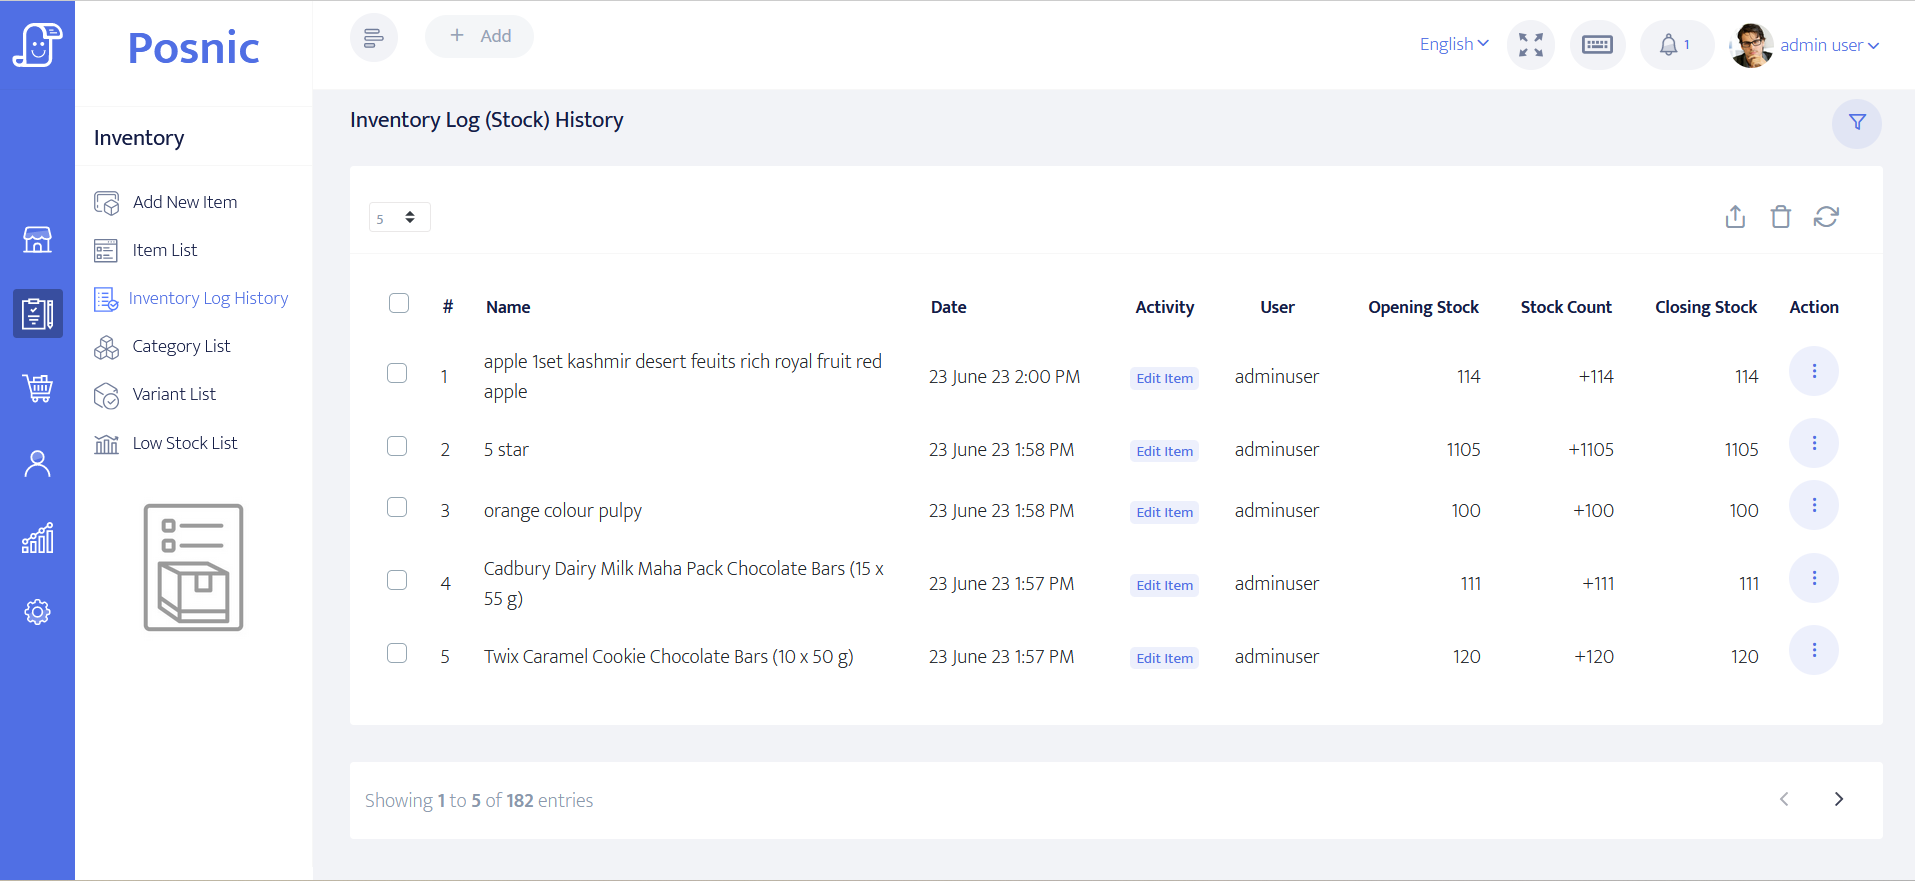
- History : All details like sales, purchase history of listed item will be available here. Add also edit option display stock log details and delete button.
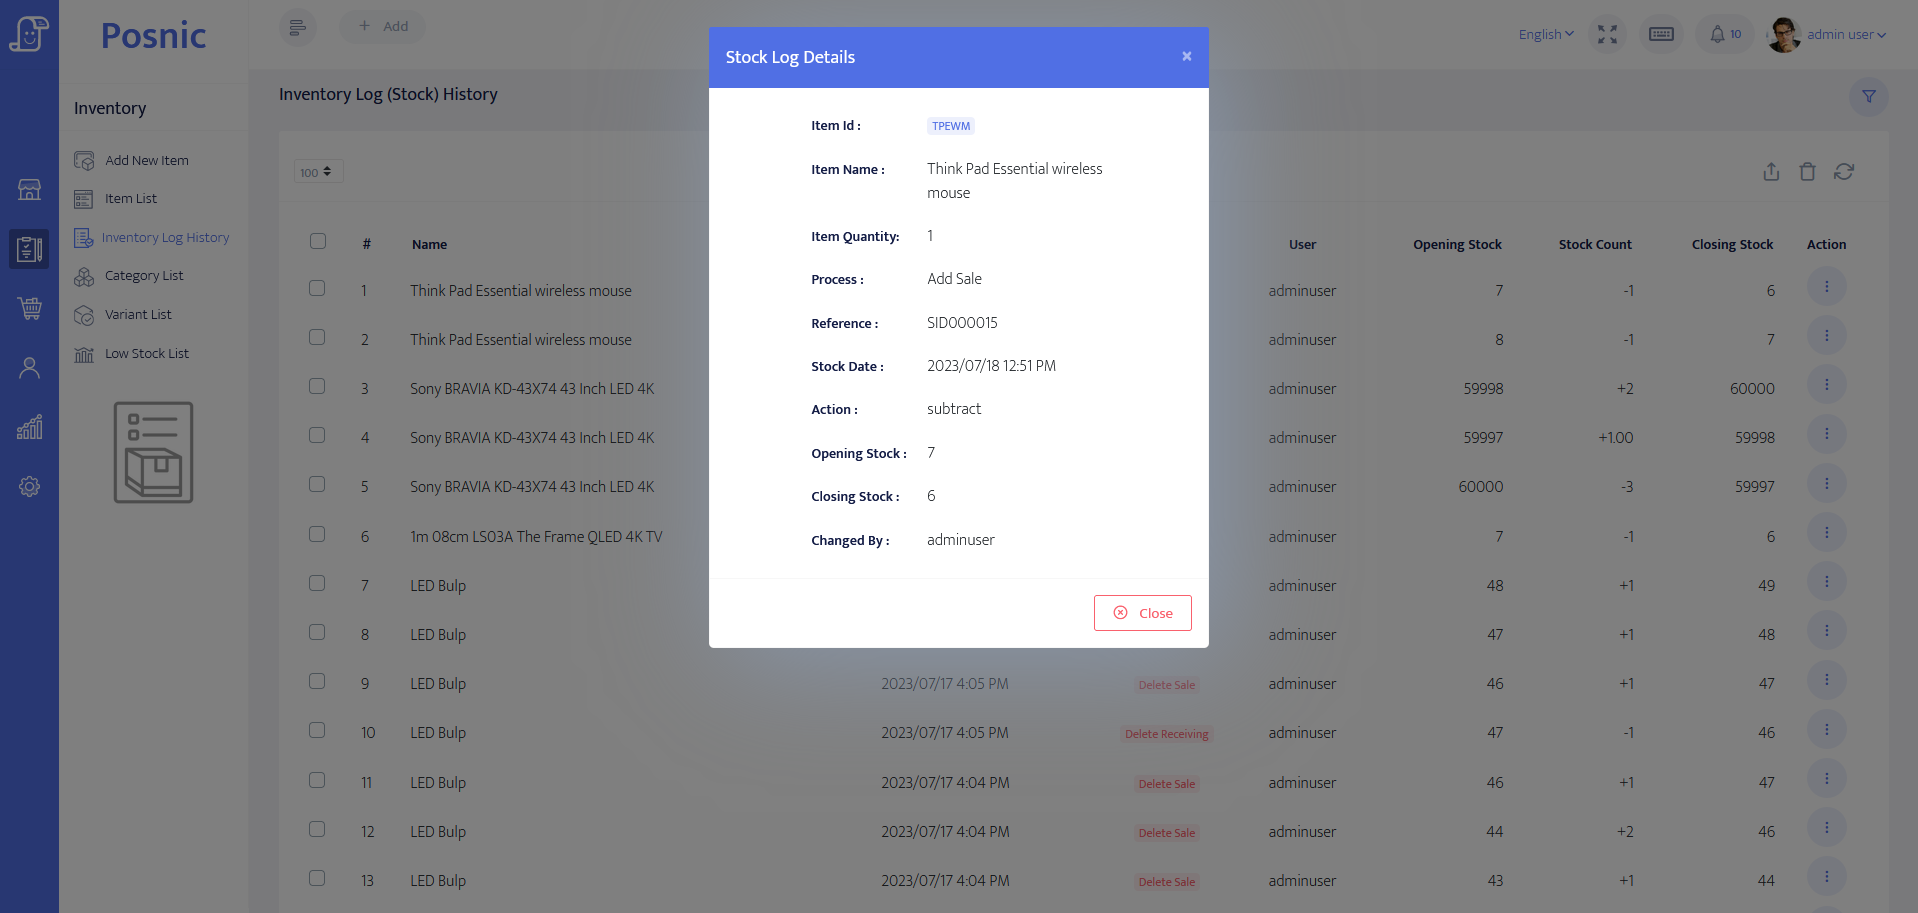
- View page : If you click the view button, it will display the details of Stock Log Details.
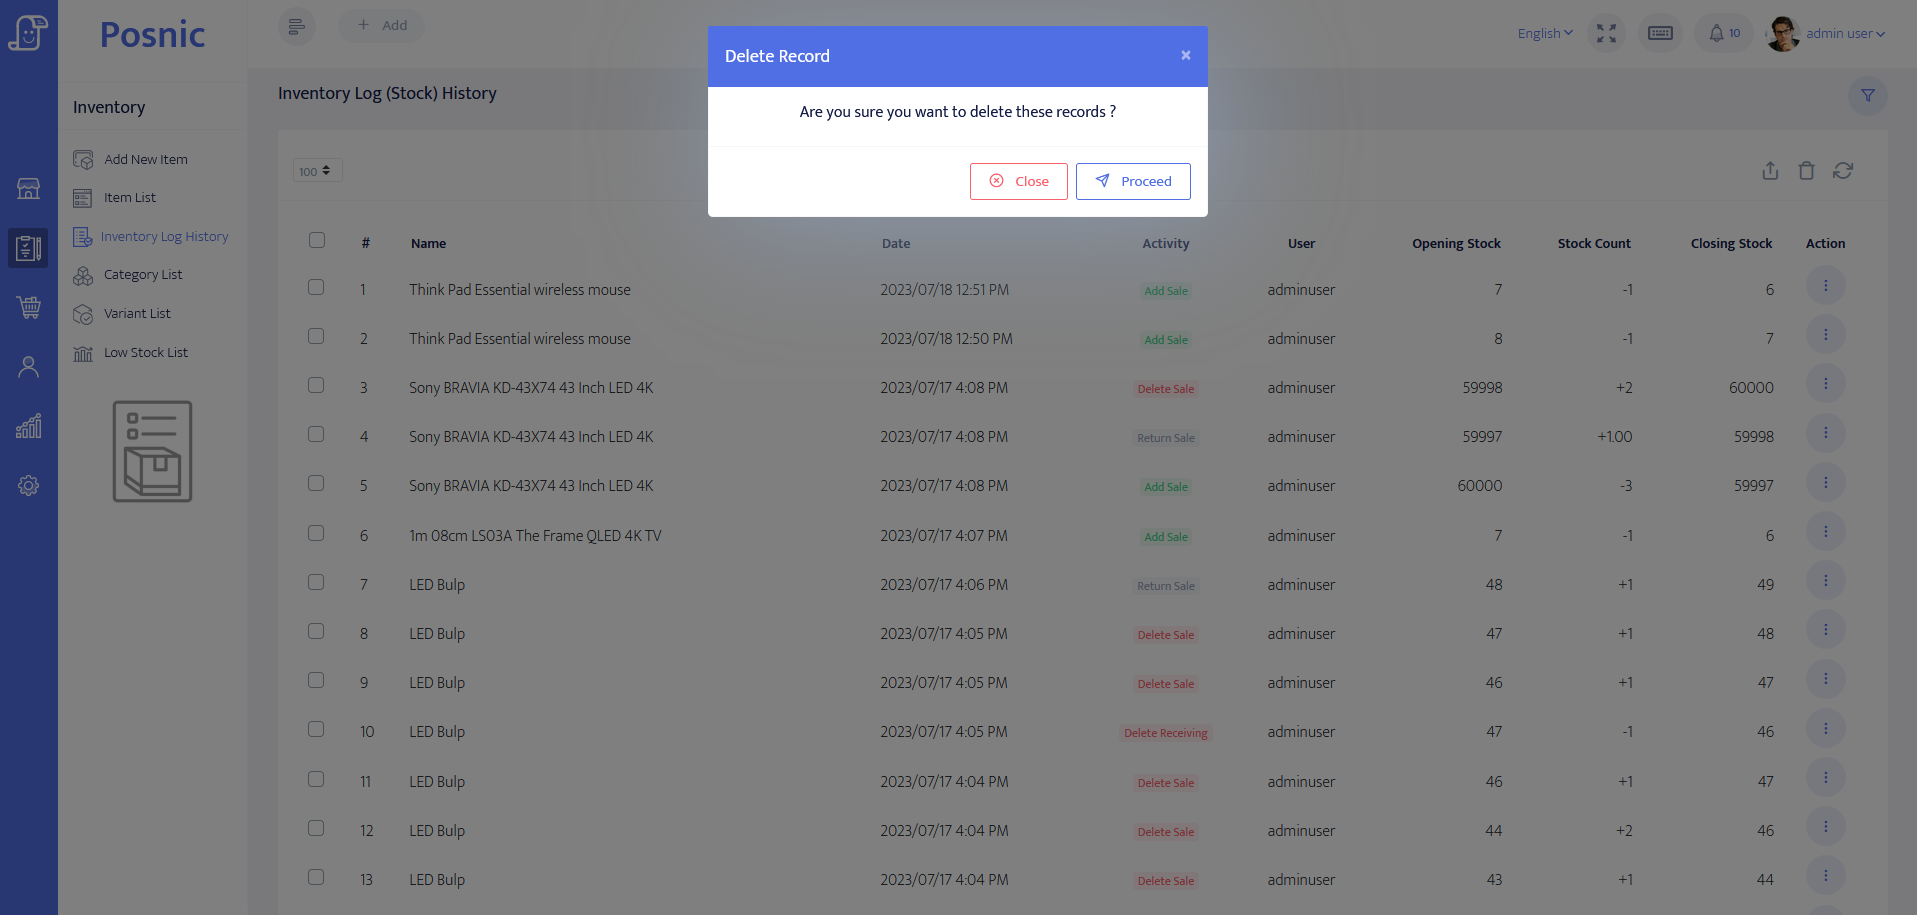
- Delete page : When the "delete" button is clicked, it which will remove the inventory details.
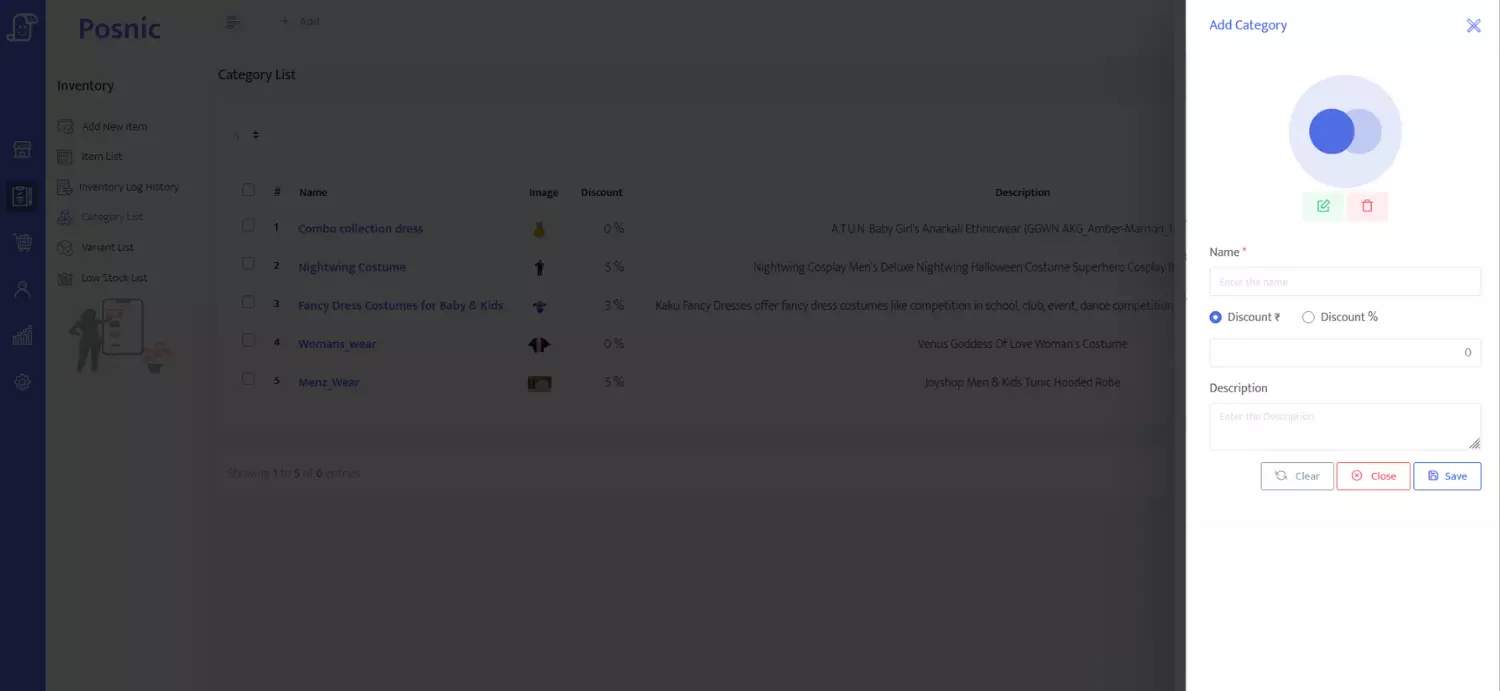
- Add page : To create a new category, click the New button in the category history, enter the category details, and click the Save button.
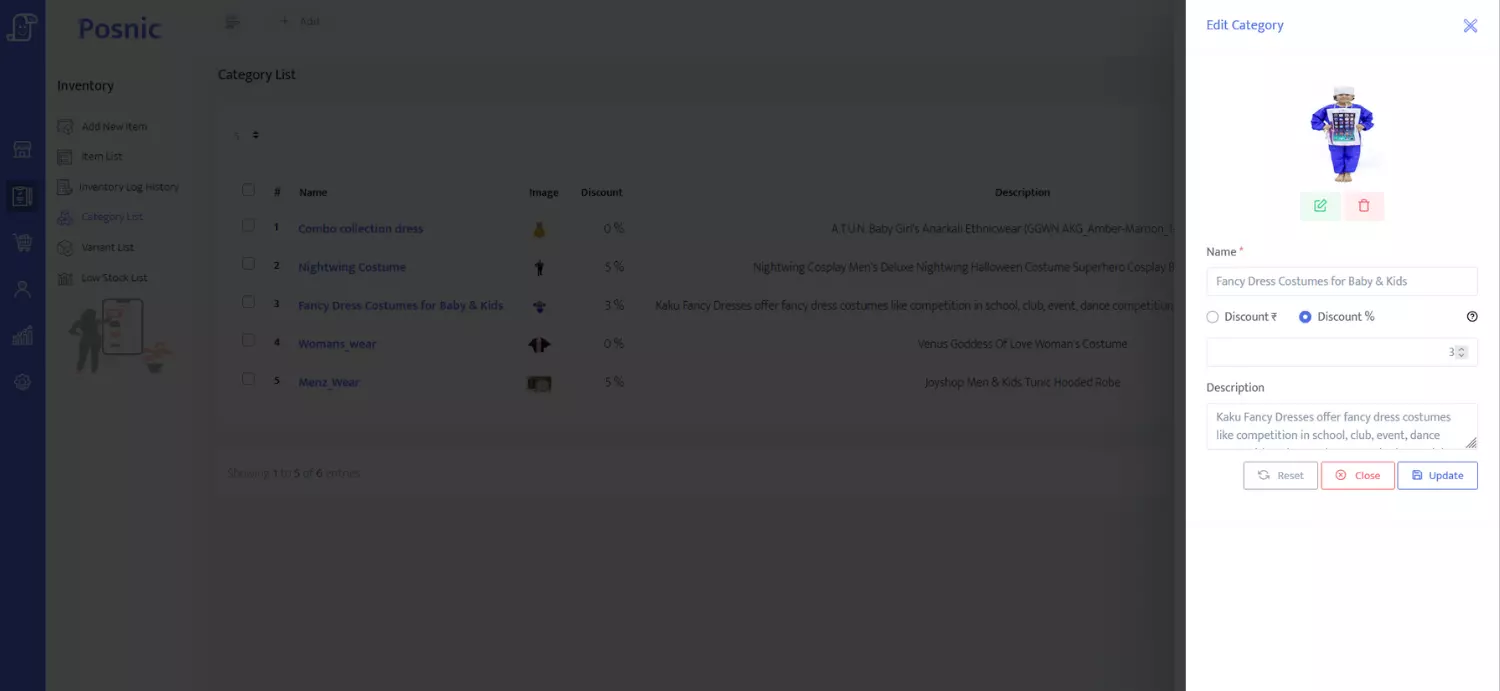
- Edit page : To edit the details of a category, click on the category option button in the category list and choose the edit category button. Then enter the details and click on the update button.
- History : This section is used to add, update, delete, and add discounts for item categories.
- Details : To view the category details, click the option button in the category list and select the view category button.
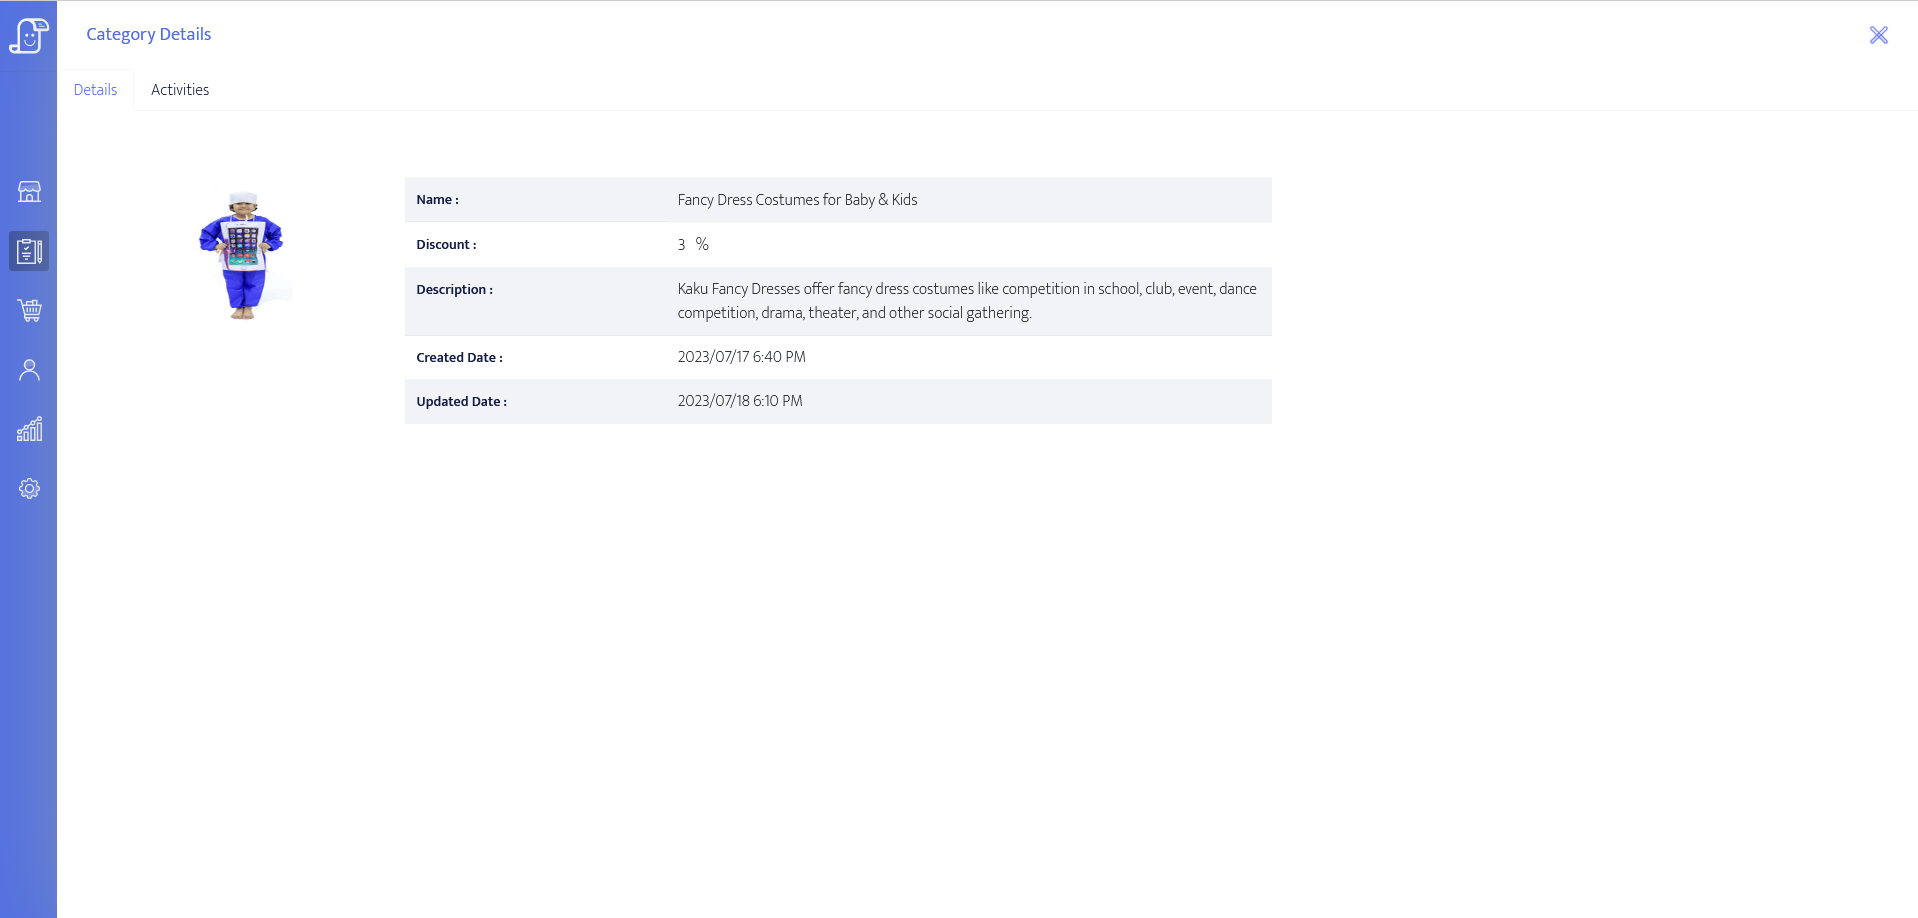
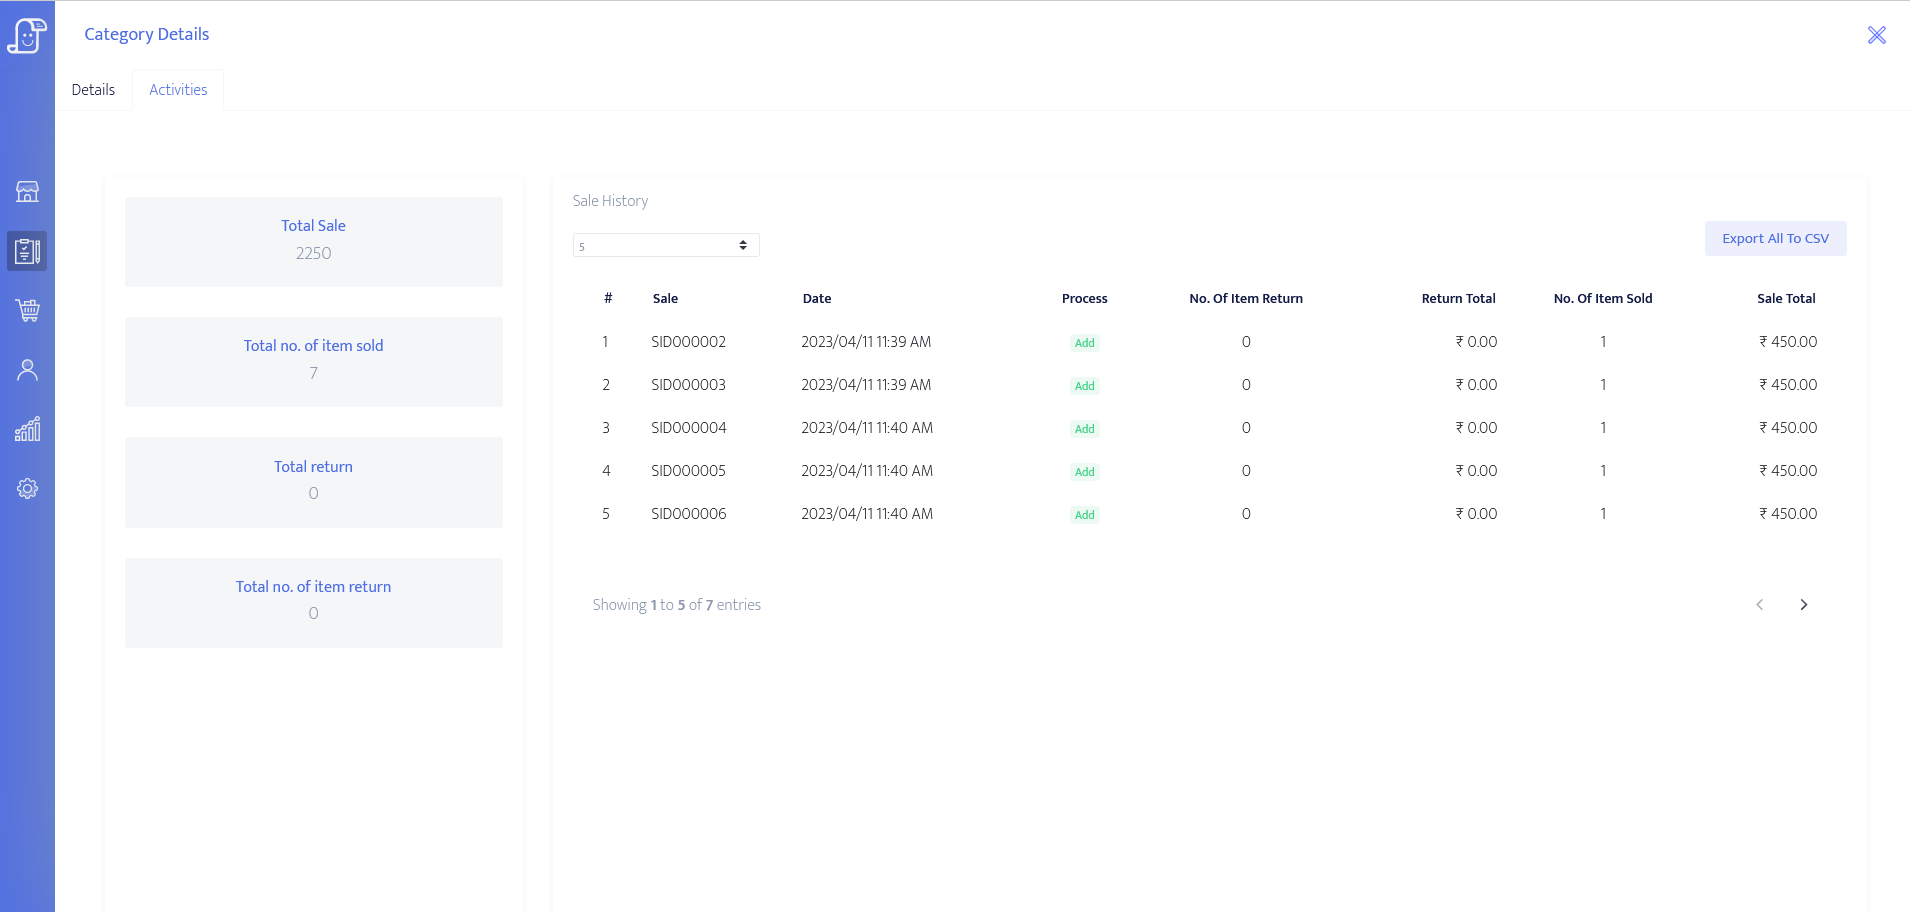
- Activities : This section displays the detailed list of item sold by their category.
- Delete page : When the "delete" button is clicked, it which will remove the inventory log details.
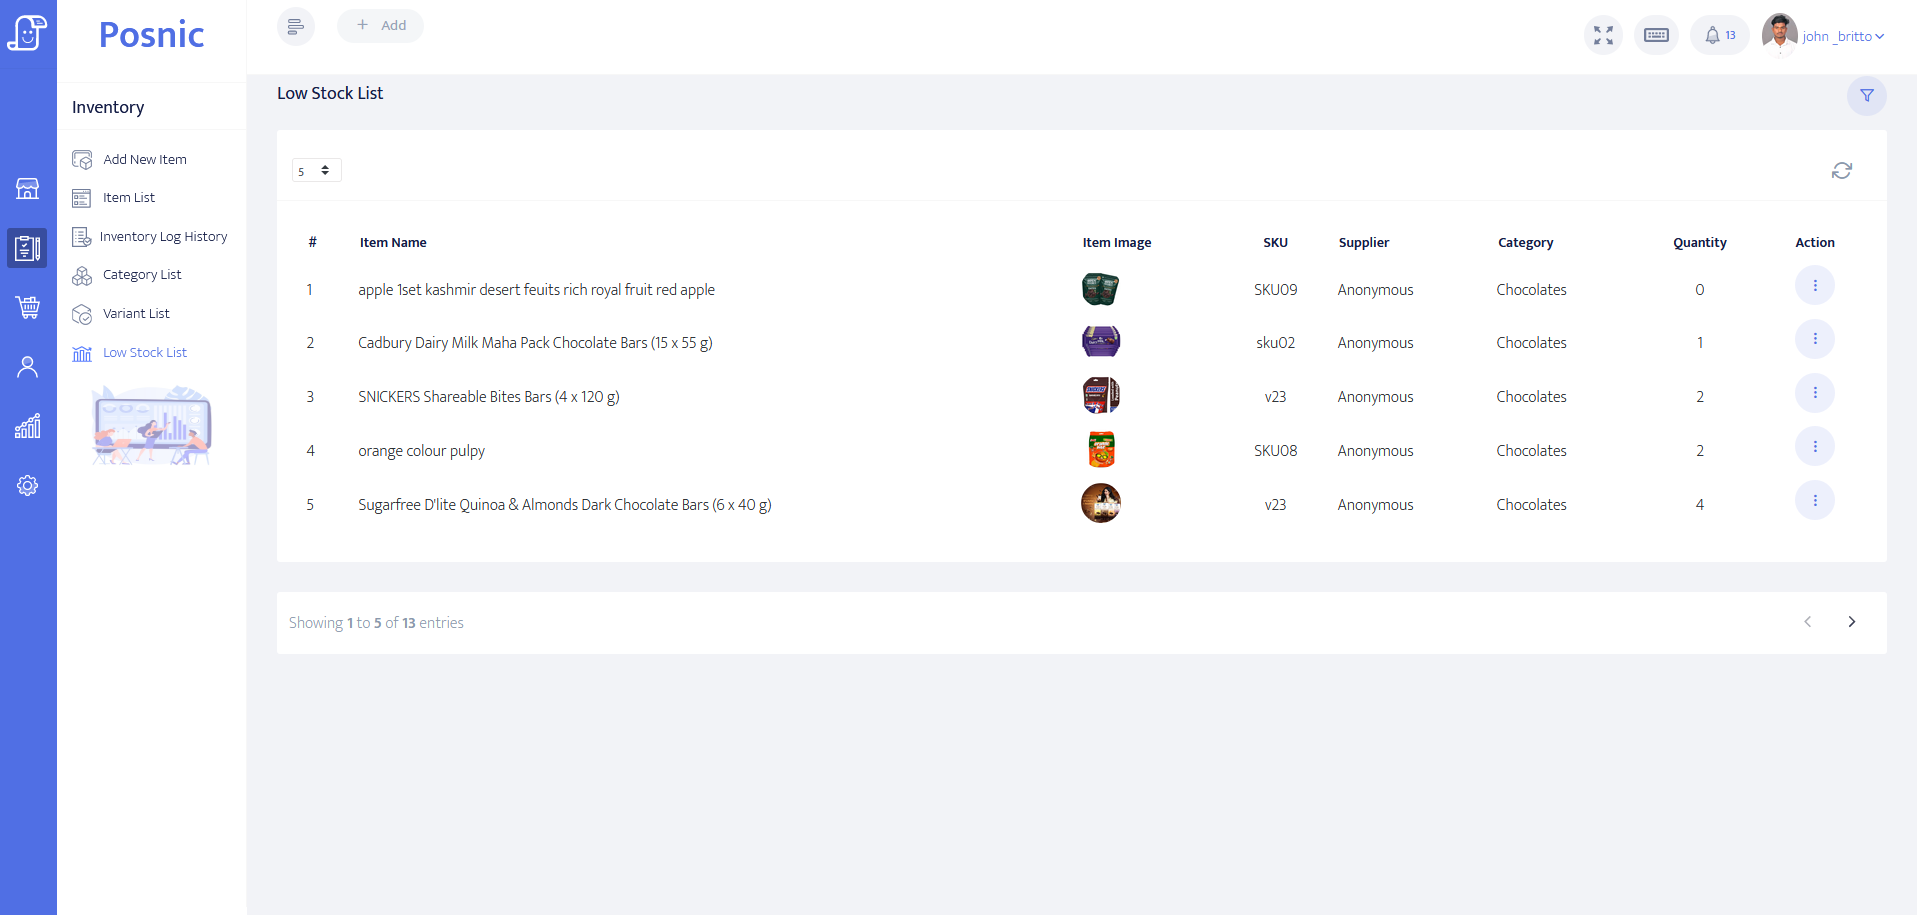
You can view the low-stock items detail here.If the item quantity is less than ten then it will be added here. If you click the edit button, and click add stock button, it will go to the new receiving menu. Then you can purchase the items.
Purchase
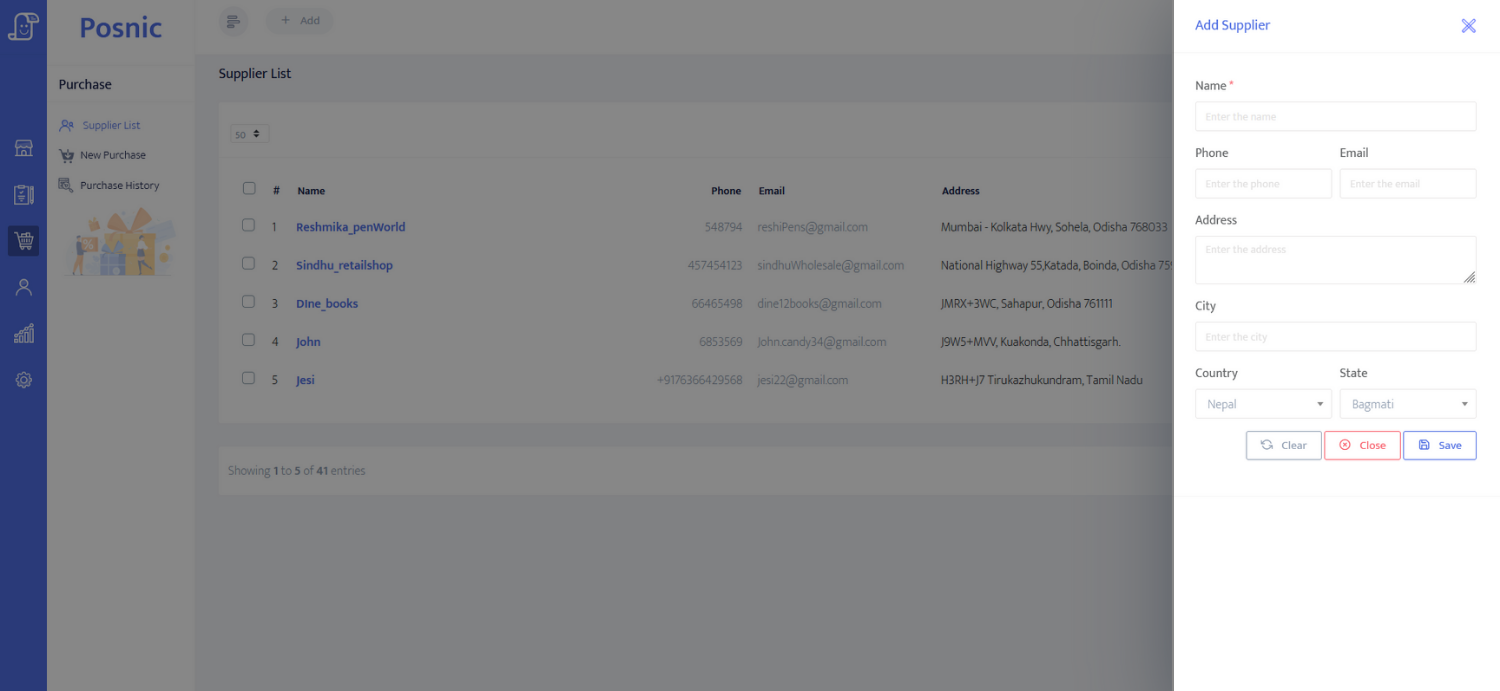
- Add page : To create a new supplier, click on the new button in the supplier list and fill in the details of the supplier, like name, phone, email, city, etc., then click on the save button and the supplier details get added.
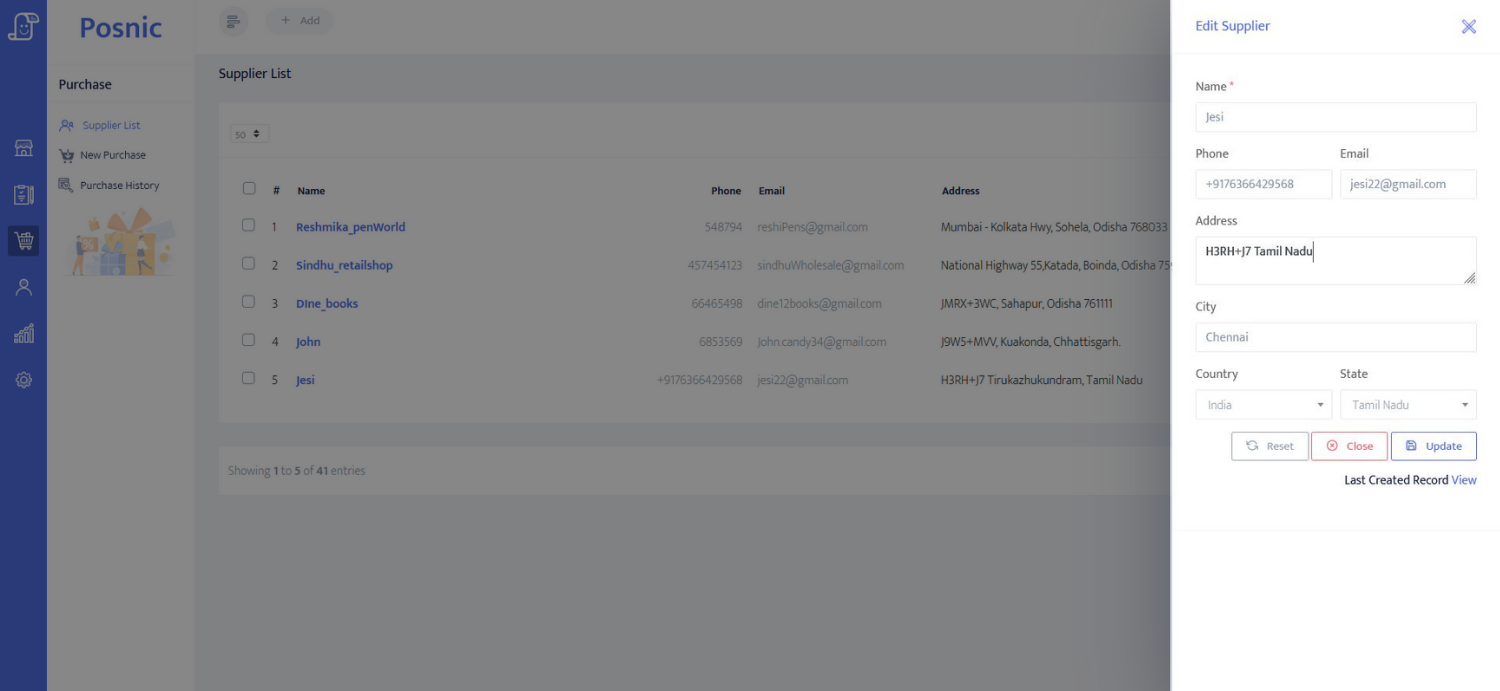
- Edit page : To edit the details of a supplier, click on the supplier's name option button in the supplier list and choose the edit button. Then edit the details and click update.
- Action icon/button : You can edit, view and delete the particular supplier's detail in the supplier list.
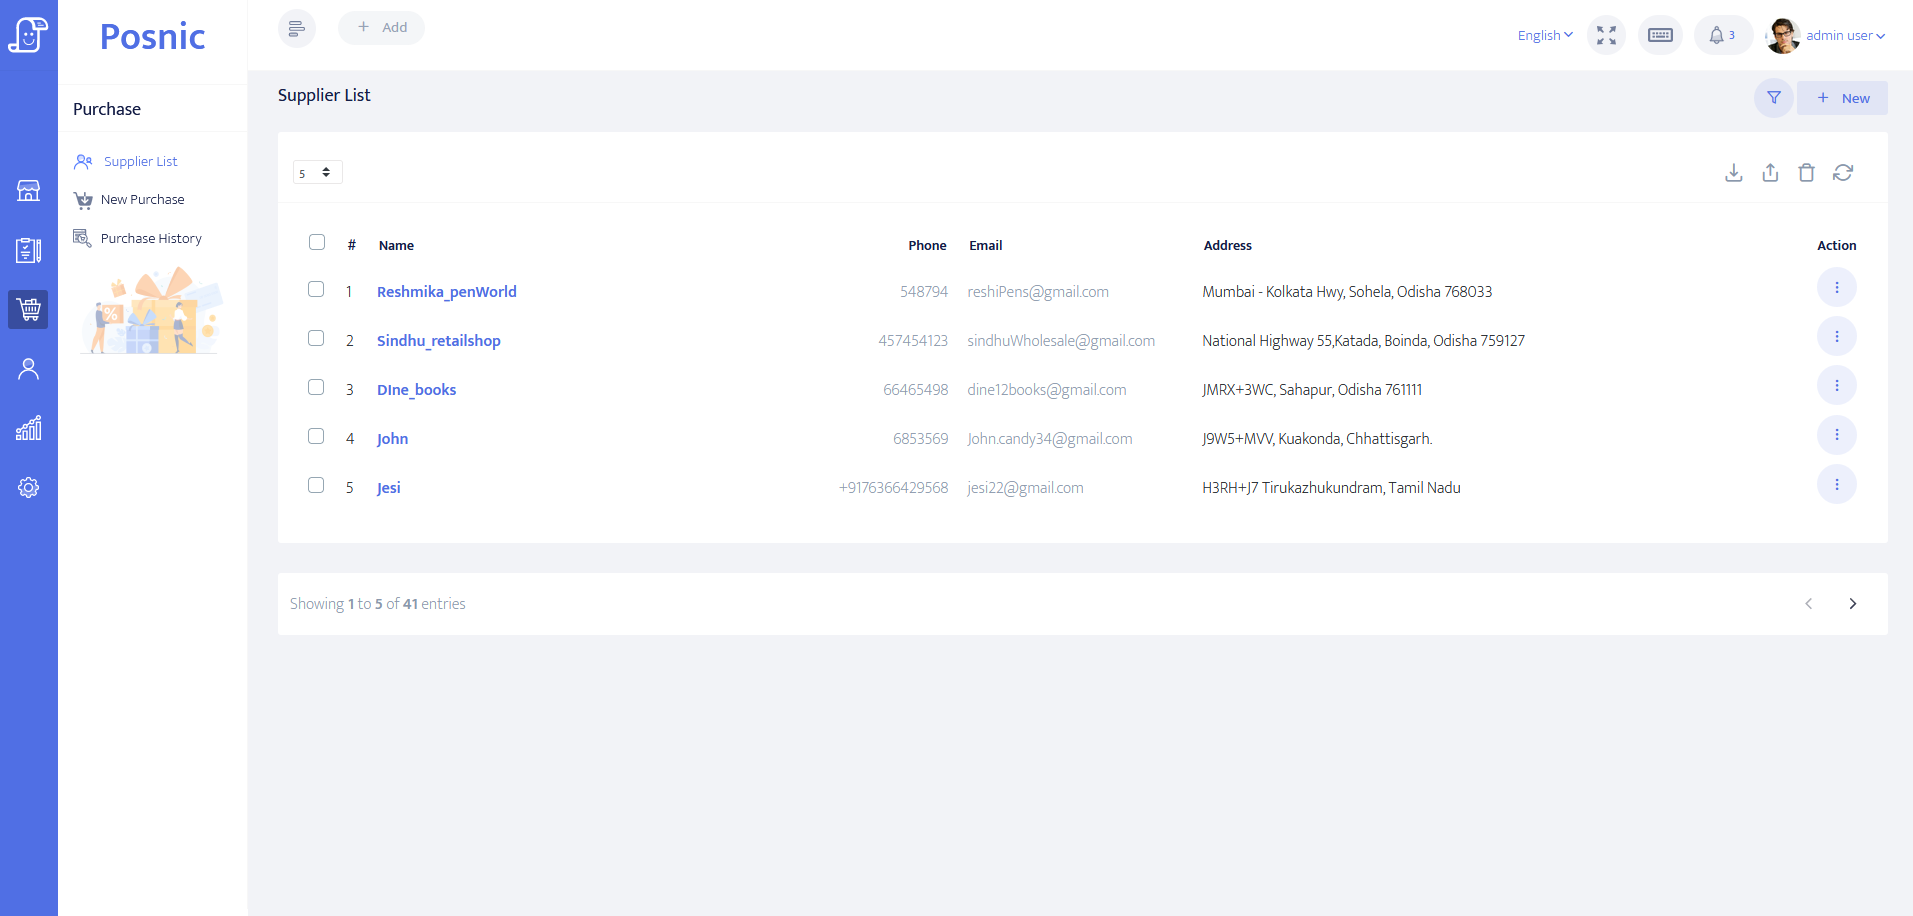
- Supplier Details : To view the supplier details, click the view button in the options and the supplier details page get displayed.
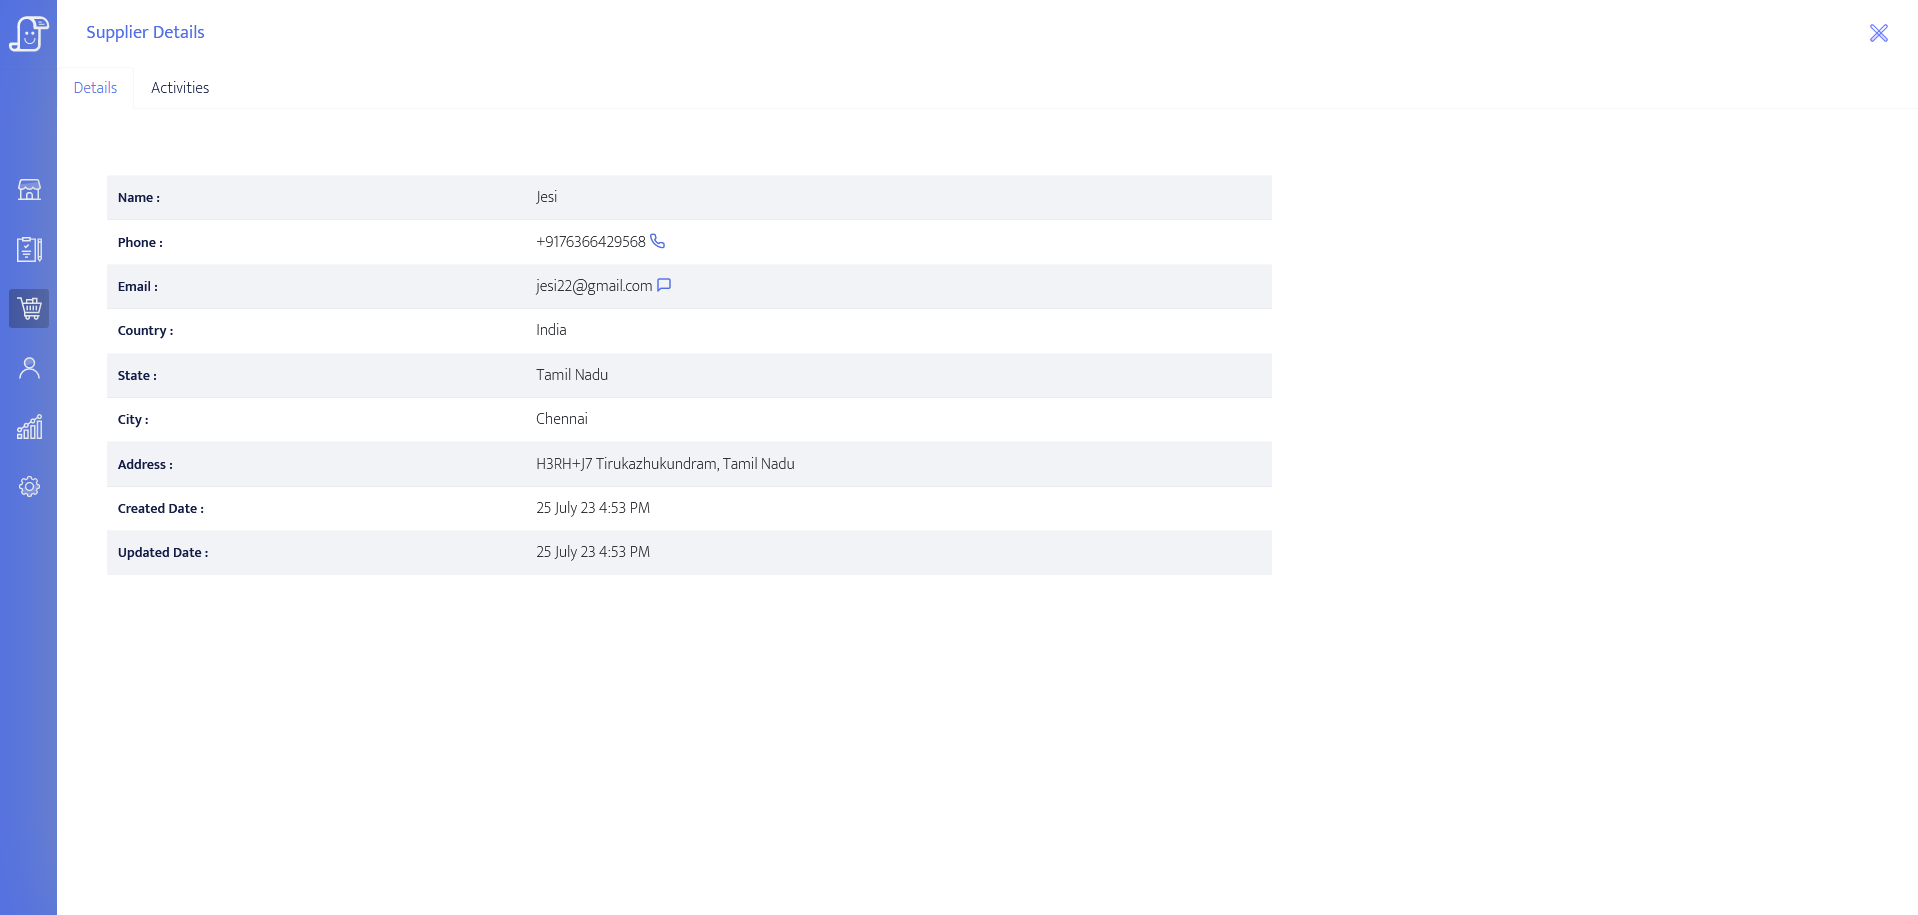
- Activities : This section displays the products sold by the supplier along with their details.

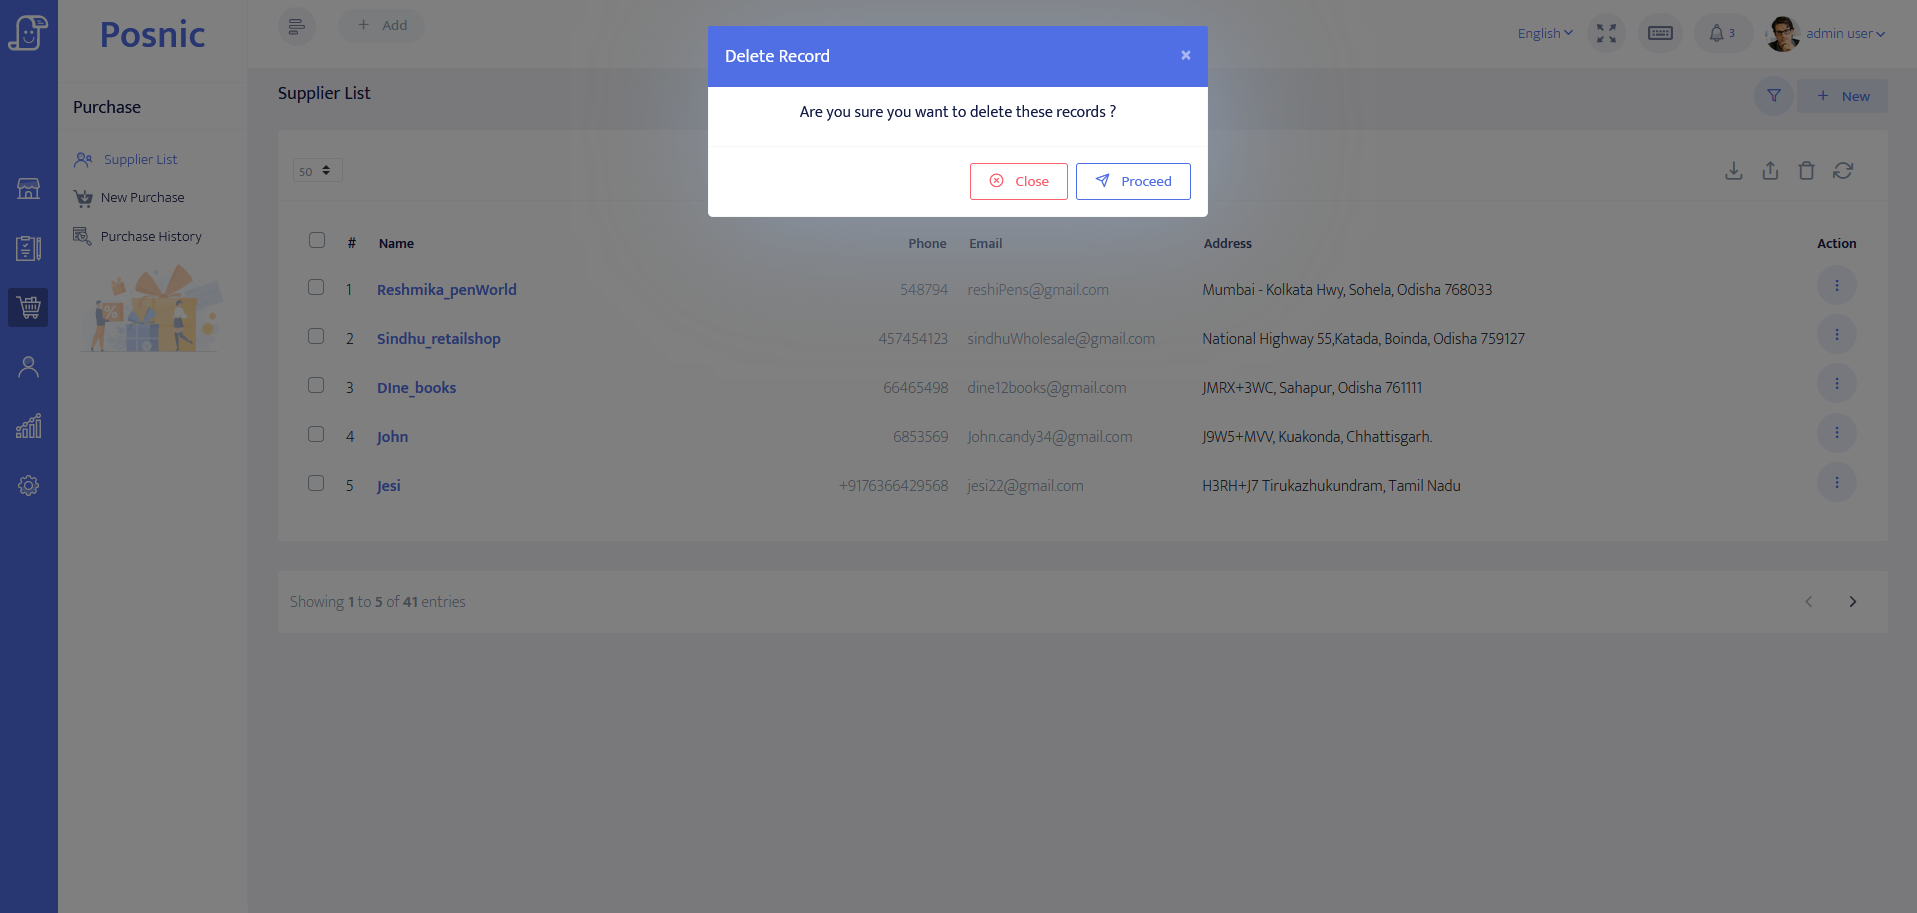
- Delete page : To delete the supplier's detail, click the delete button in the options and the supplier's datail get deleted.
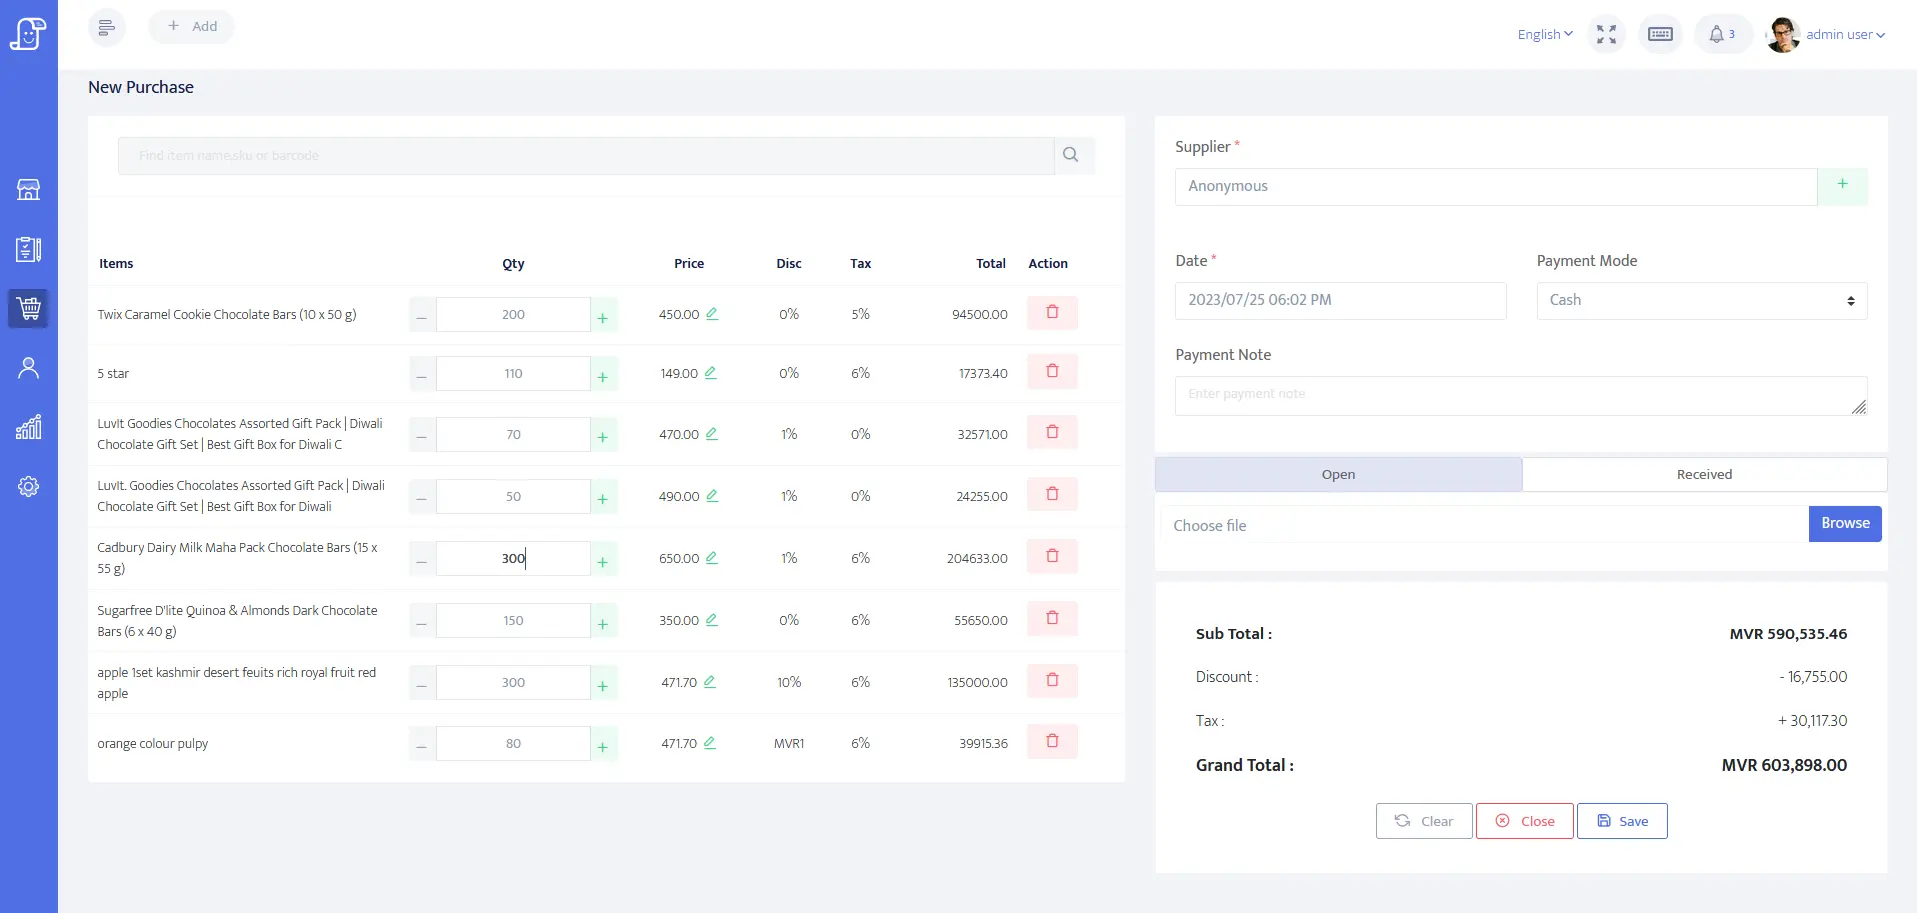
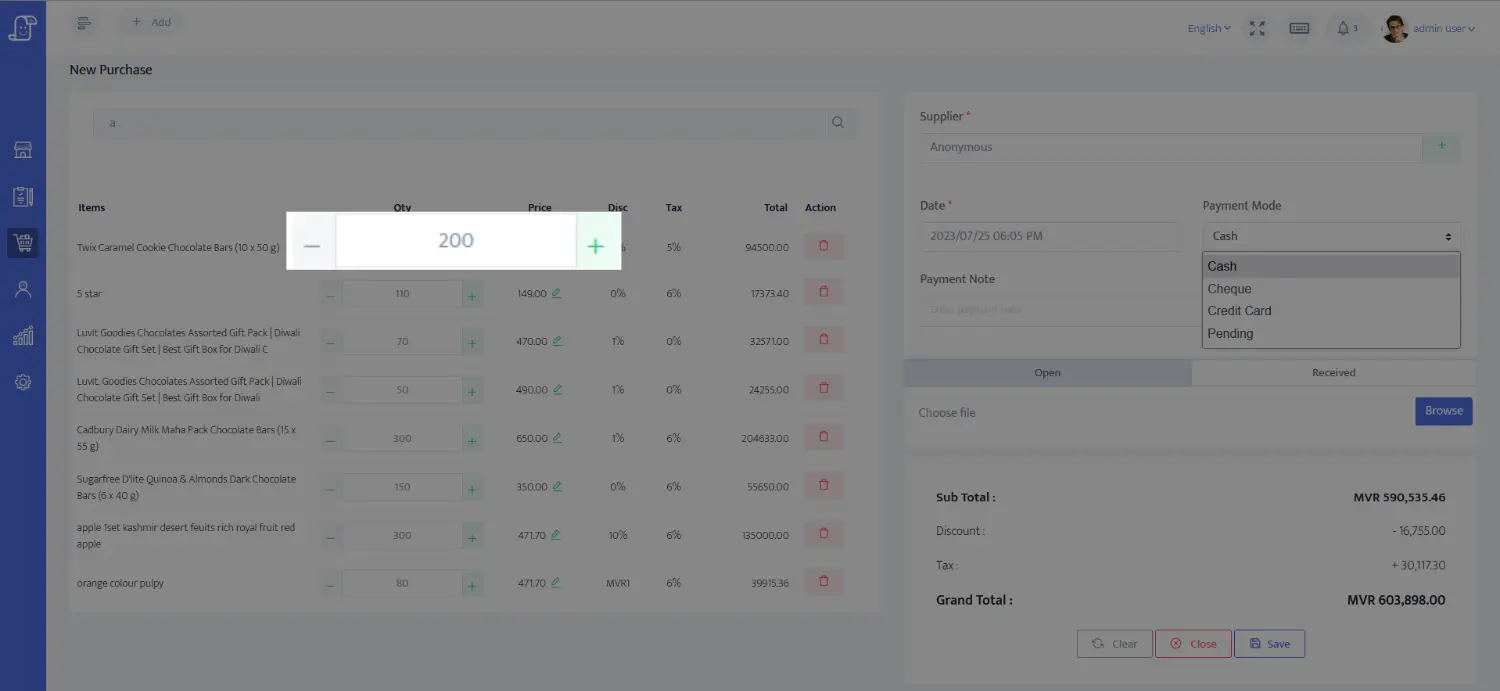
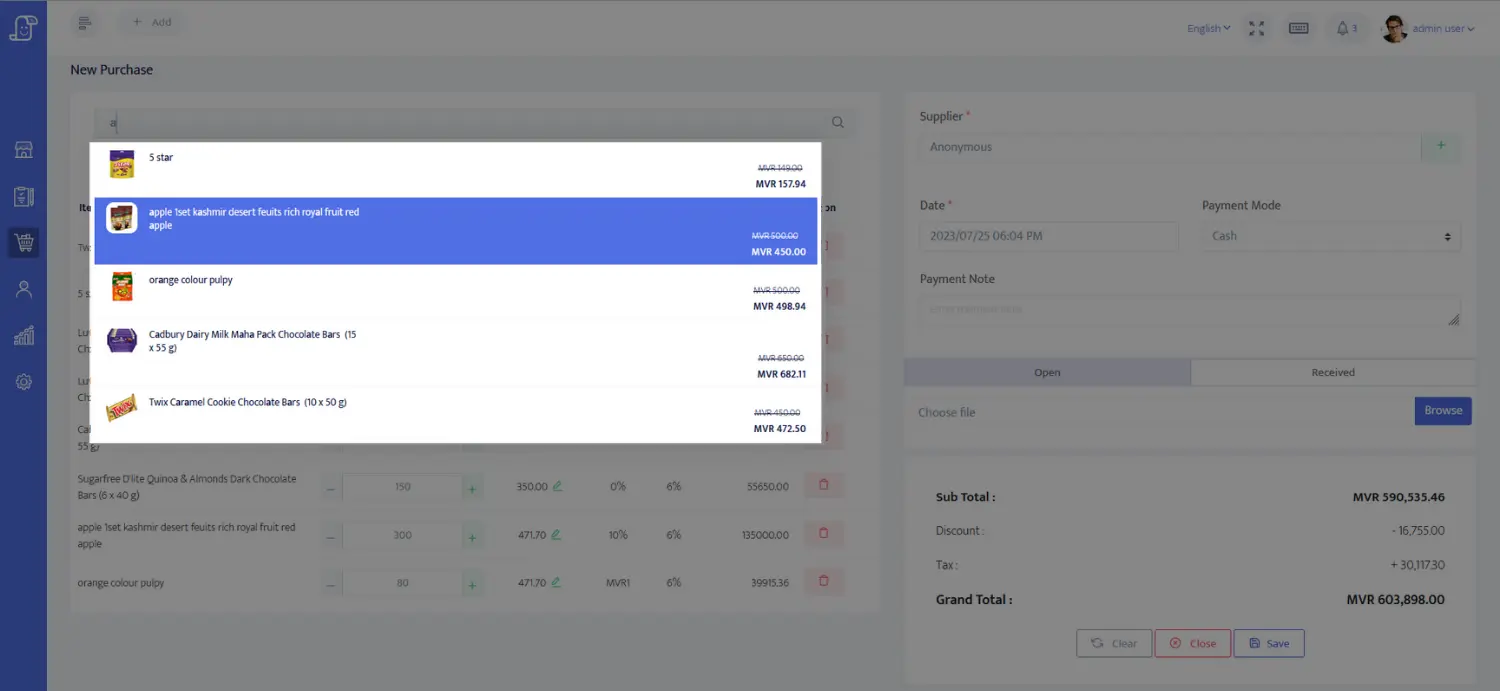
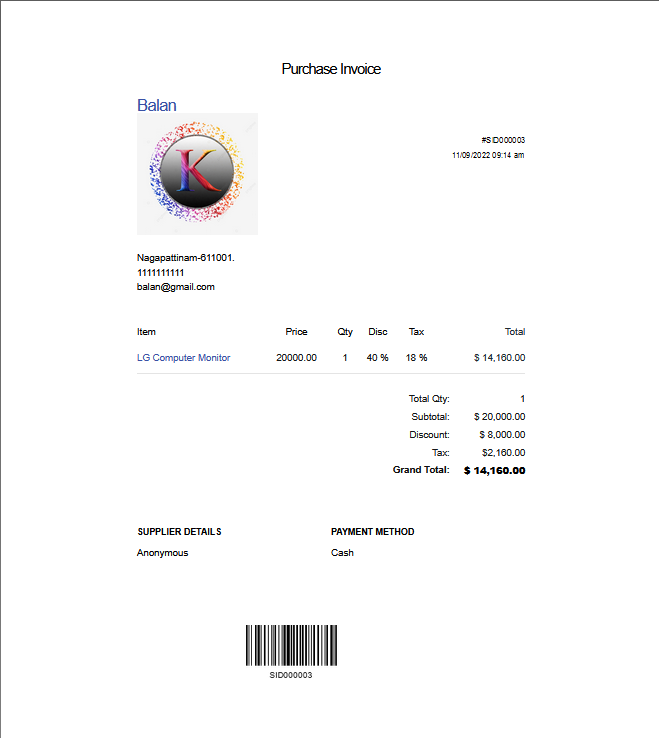
- New purchase : To add a new purchase item, click on new button on the left side and enter the supplier name. Then in the search box enter any product names, barcodes, or SKUs to be purchased and select the item. Then, after completing of the purchase details, click on the Save button.
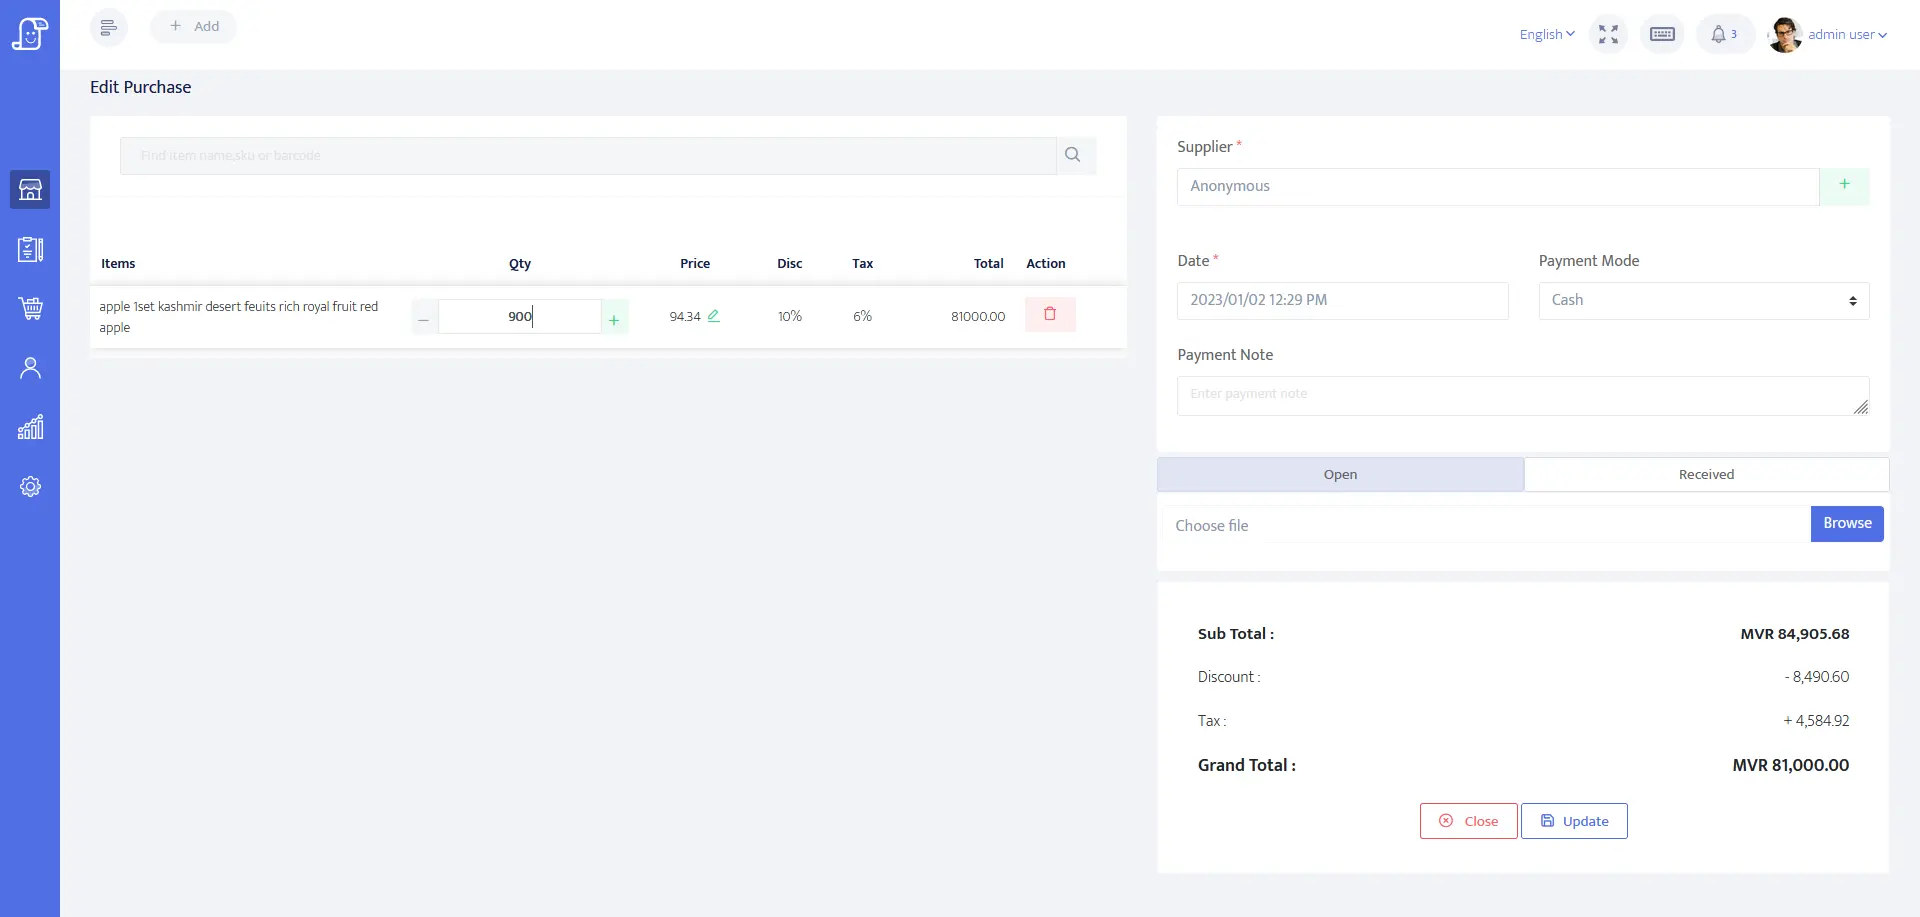
- Edit page : To edit the purchase details, click on the purchase option button in the purchase list and choose the edit button.
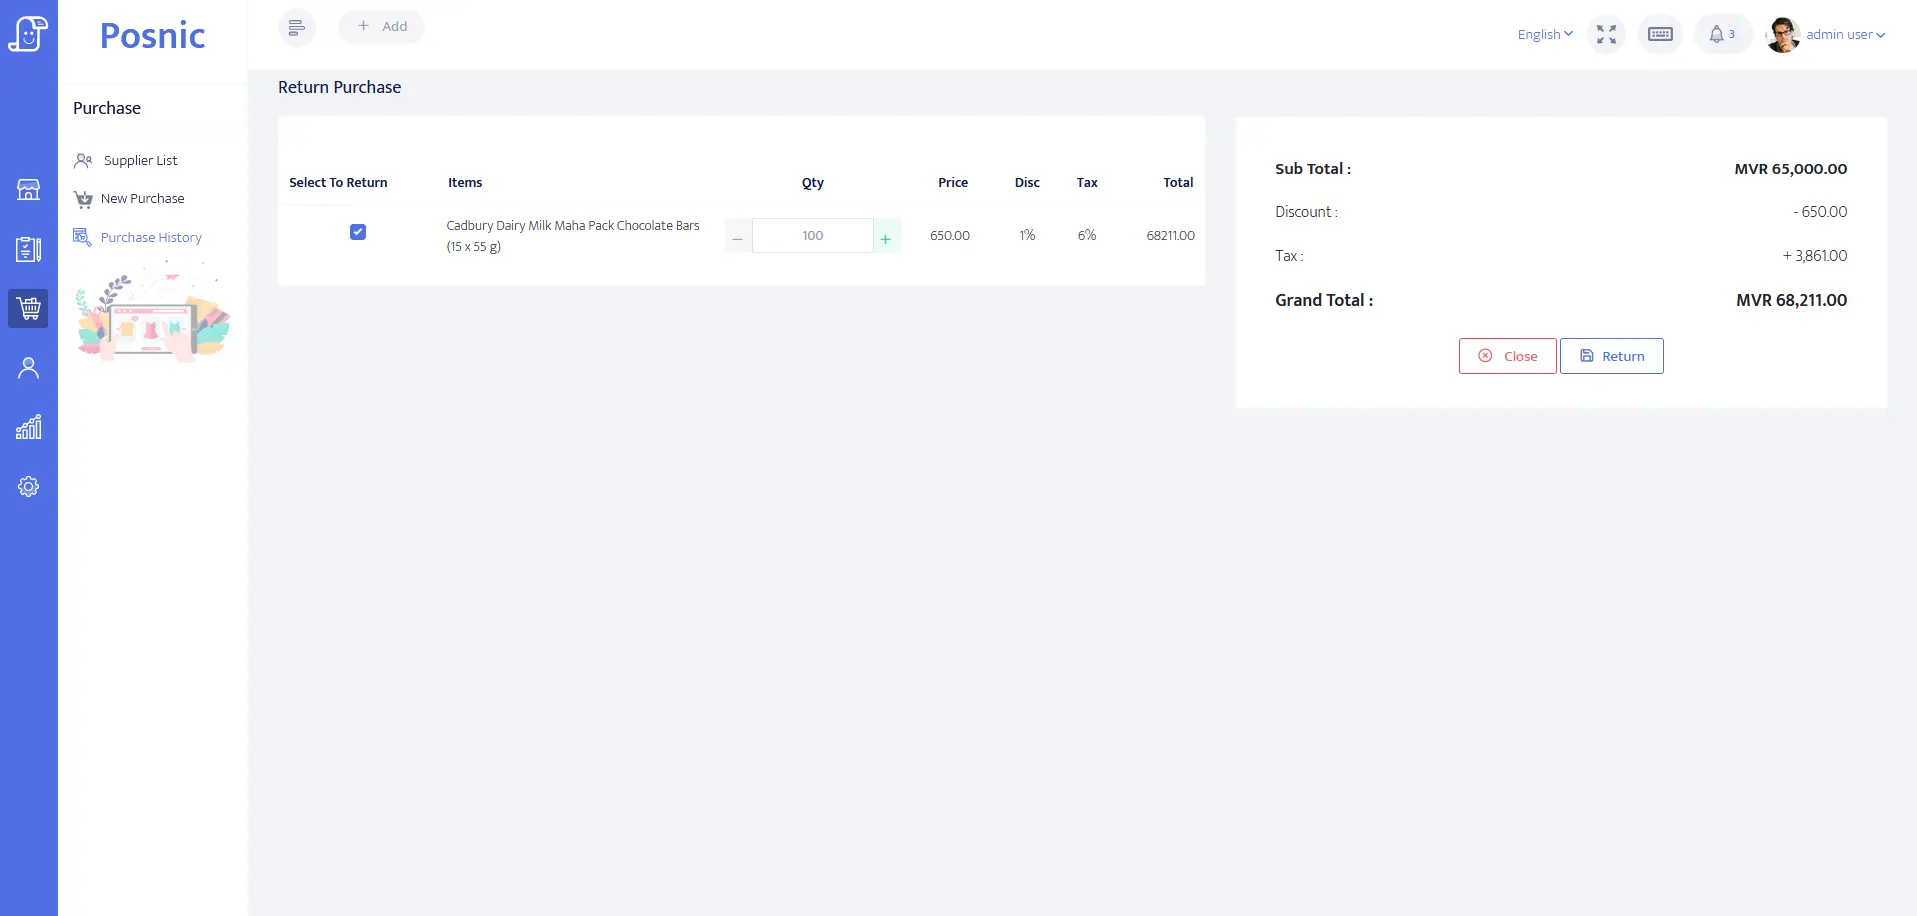
- Return page : To return the purchased items, click on the options button in the purchase list and select the return button, then correct the item to be returned and click on the return button.
- + ( or ) - Button : The plus and minus buttons can increase or decrease the item quantity. If you don't need an item, you can remove it.
- Search Option : Use the search function to find items by name, SKU, or barcode and add them to your table or cart for faster and more efficient shopping.
- Purchase history: Here you can edit, view, receive and return items, and delete the purchases from the purchase history.
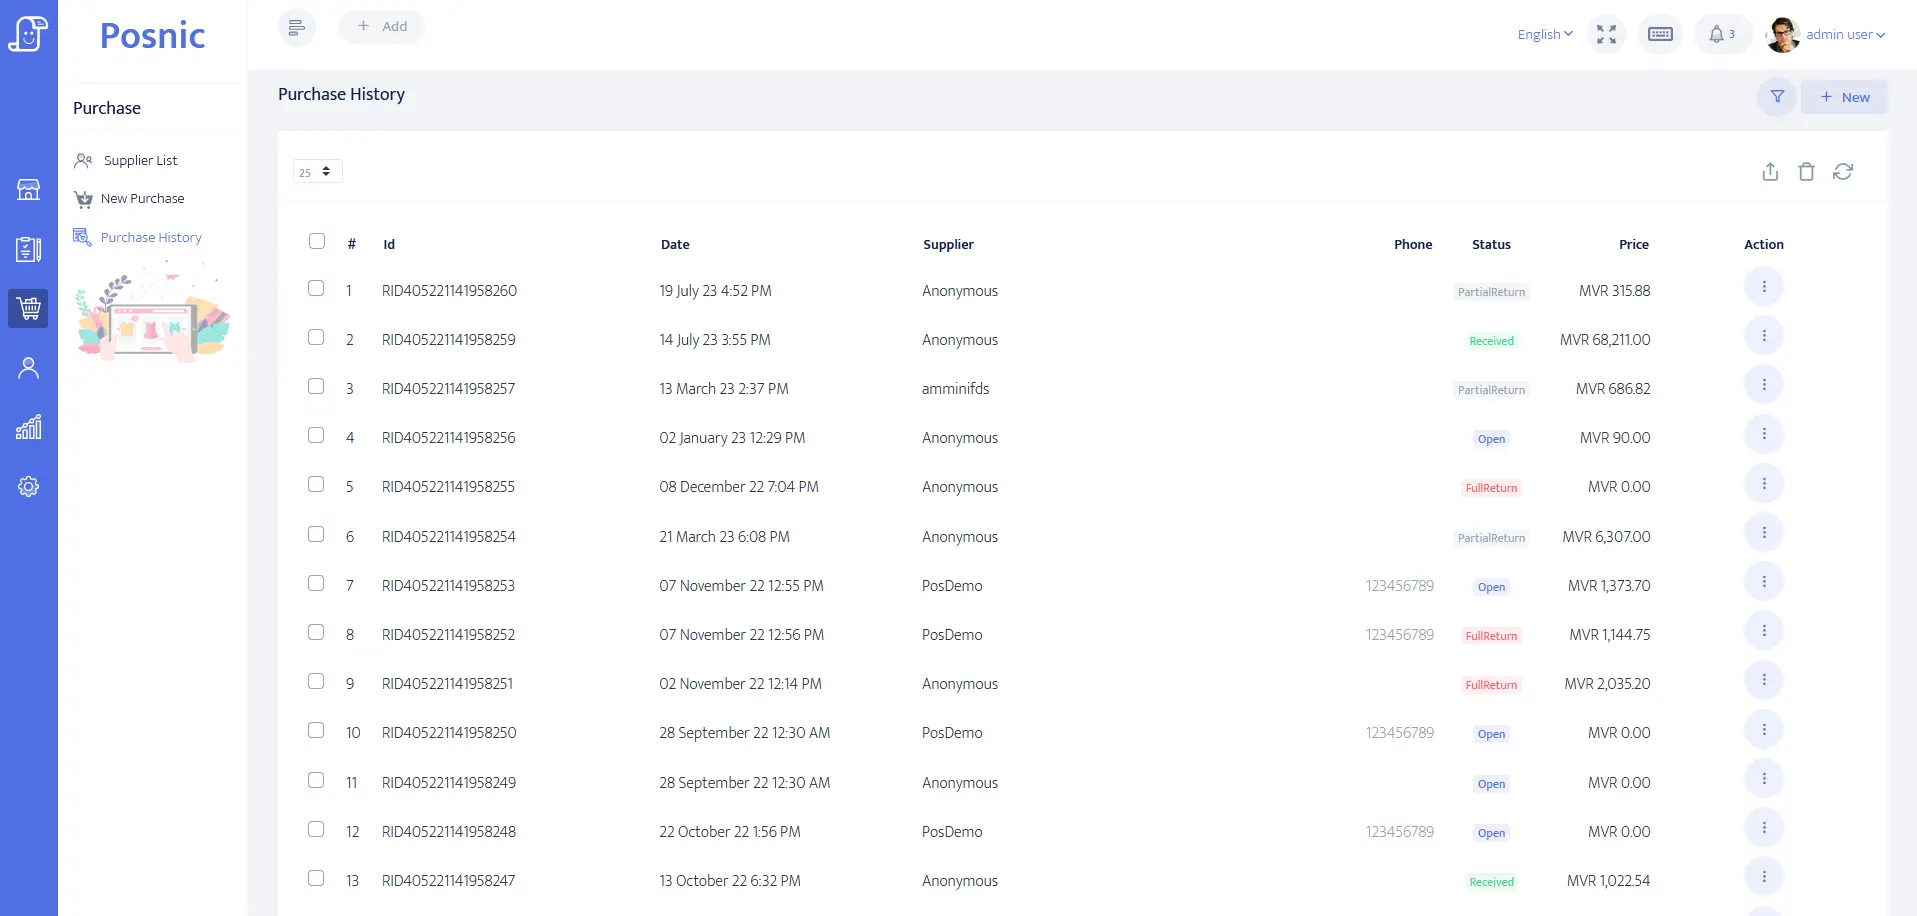
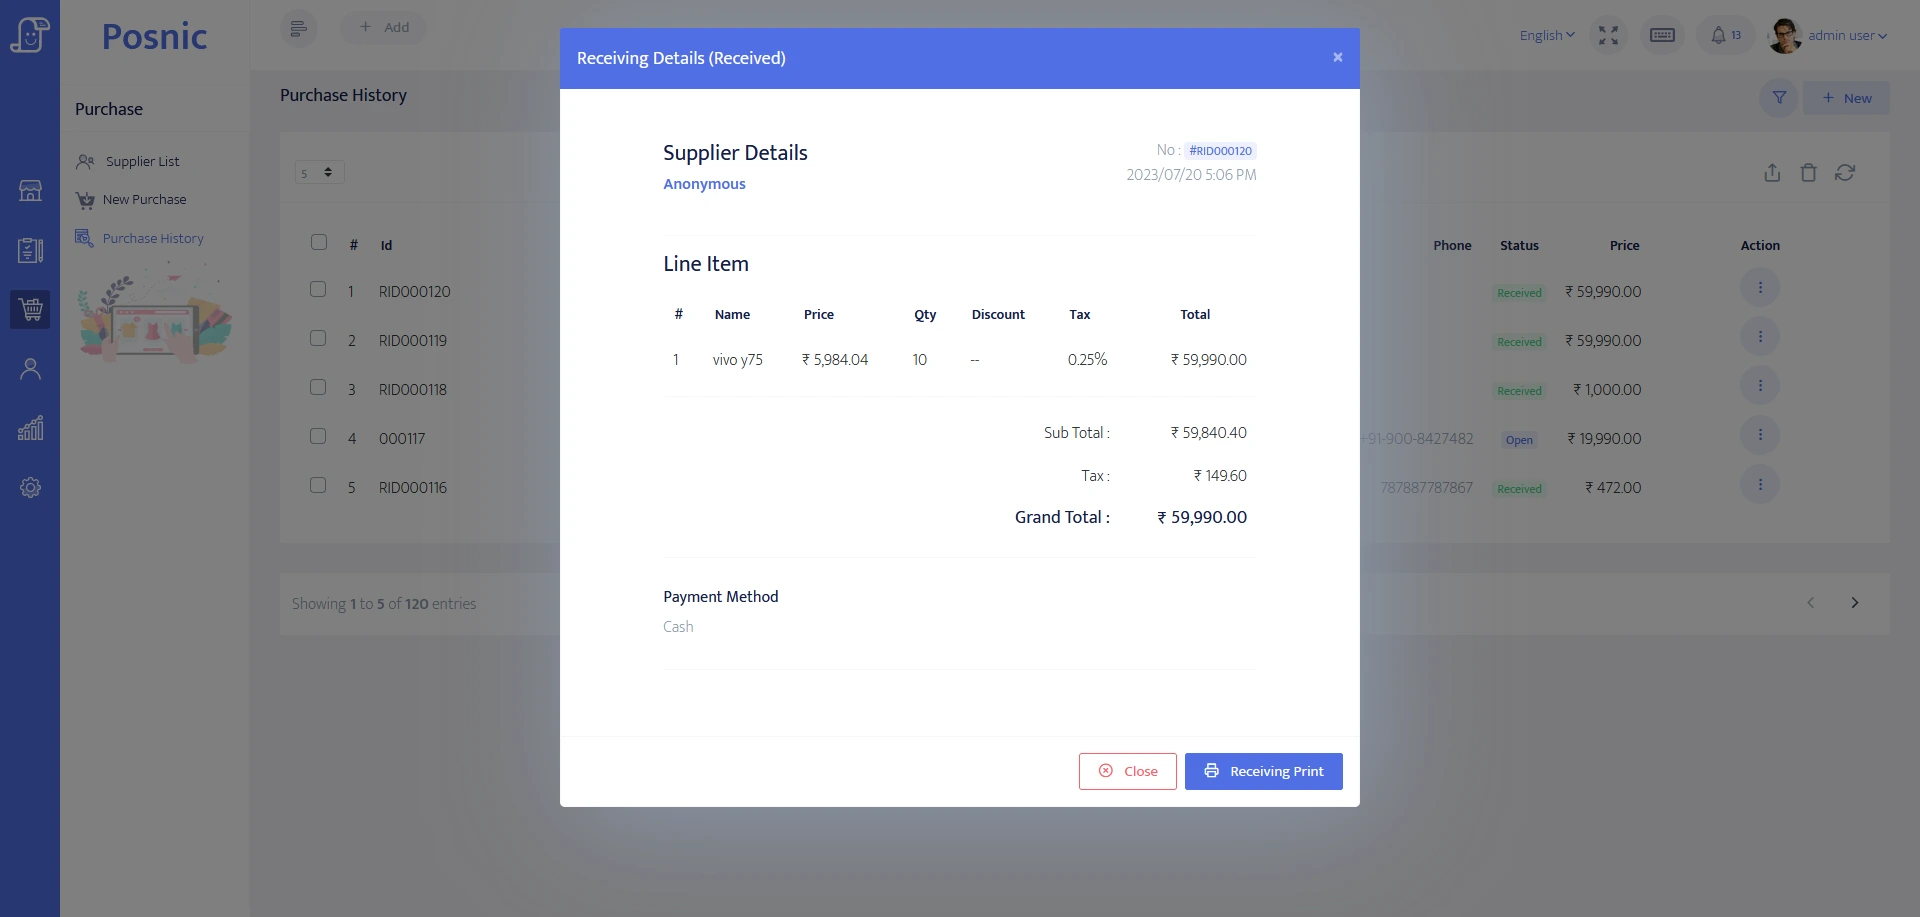
- View page : To see the purchase details, click the purchase option button in the purchase history and select the view button.
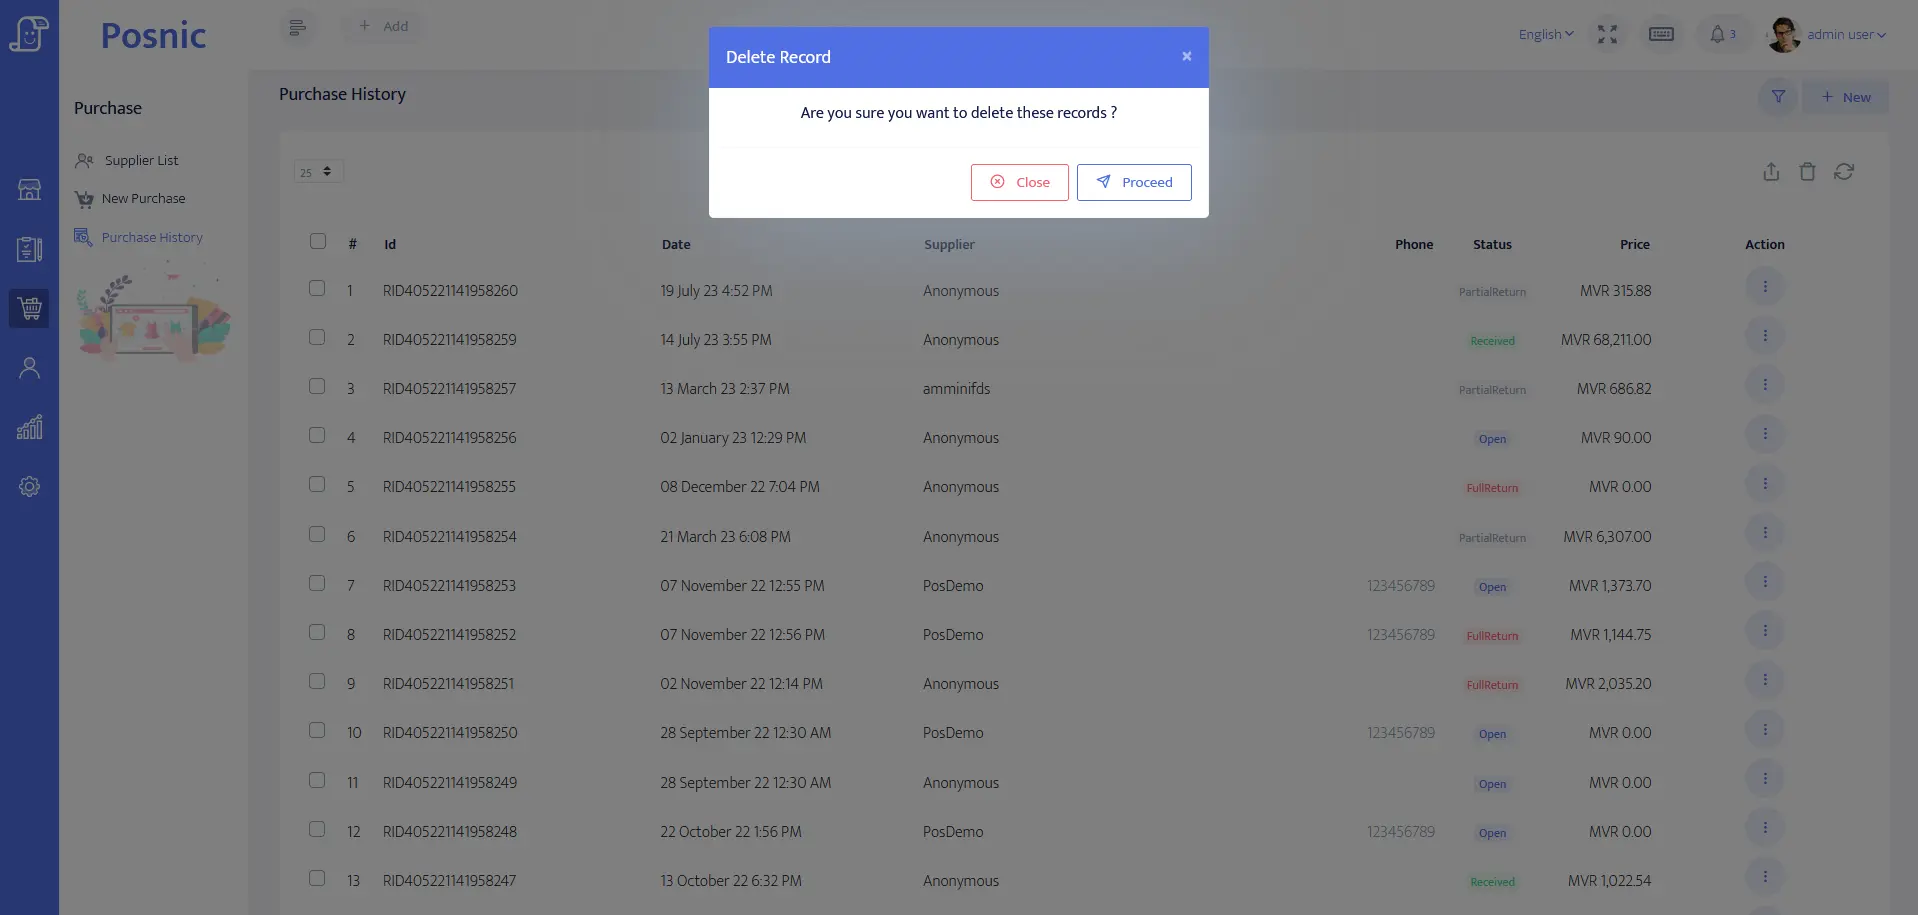
- Delete page : When the delete button is clicked. It will remove the Purchased item detail.
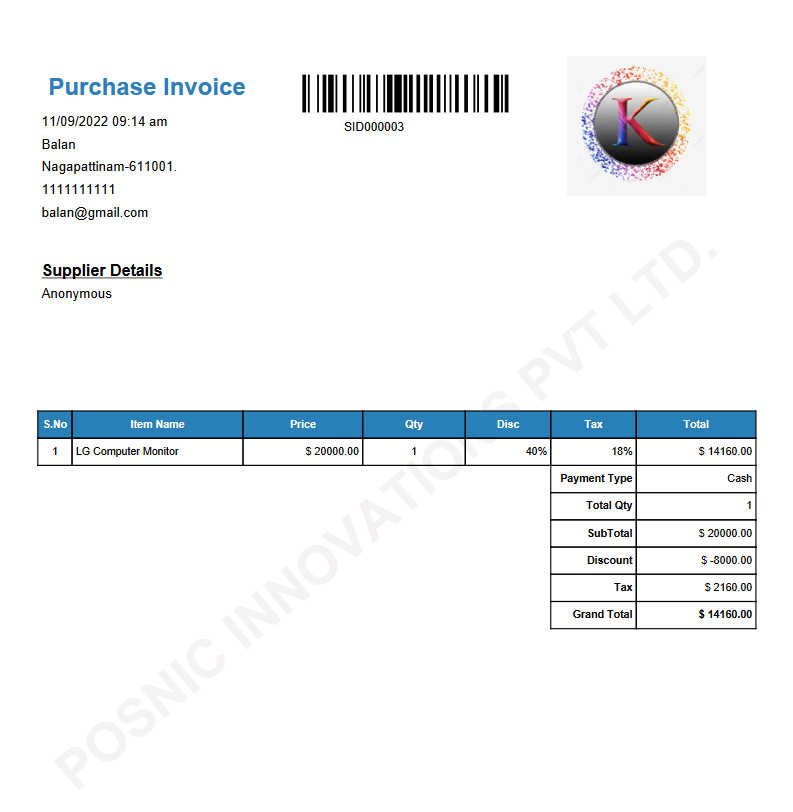
- PDF page : By clicking the pdf button it will automatically download the purchase item from the purchase list in PDF format.
- Print page : To print the purchase details, click on the options button of purchased items in the purchase list and select the print button.
Customers
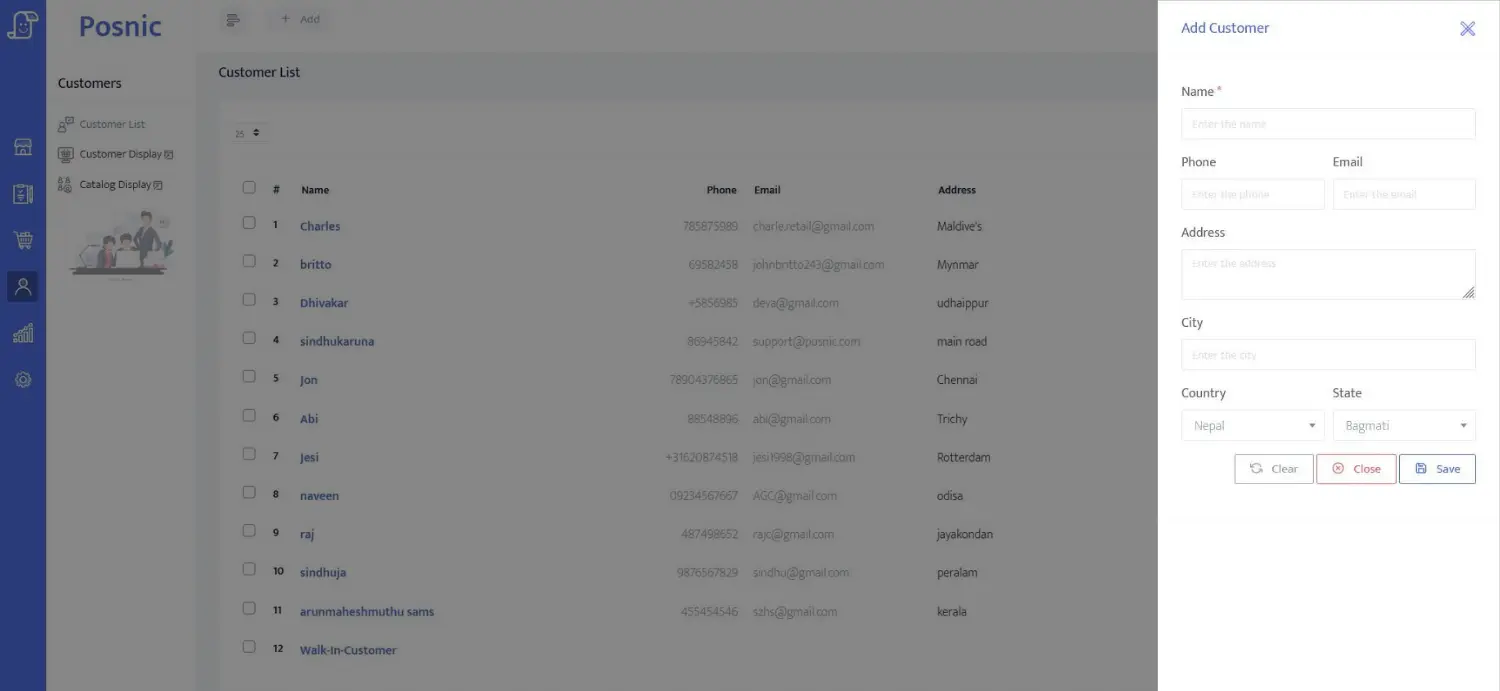
- New page : If you want to create a new customer, click on the new button in customer list and, enter customer details, then click on the save button.
- Edit page : To edit customer details, click the customer option button in customer list and select the edit button. After changing details, click the update button.

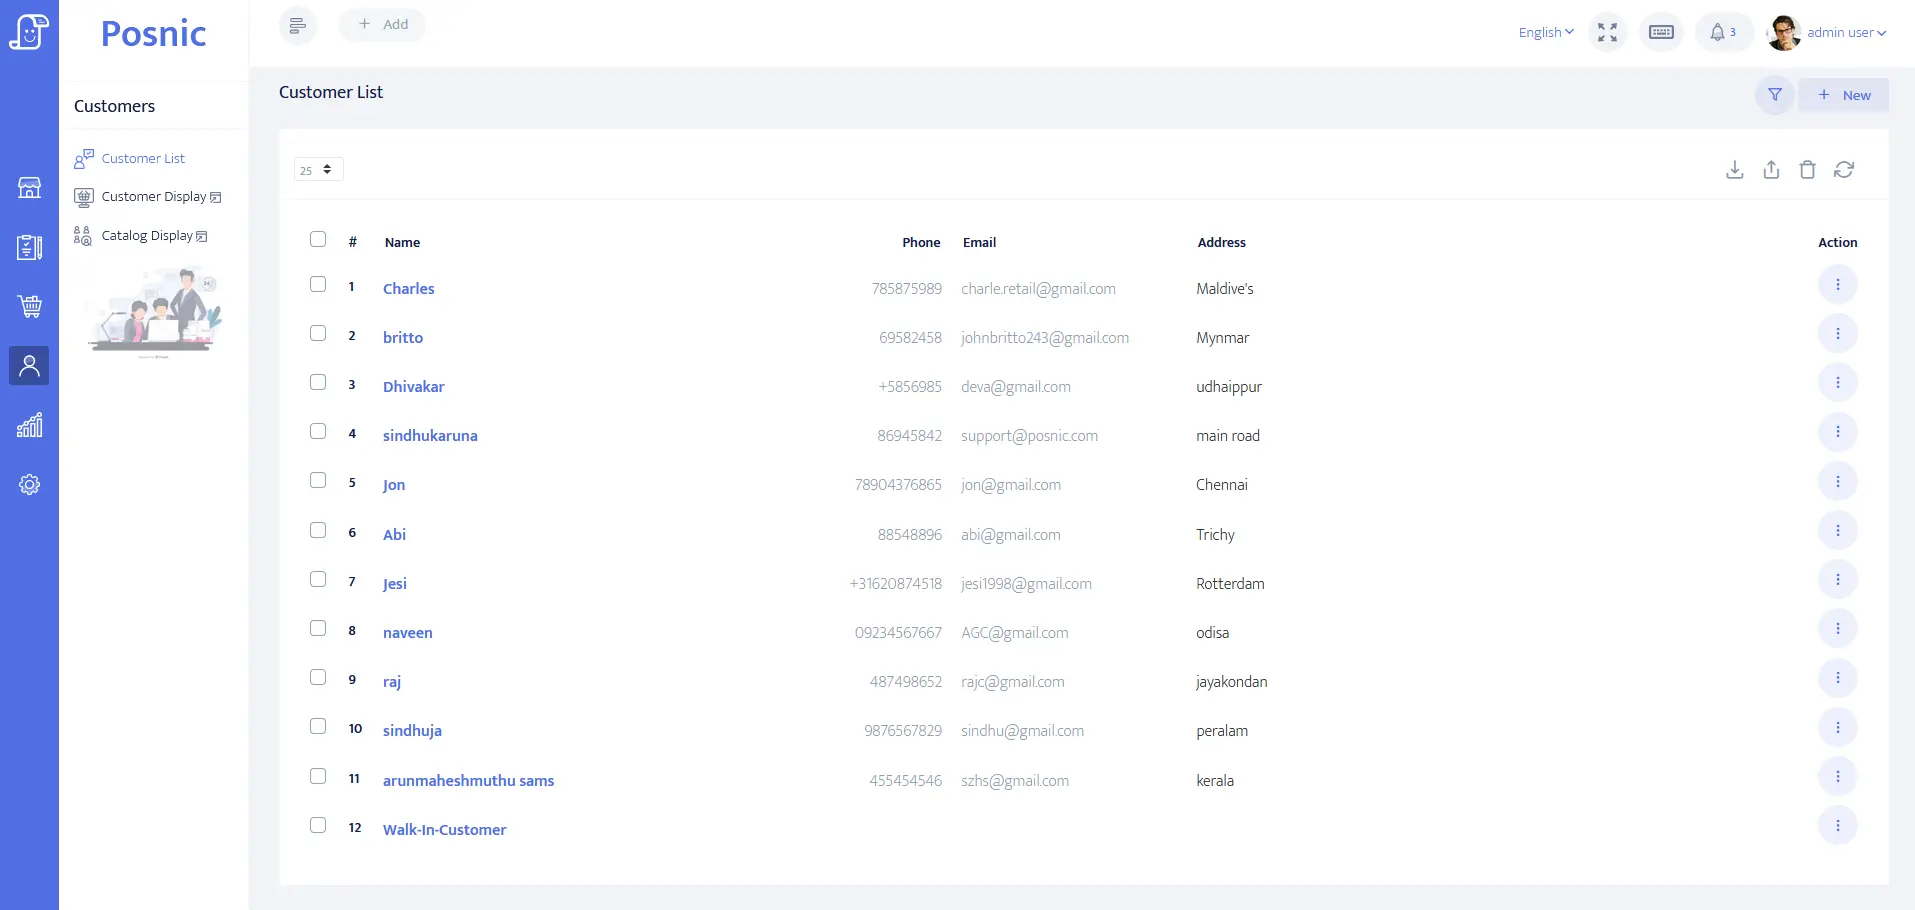
- History : You can find a list of customers who have sales in this area. In this, you can add, update, view, delete, etc., details of customers.
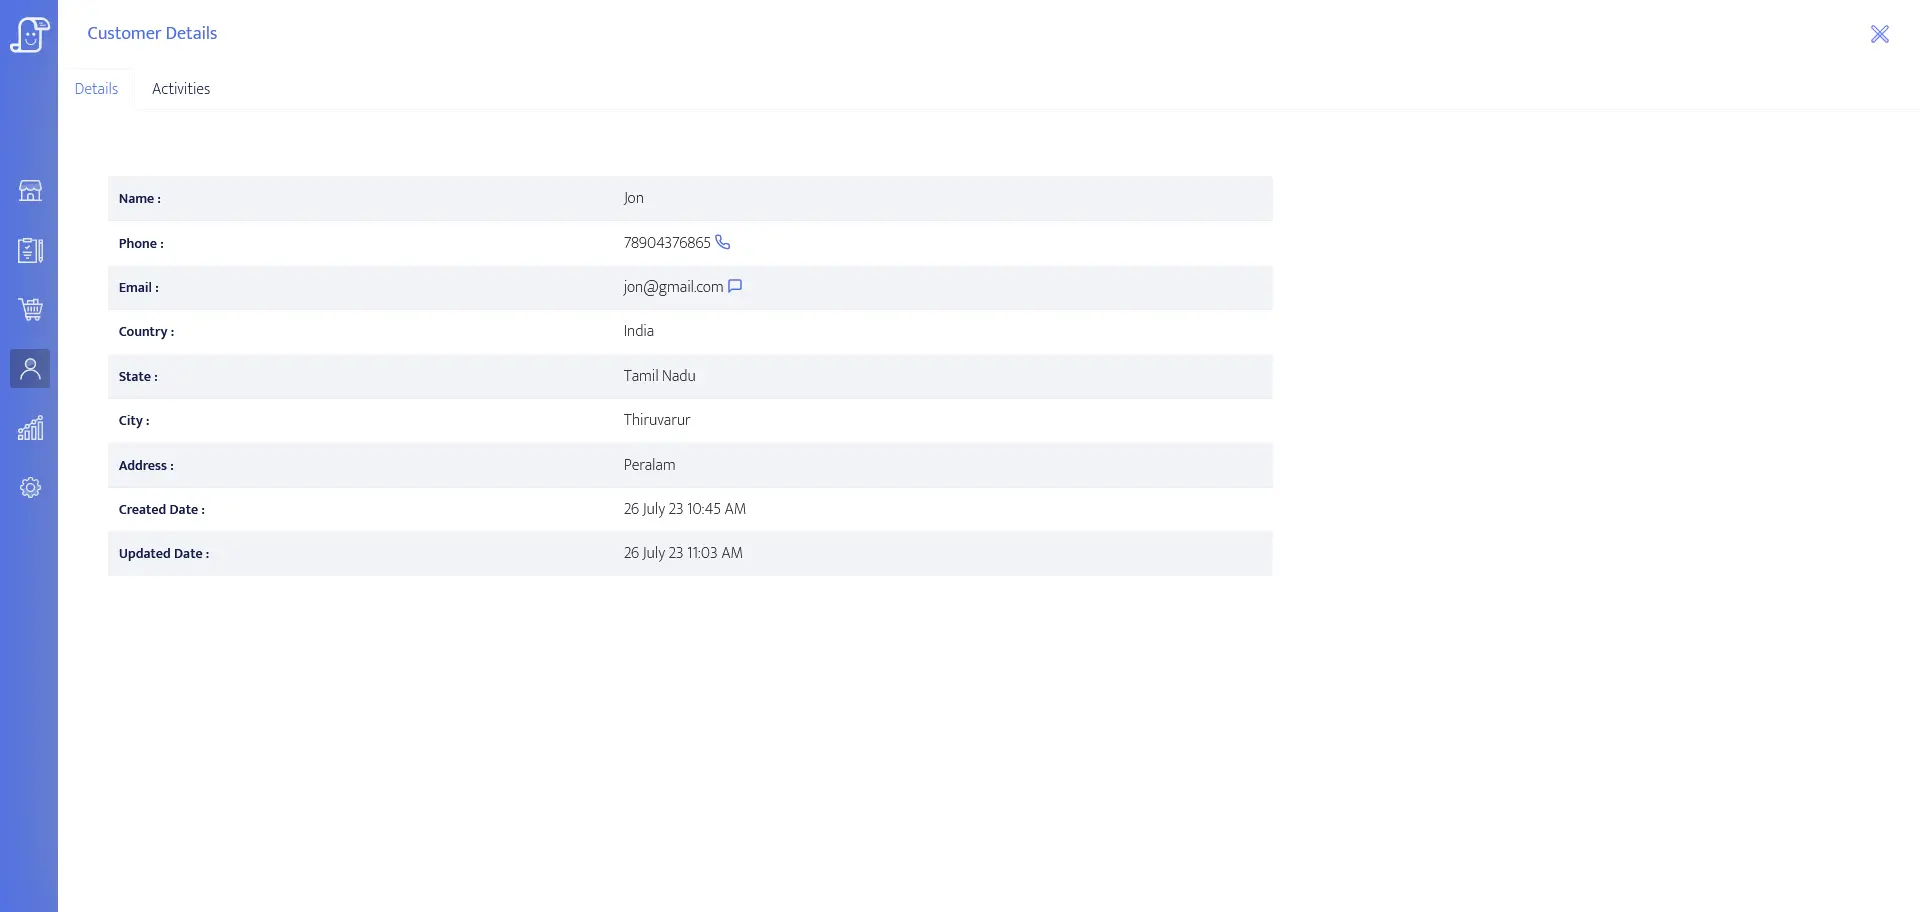
- Details : To view details of customers, click on the customer option button in customer list and select the view button.
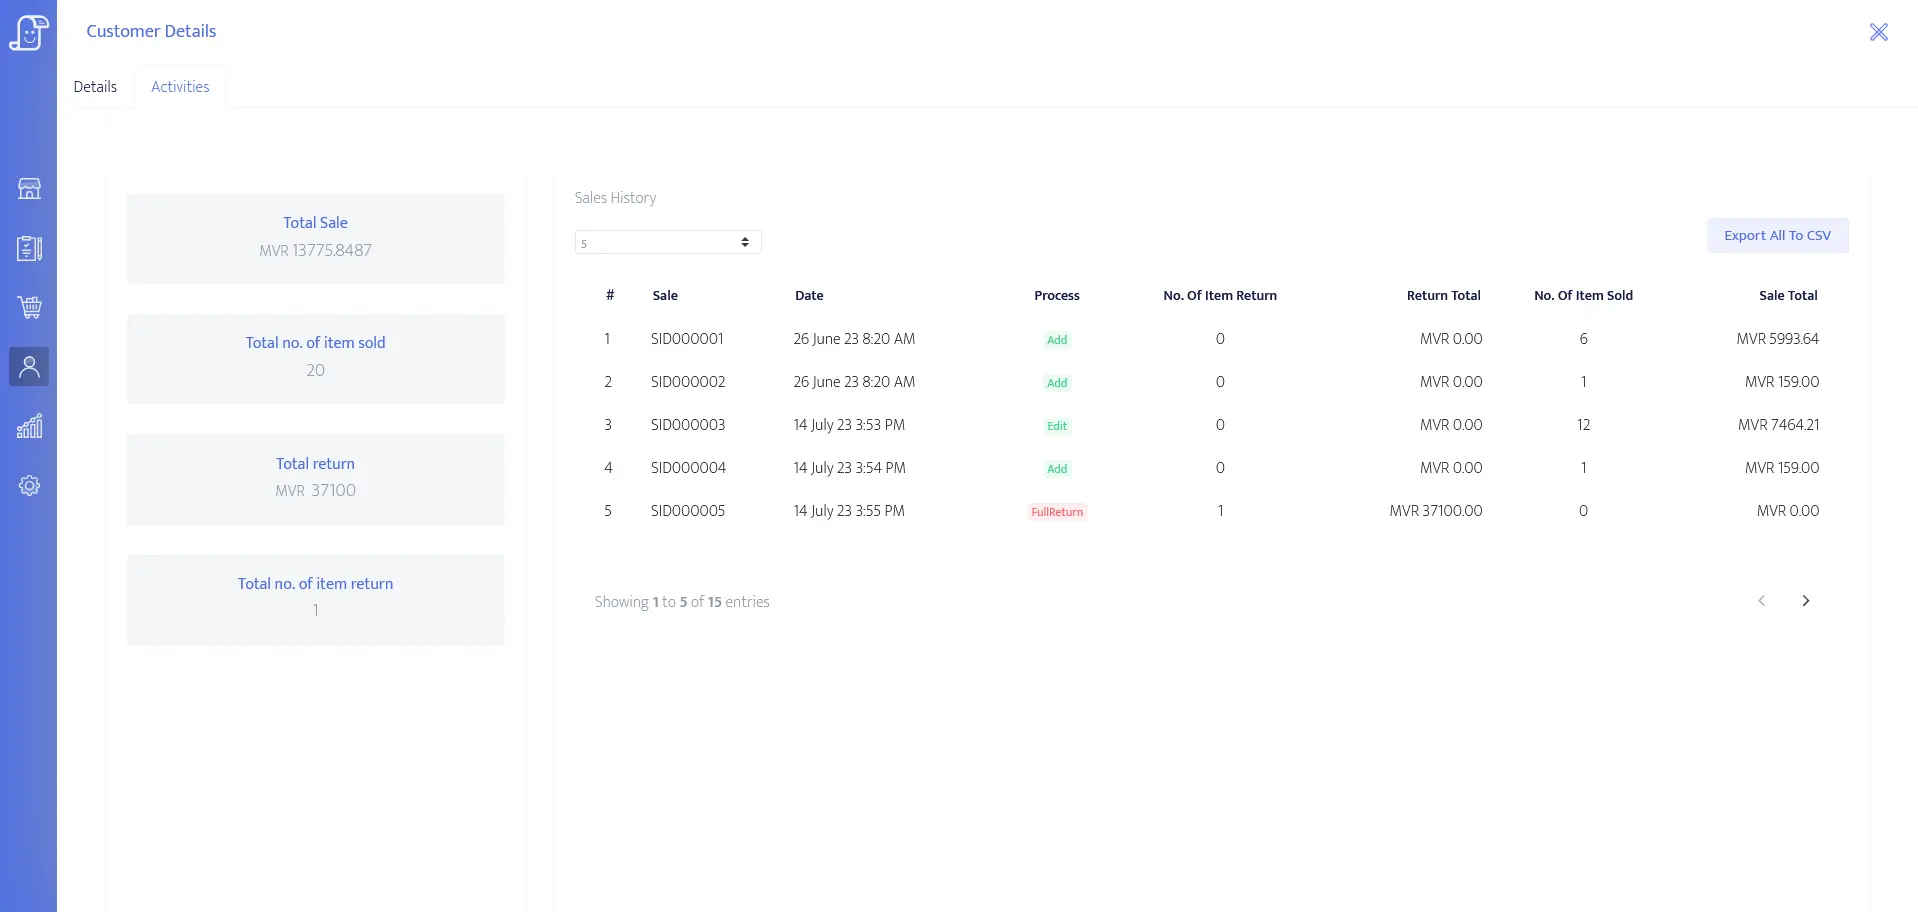
- Activities : This section displays the products purchased by the customer along with their details.
- Delete page : To delete customer details, click the customer option button in customer list and select the delete button. Then deleted details can be seen in customer history.
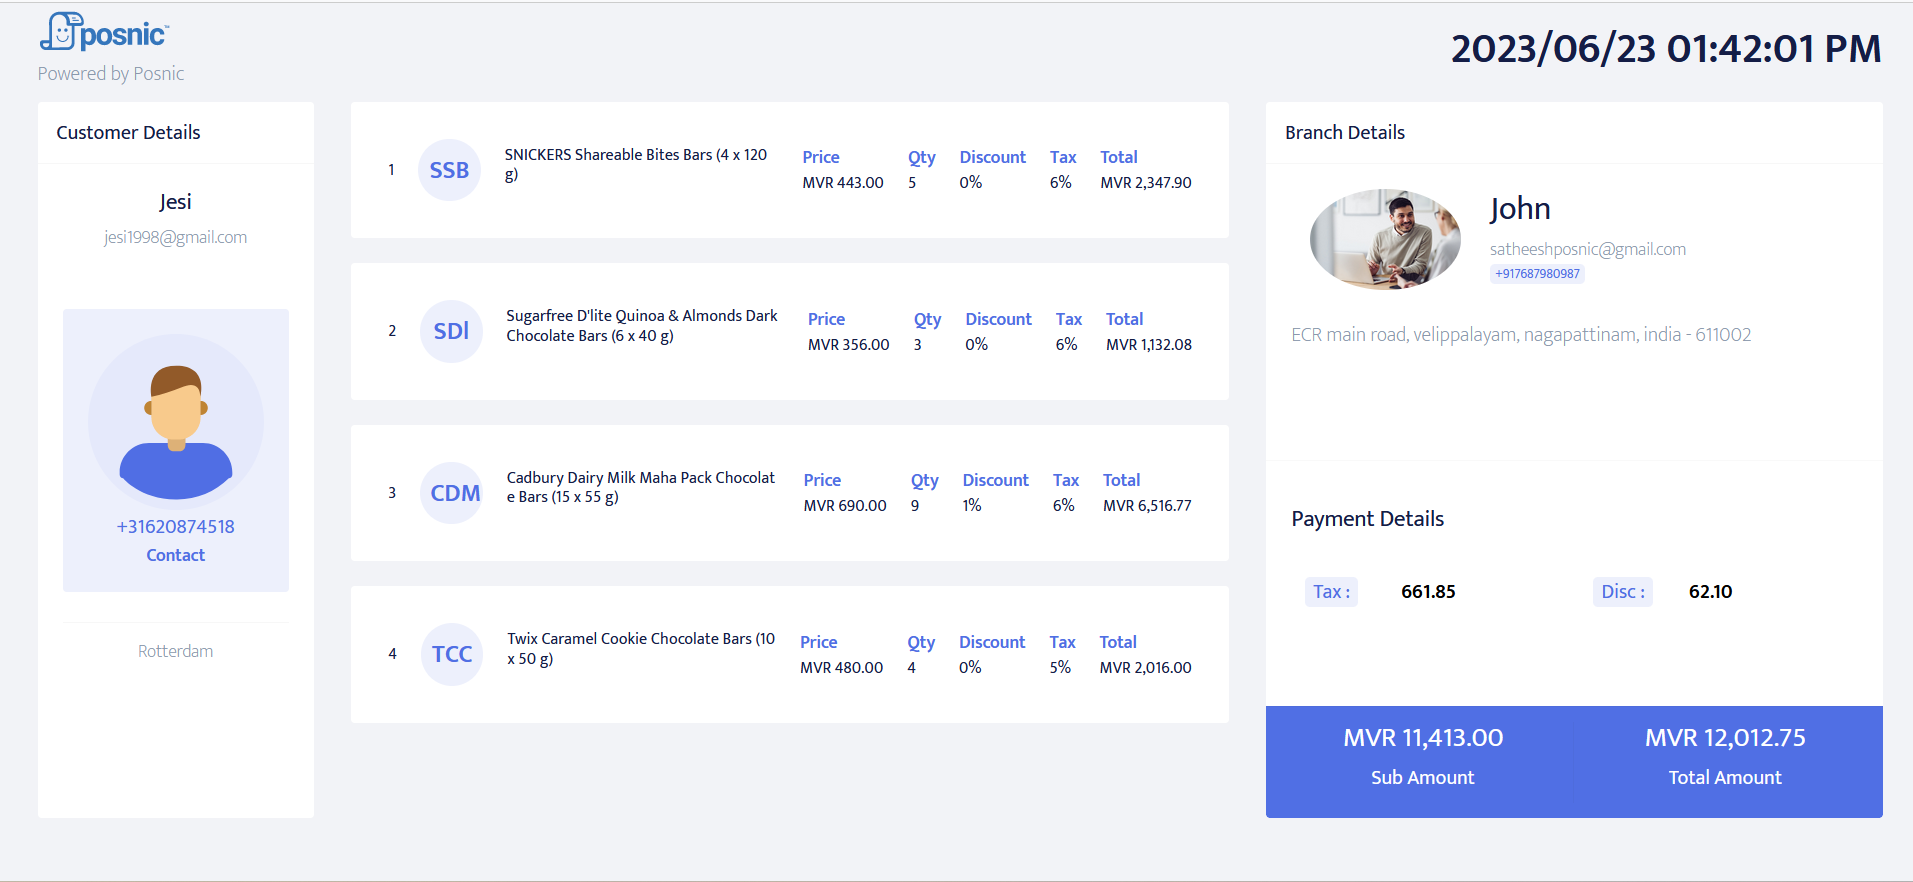
This menu is used to show the customer details with a separate window. The selected customer purchased item details will show the total amount, discount amount, etc.
Reports
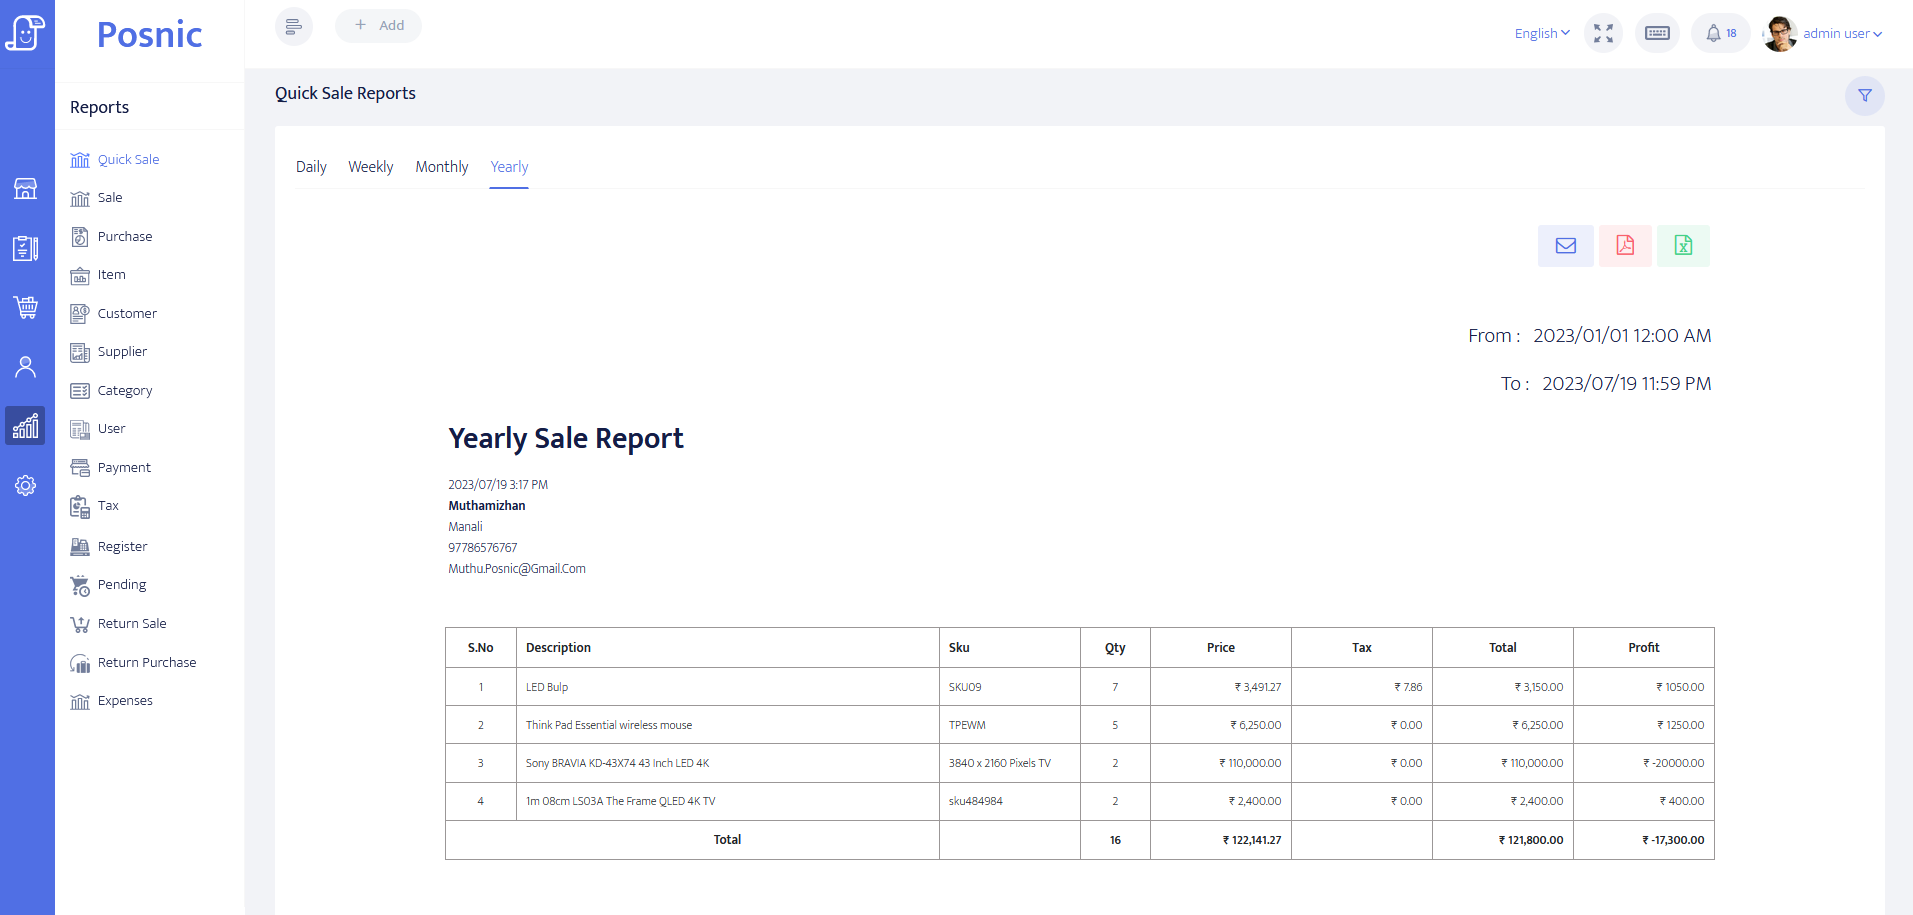
The Quick Sale Reports section will display the Daily, Weekly, Monthly, and Yearly Sale reports.
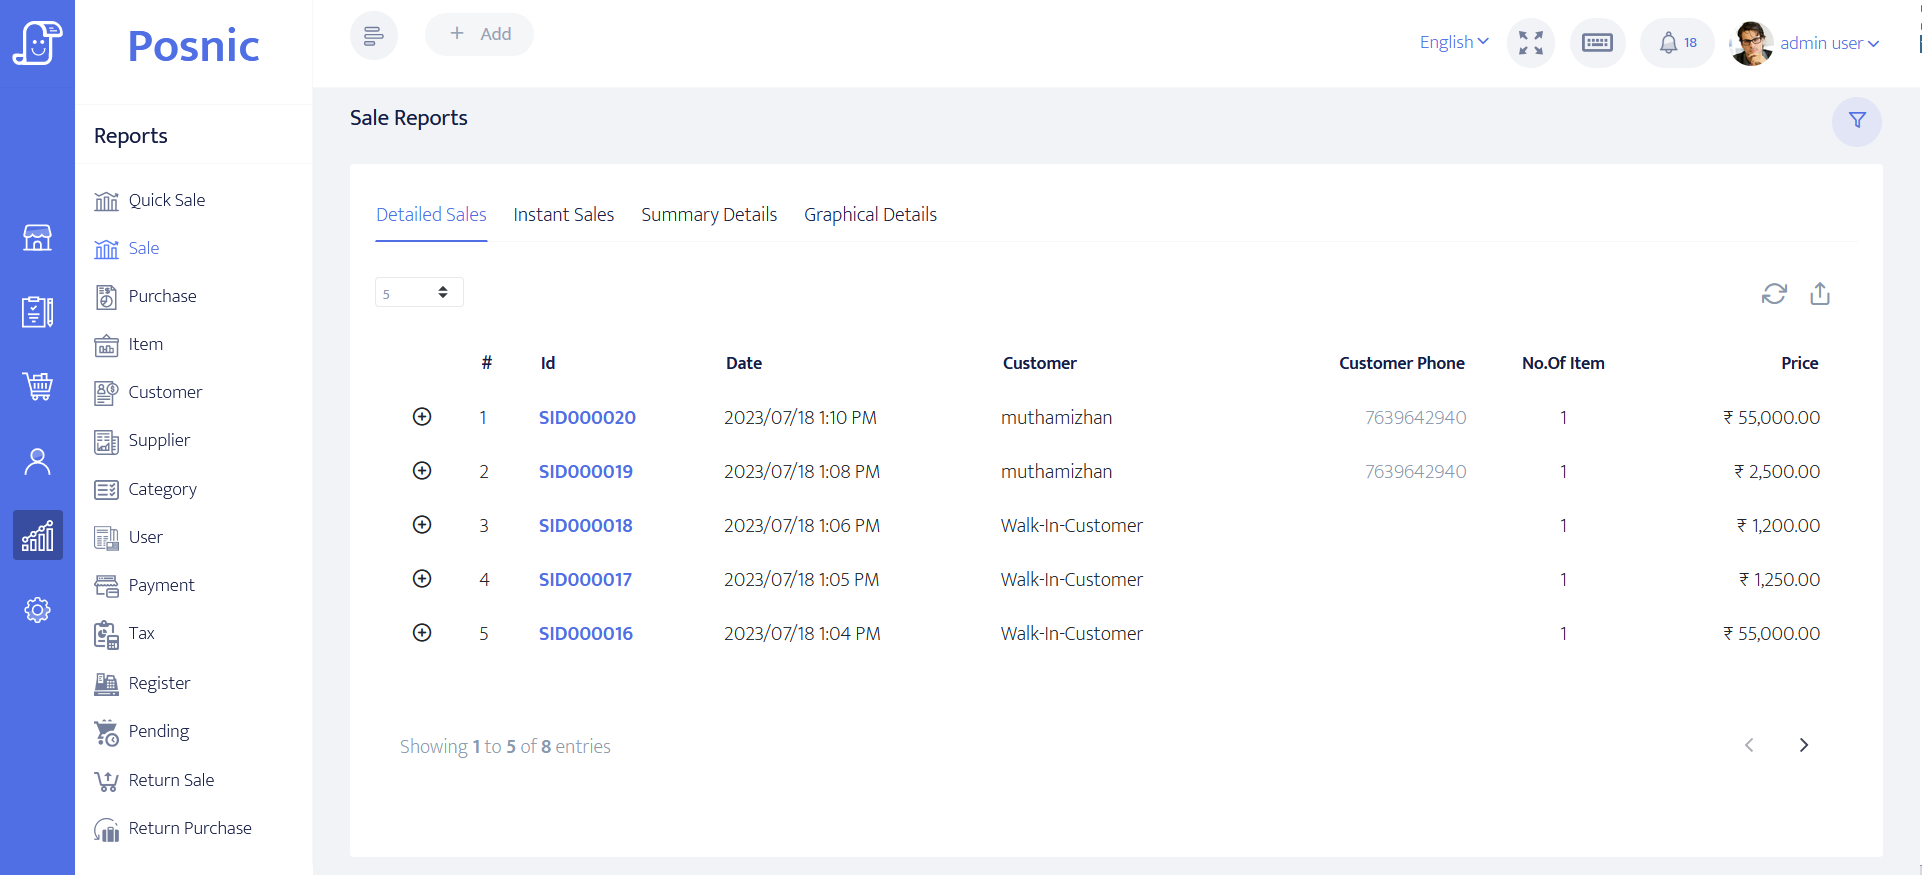
The sale report section will display Detailed Sales, Instant Sales, Summary Details, and Graphical Details.
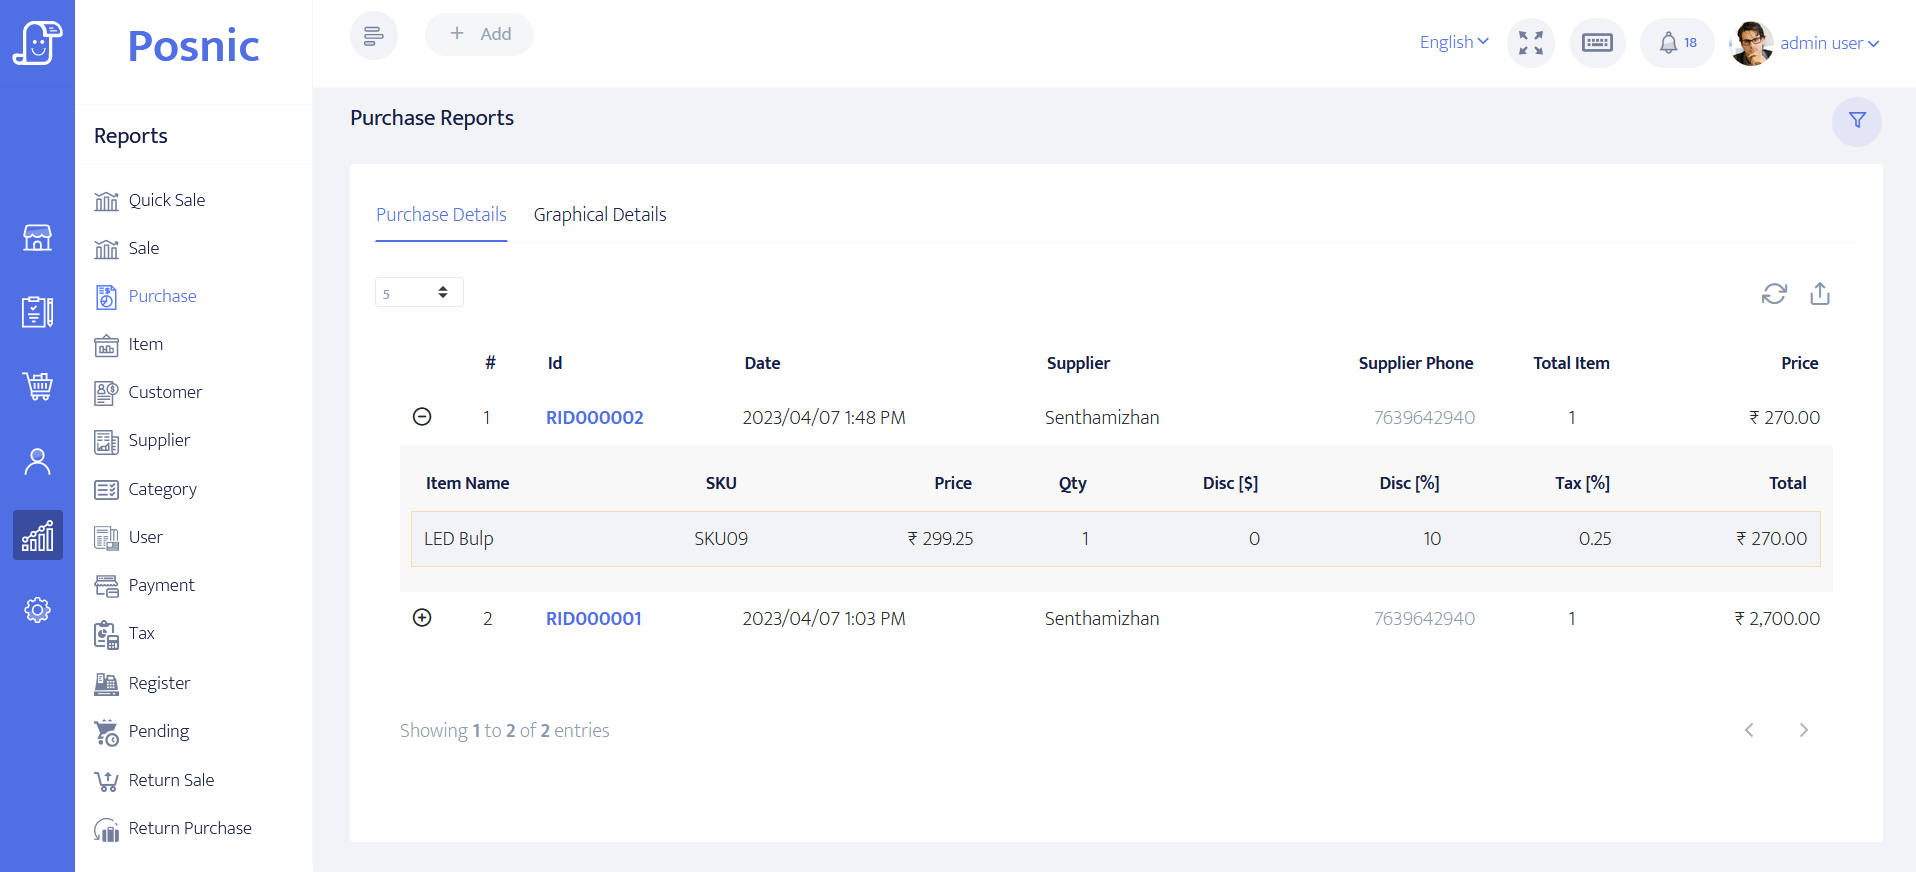
The Purchase Report section will display the Purchase Details and Graphical Details.
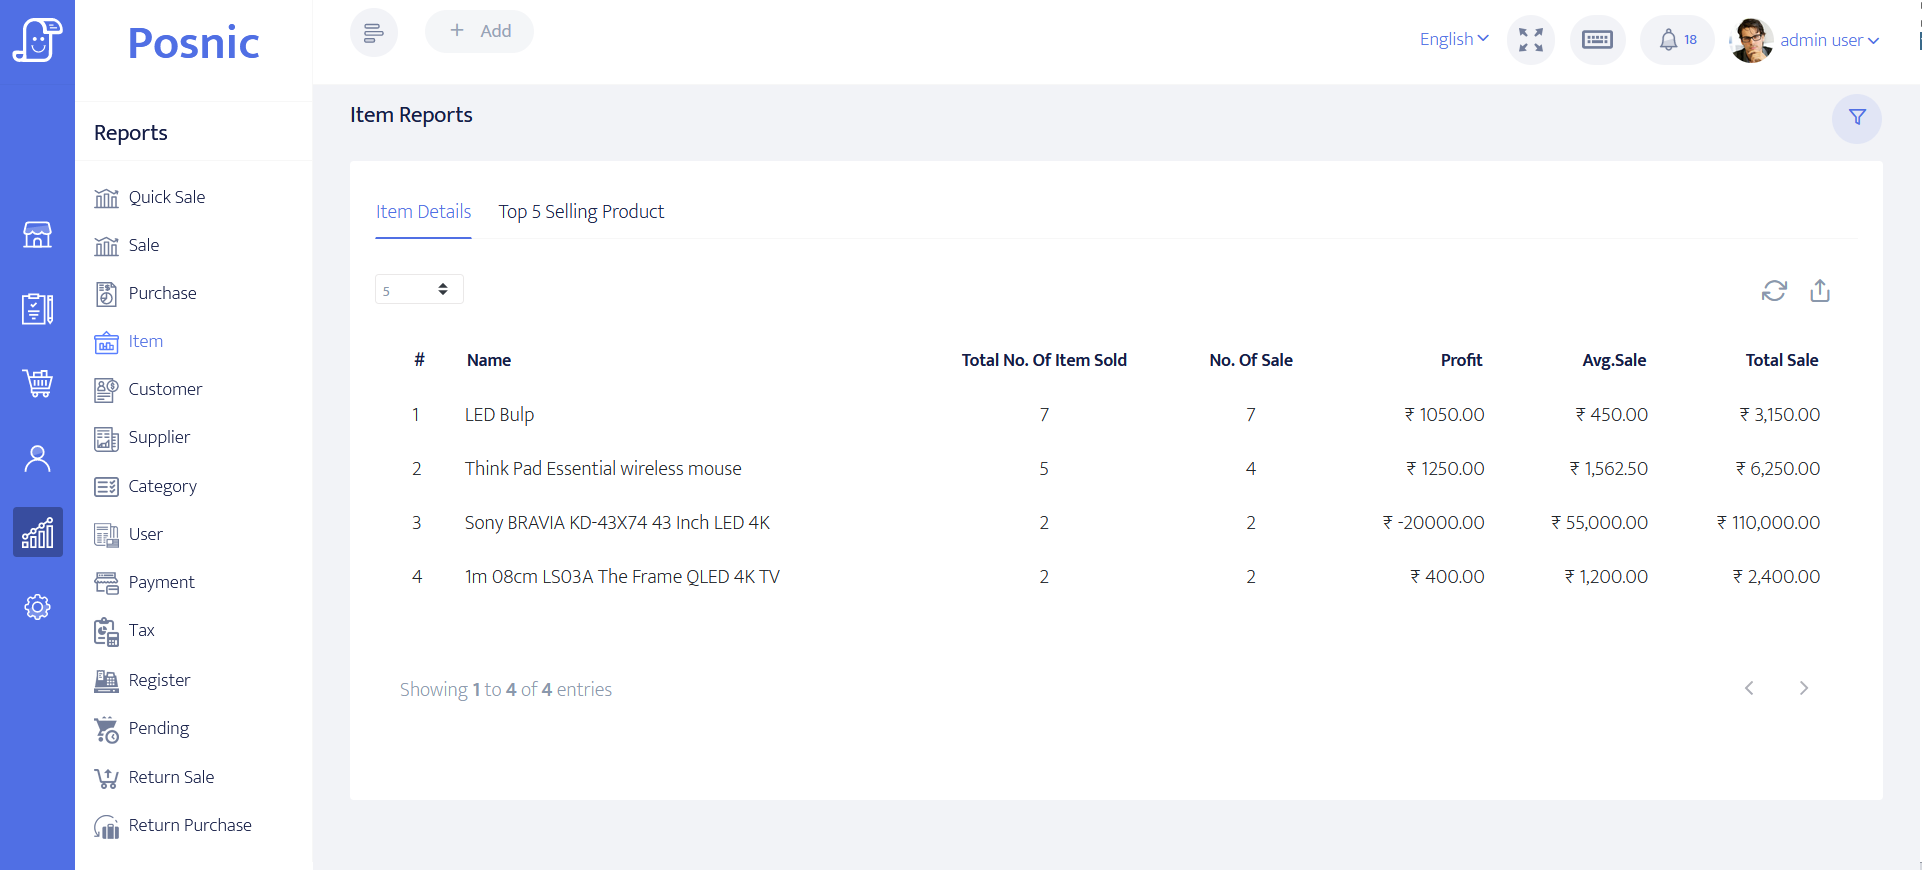
The item report section shows how number of items each have been sold and also shows the detailed report of each items sold graphically.
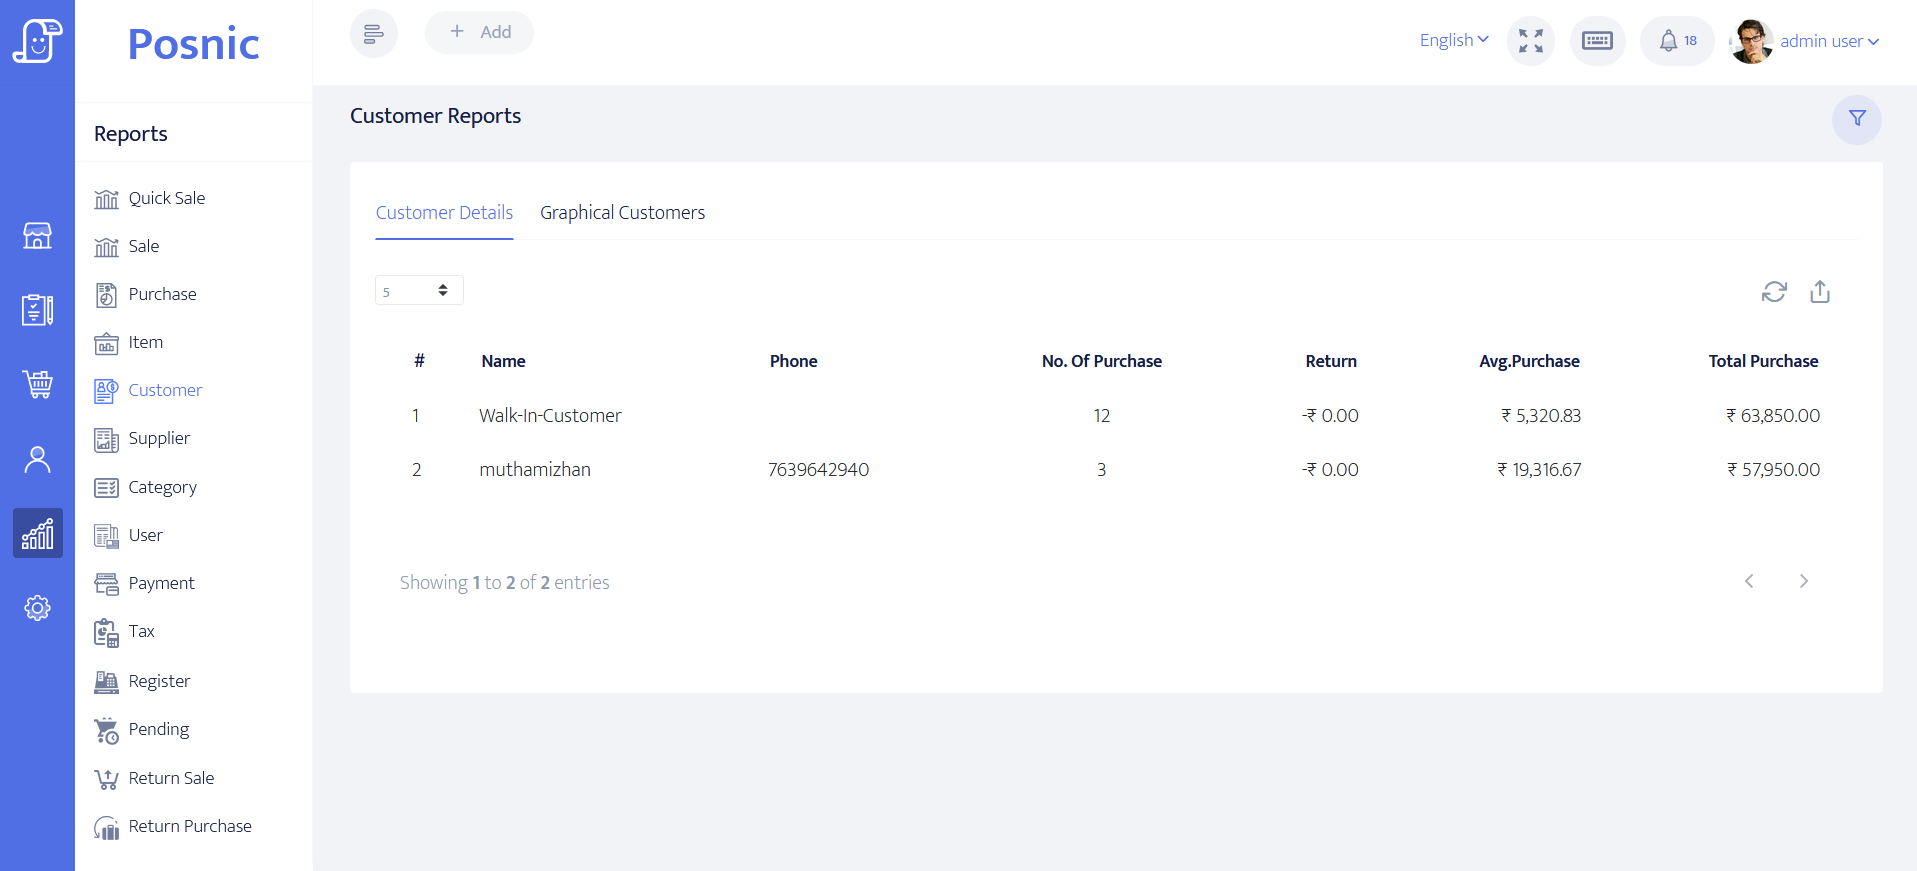
This section displays customer purchase and return data, along with a graph that illustrates purchases made on different days of the week.
The Supplier Reports section will display the Supplier Details, Supplier Based Product, Supplier Based Sale, and Top 5 Suppliers.

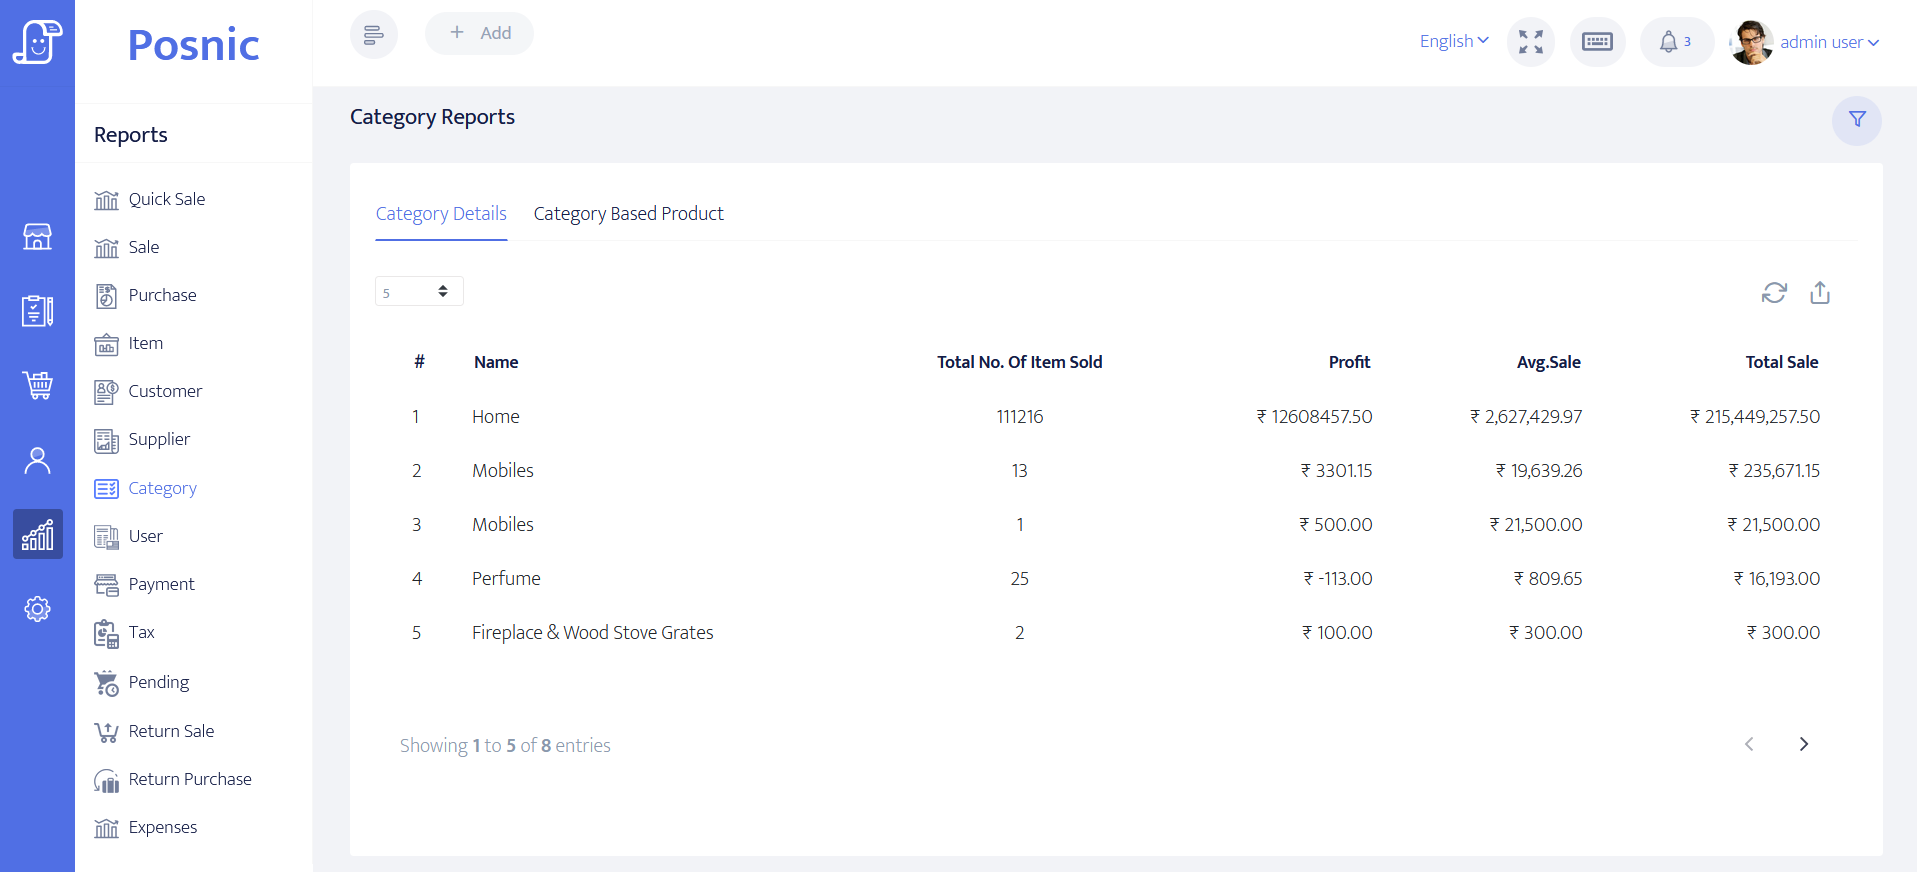
Use this report to see how many products were sold in each category, the total revenue, and profit made. It also displays the number of items sold for each product in the category.
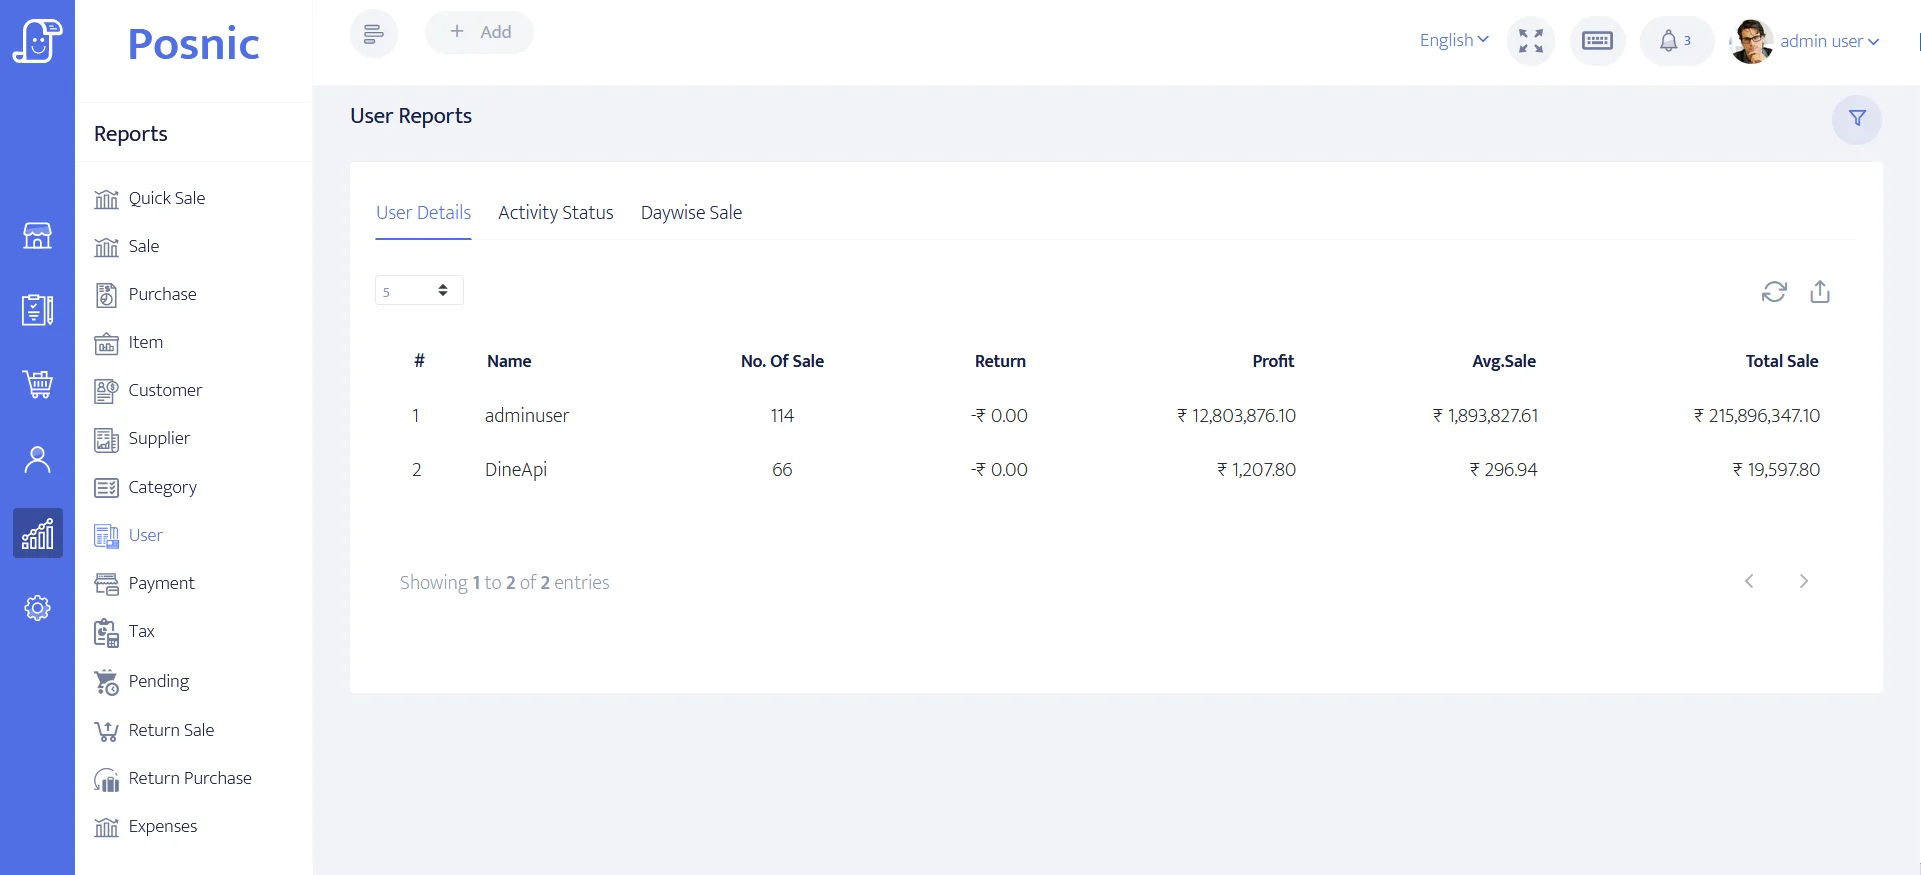
With this user report, you can track the sales, total amount, and profit per user. Additionally, it displays user activity levels and day-wise sales.
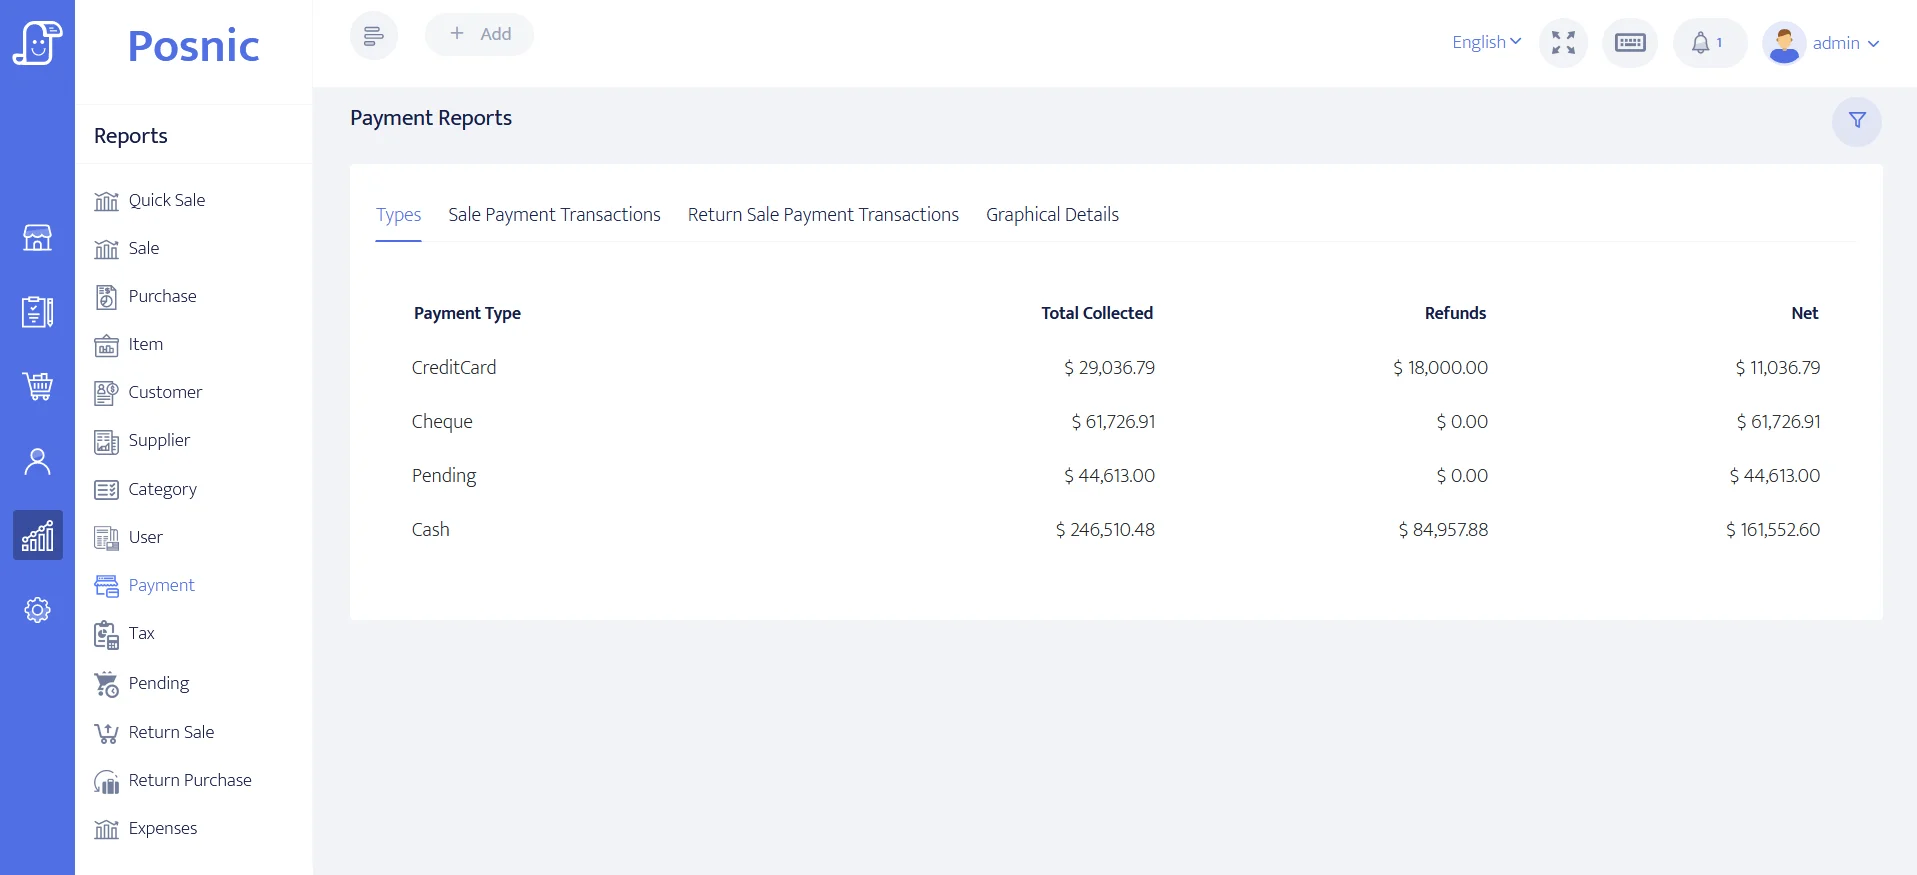
The payment report section shows the total amount collected from sales and refunds for each payment category. The log and graph also display the transaction details for purchases and chargebacks.
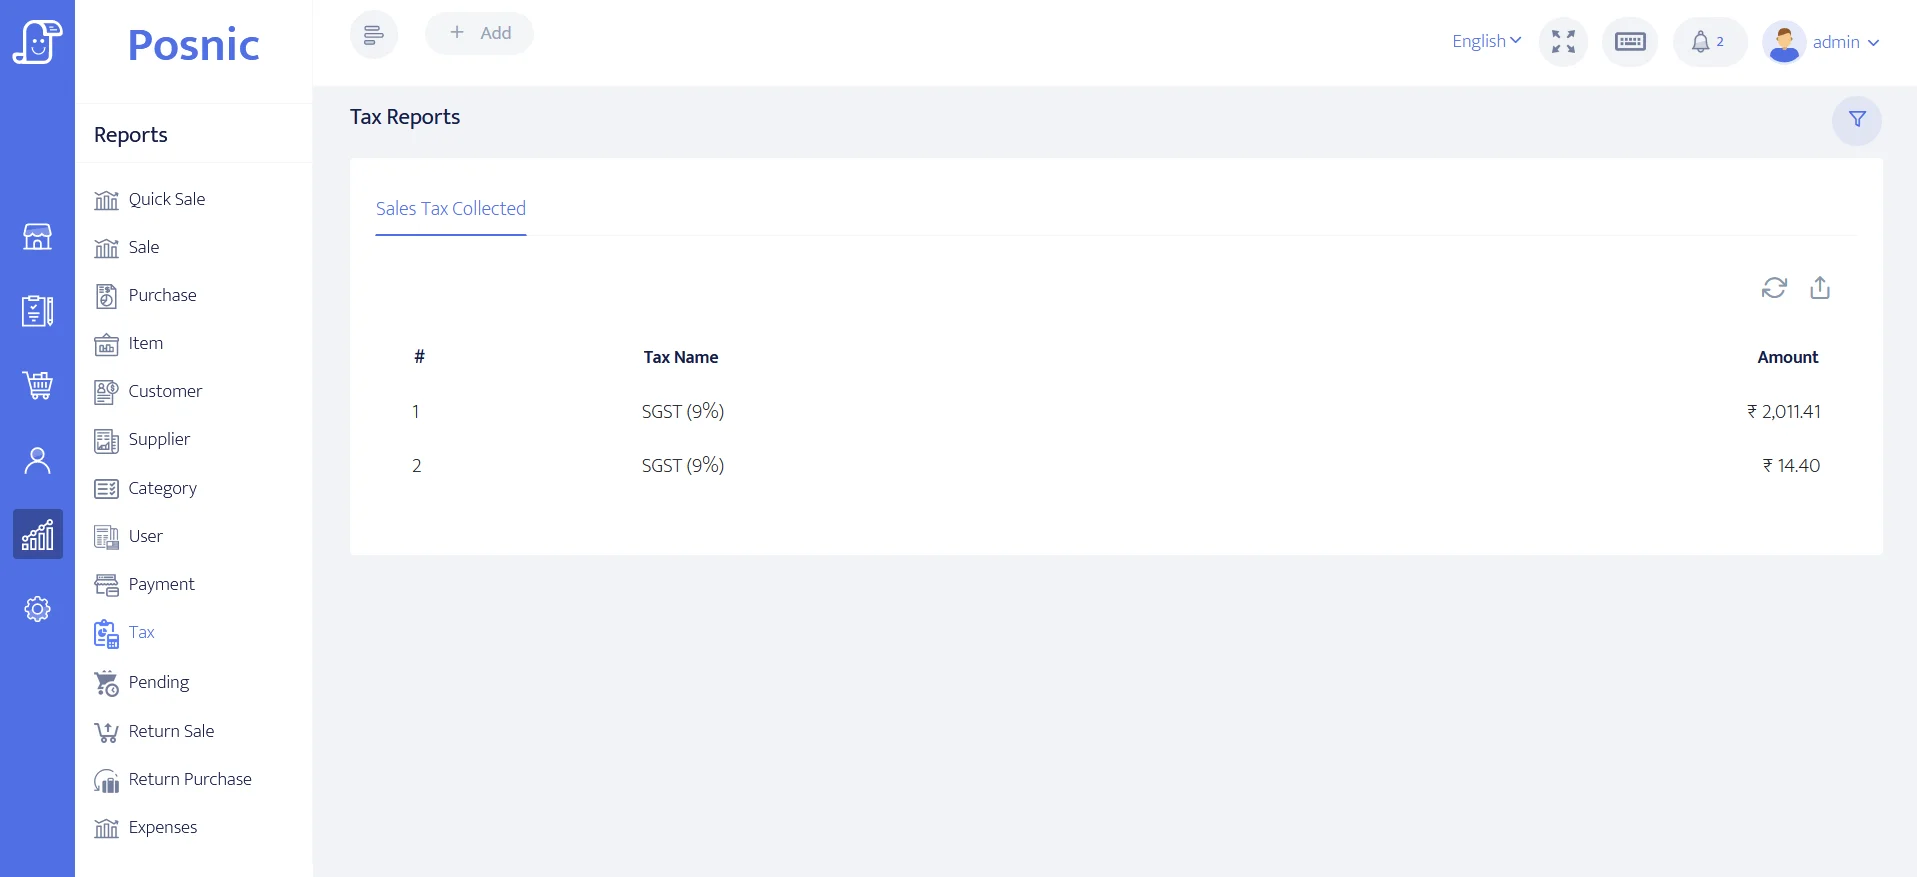
In the Tax Reports section, the details of the tax are displayed.
Use this cash register statement to aggregate cash variances in the cash register.

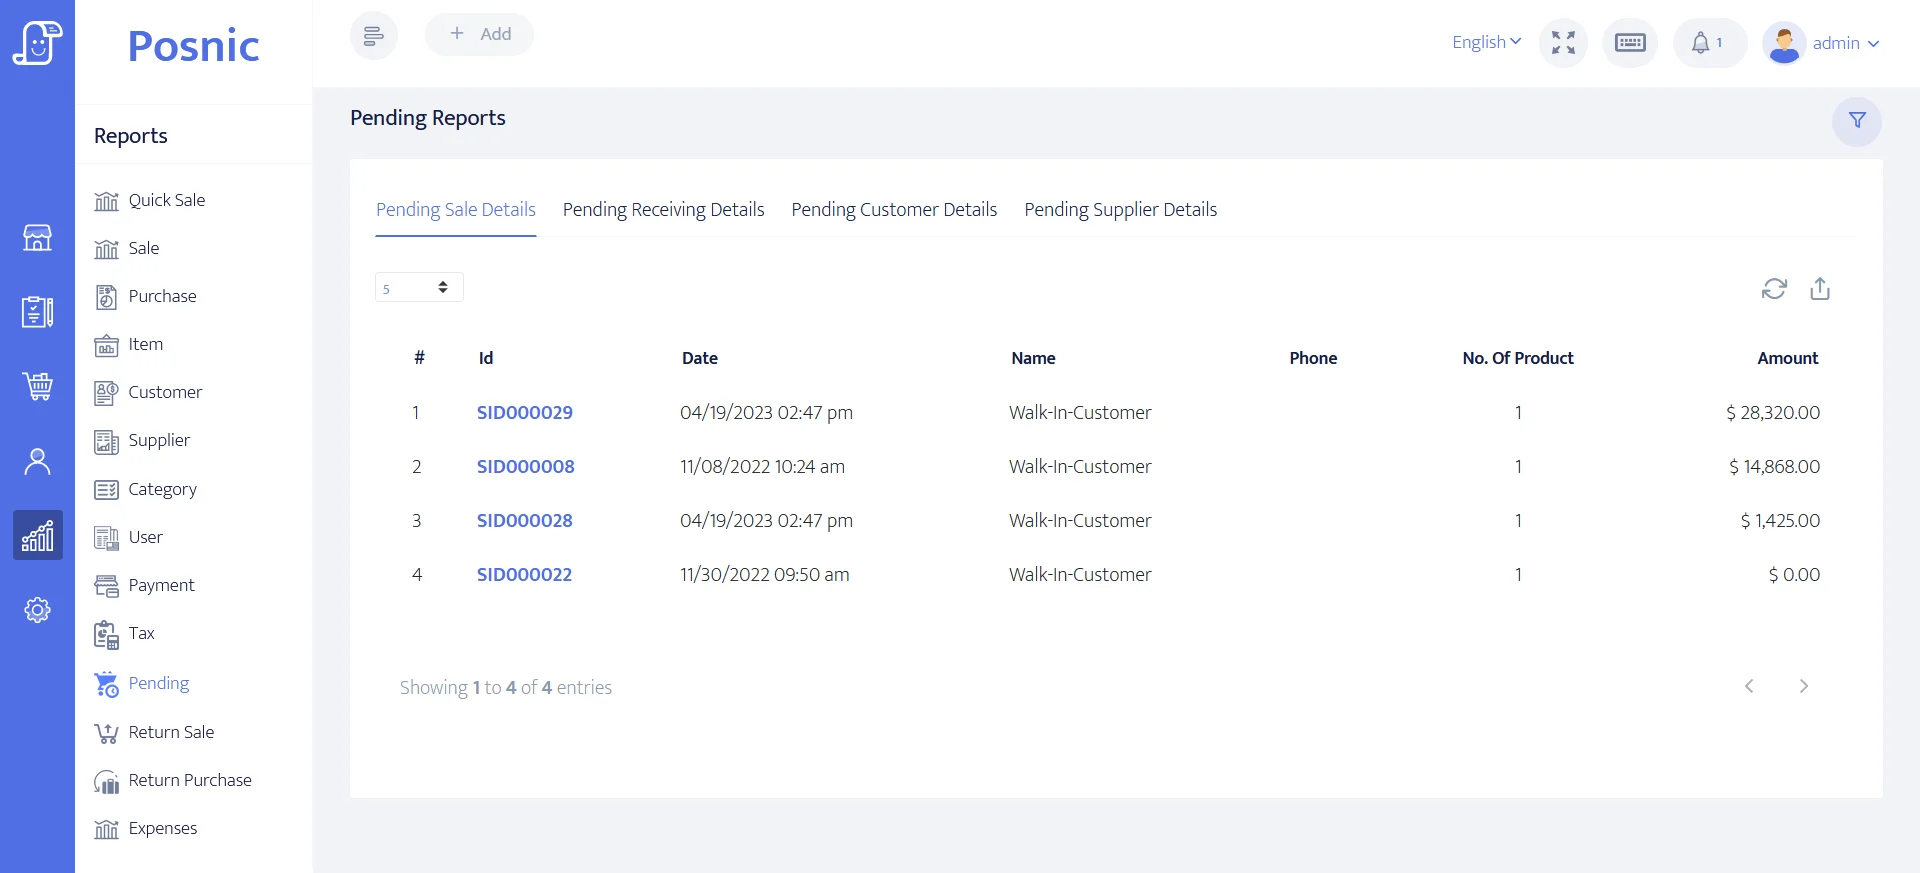
The Pending Reports section will display the Pending Sale Details,Pending Receiving Details,Pending Customer Details, and Pending Supplier Details.
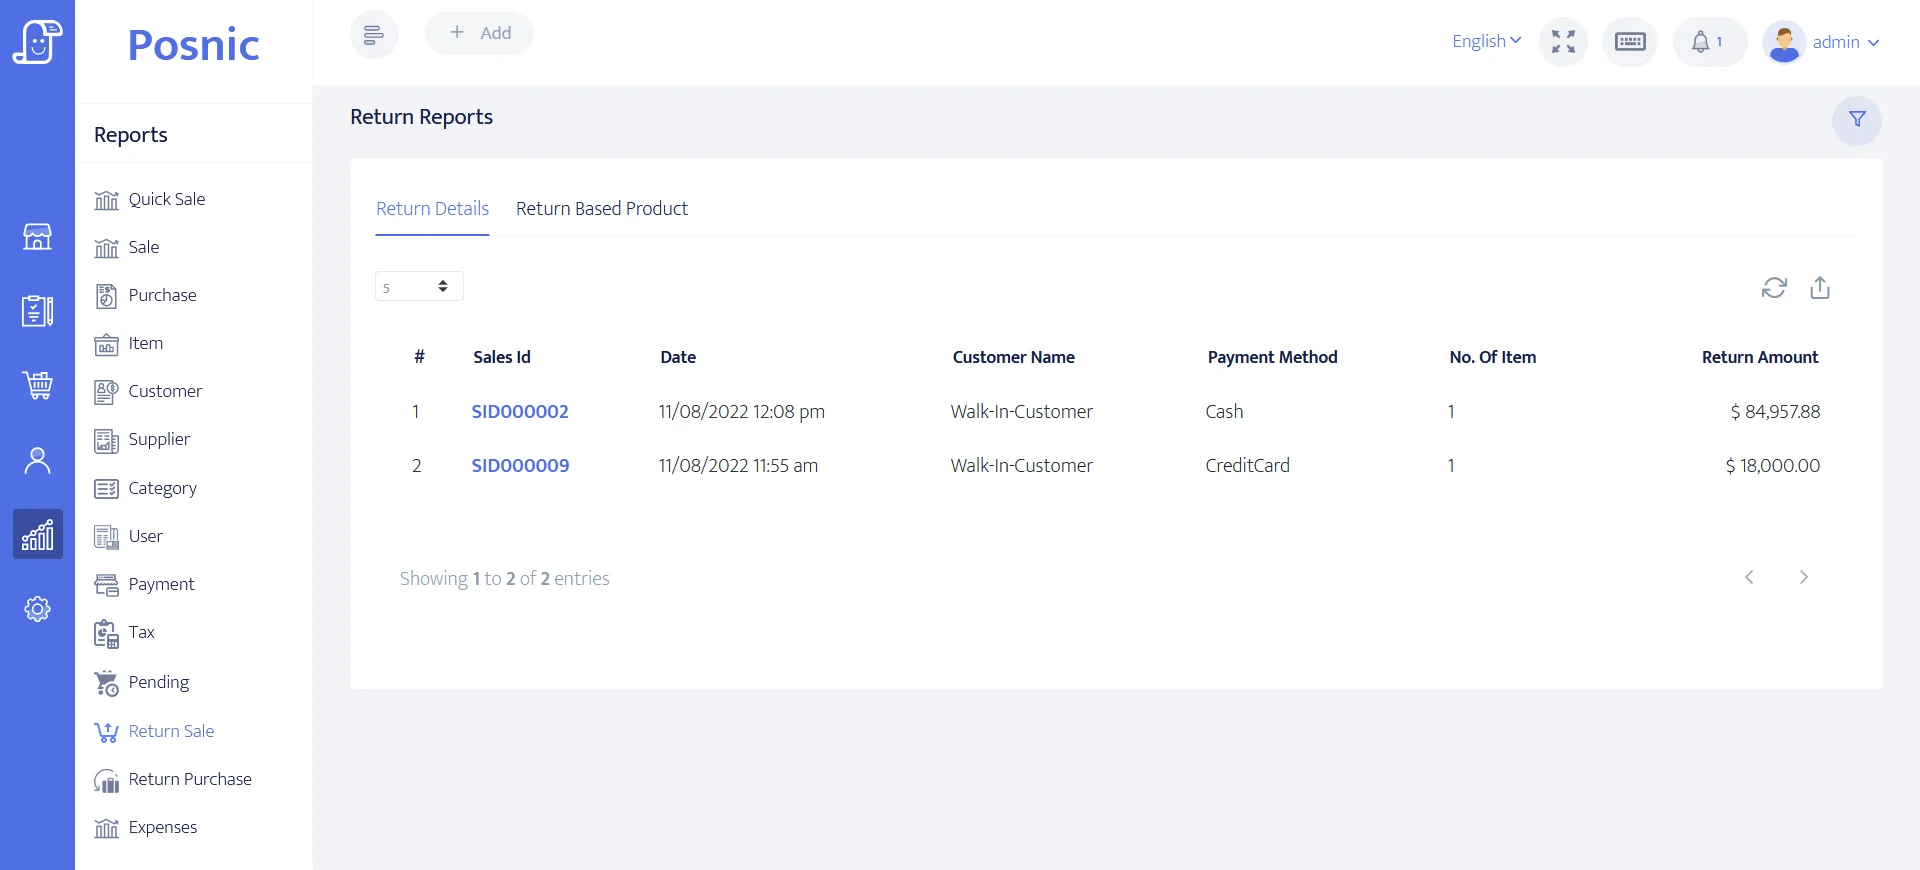
- Return Sale : In this return sale section, you can find all information about returned goods, customers, suppliers, etc.
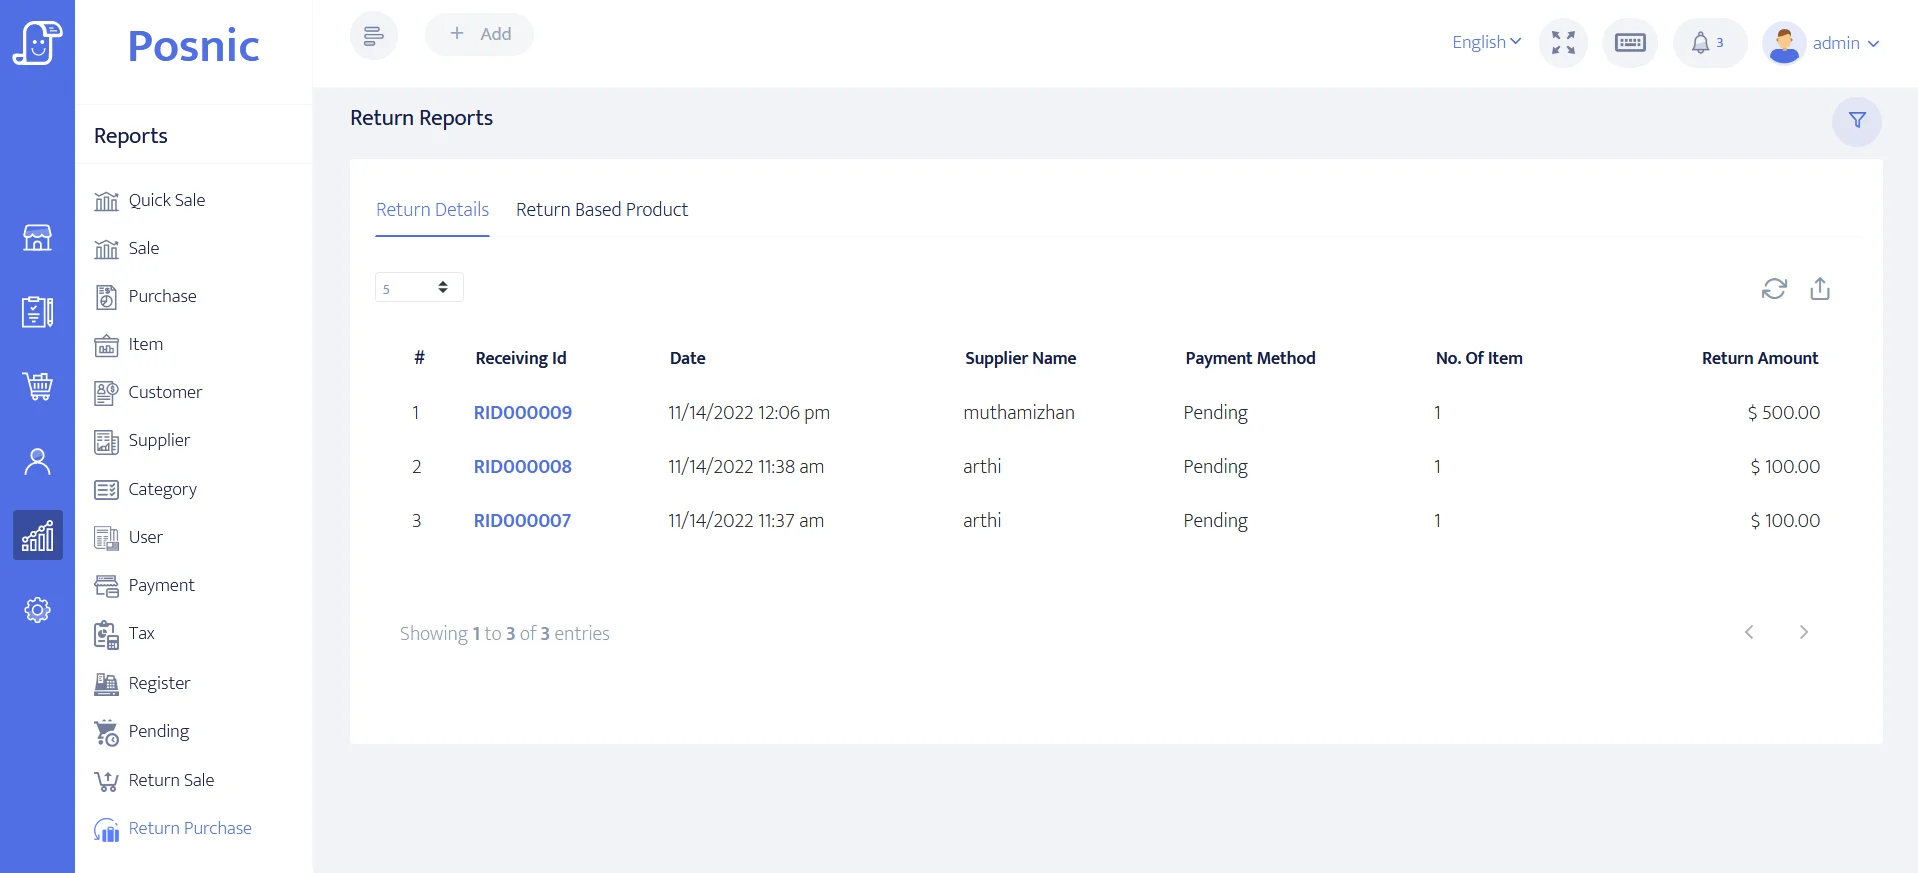
- Return Purchase : In this section, you will find comprehensive information about returns, including details about returned goods, payment methods, and suppliers.
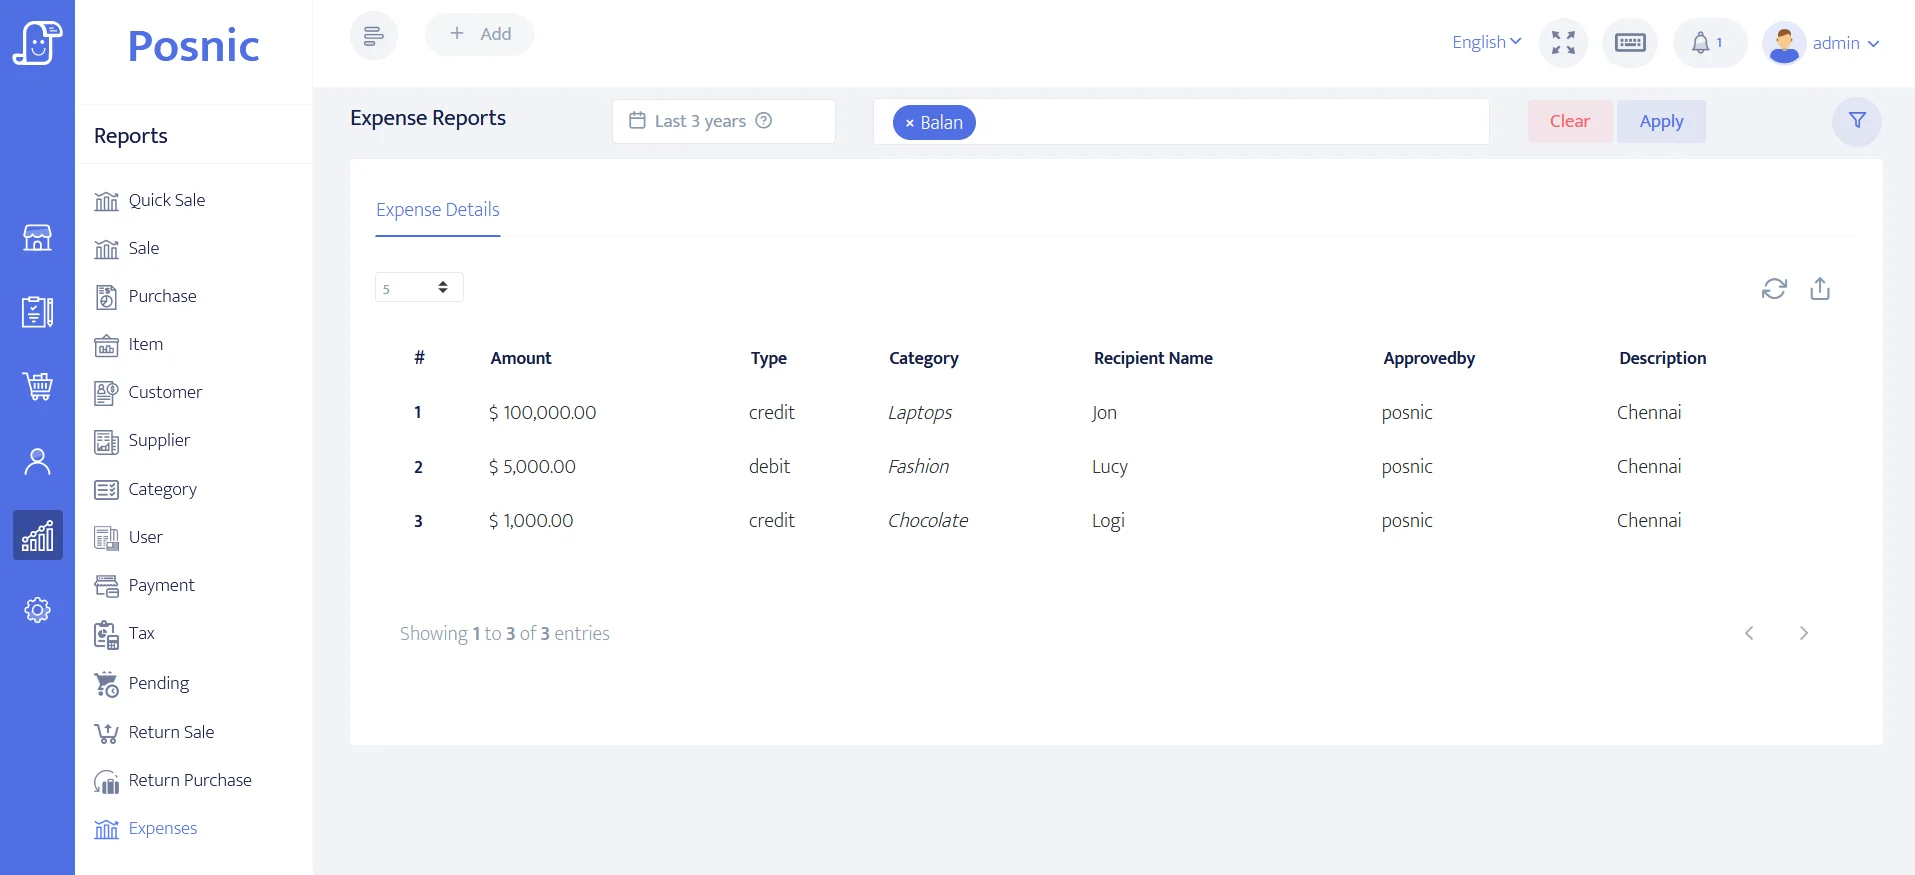
This section of the expense report will display other sales-related expenses with complete details.
Manage
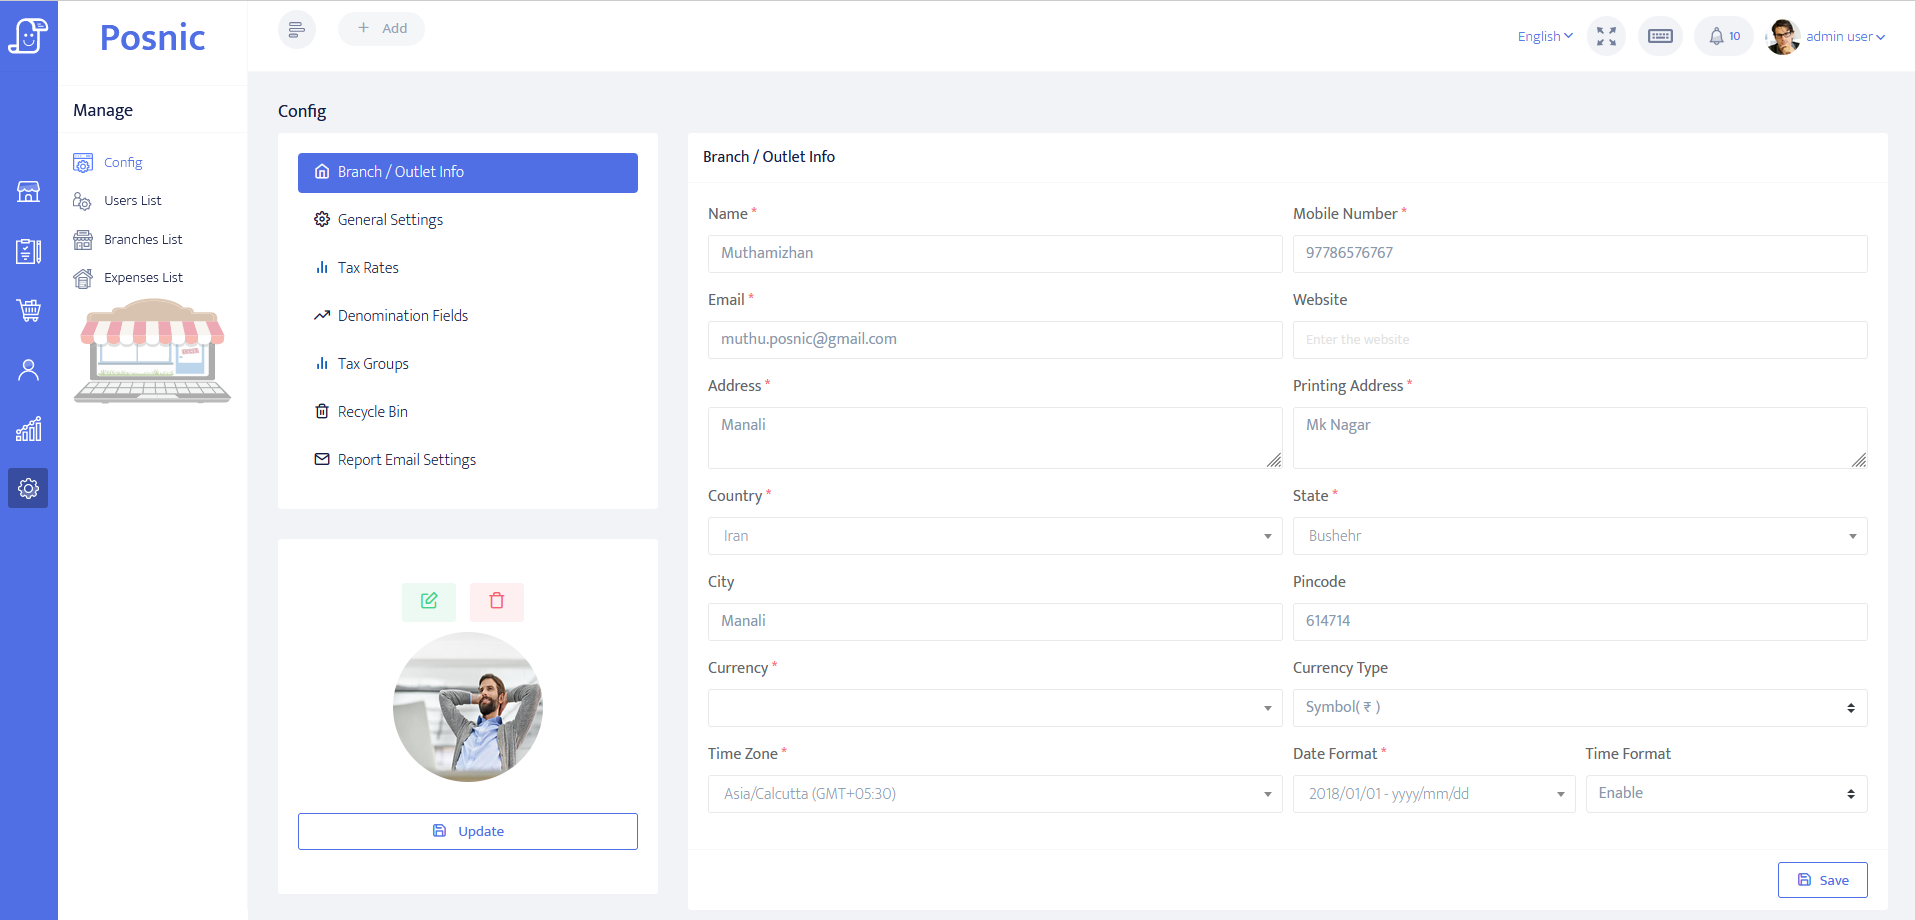
Branch / Outlet Info
You can add or update the personal branch detail like store name, store owner, telephone, mail, currency, place, country, state, etc...
You can change the date format.
You can update the country and state.
You can change the currency and time zone.
If you want to print, you must give the store address in the printing address.
General Setting
You can set the regular customer and supplier in a standard setting to default. It will save your time.
You can set the prefix to check the ID during sales and purchases.
You can set the discount amount or discount percentage process.
Exclusive tax and exclusive discount would be helpful here.
If your country is India, then you can enable the GST option.if not you can turn off the GST option.
Tax percentages will be set automatically according to the country.
There are so many features available here.
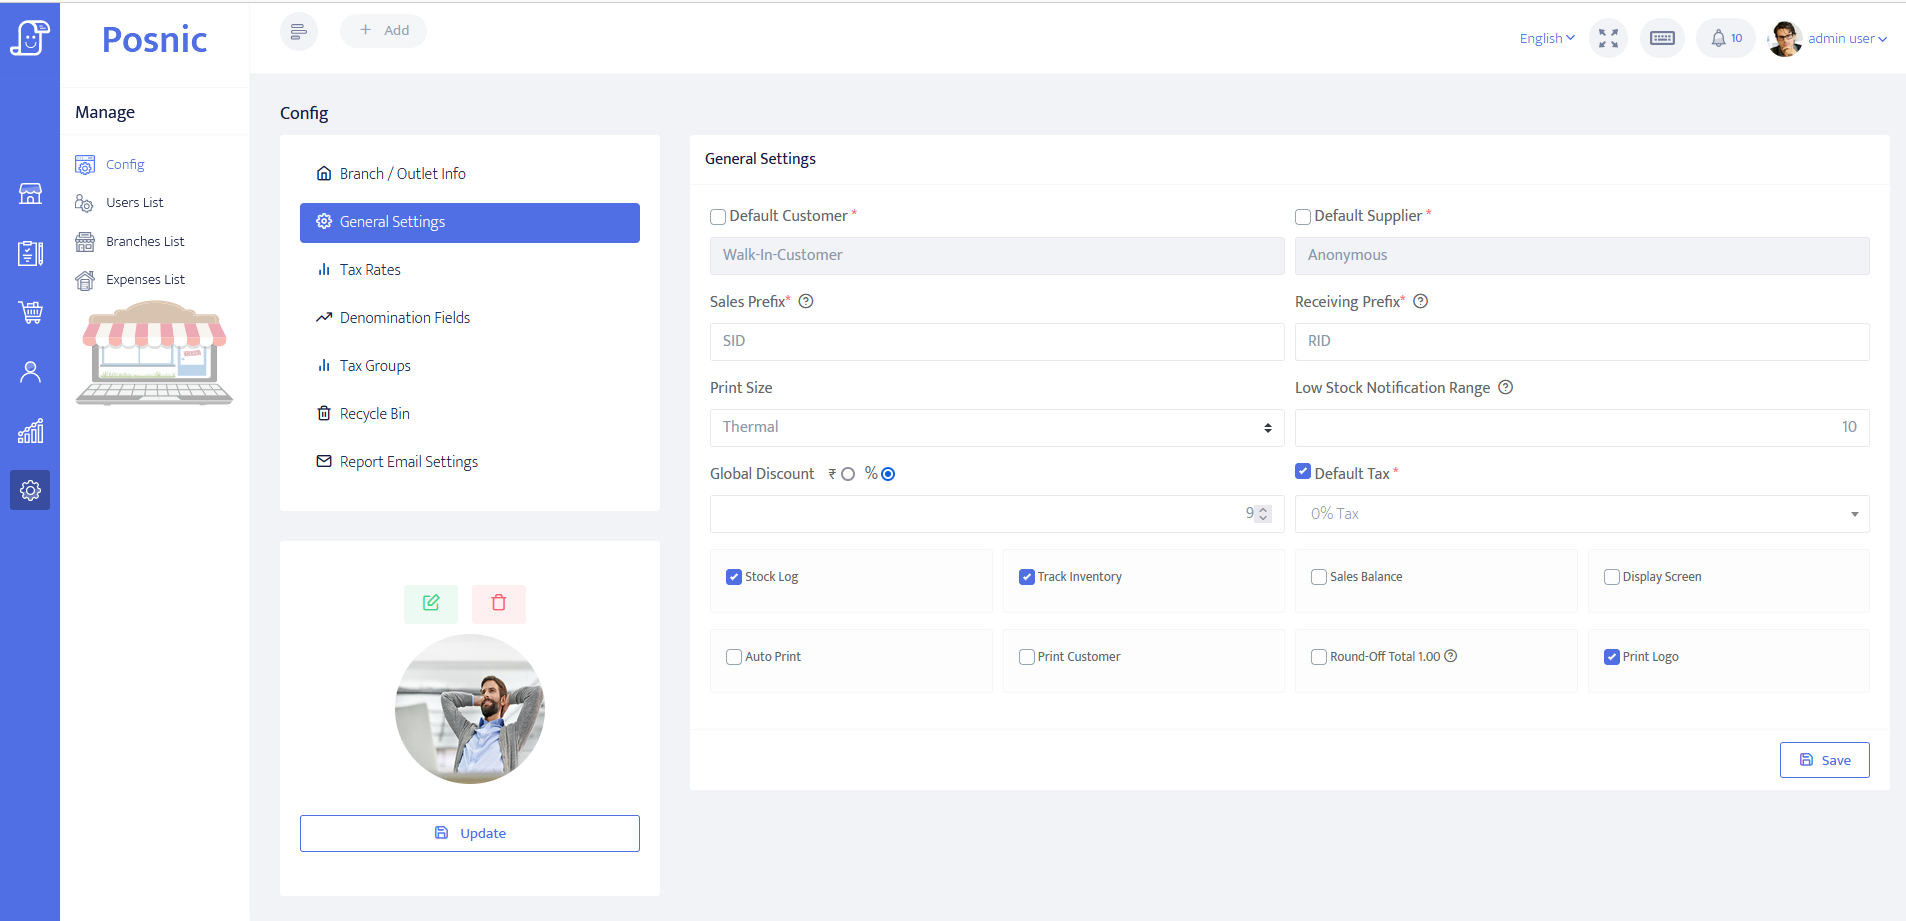
- Stock log :
If you select the stock log check box, the sales made are added to the sales Inventory. if no need of Sale inventory then leave the check box unselected.
- Track Inventory :
Selecting the track inventory check box it will track the available quantity of item to the inventory report.
- Sales Balance :
The sales balance display will show how much of the balance amount needs to be returned to the customer.
- Display Screen :
You can use the touch keyboard for sales using the display screen option. It will be easy to work.
- Auto Print :
This option will automatically take you to the print section after each sale.
- Print Customer :
Selecting the enable or disable option to print the customer details during sales will be helpful.
- Round Off Totals :
It will be helpful to round off the total amount.
- Print Logo :
This option is helpful to post the branch logo on the sale print.
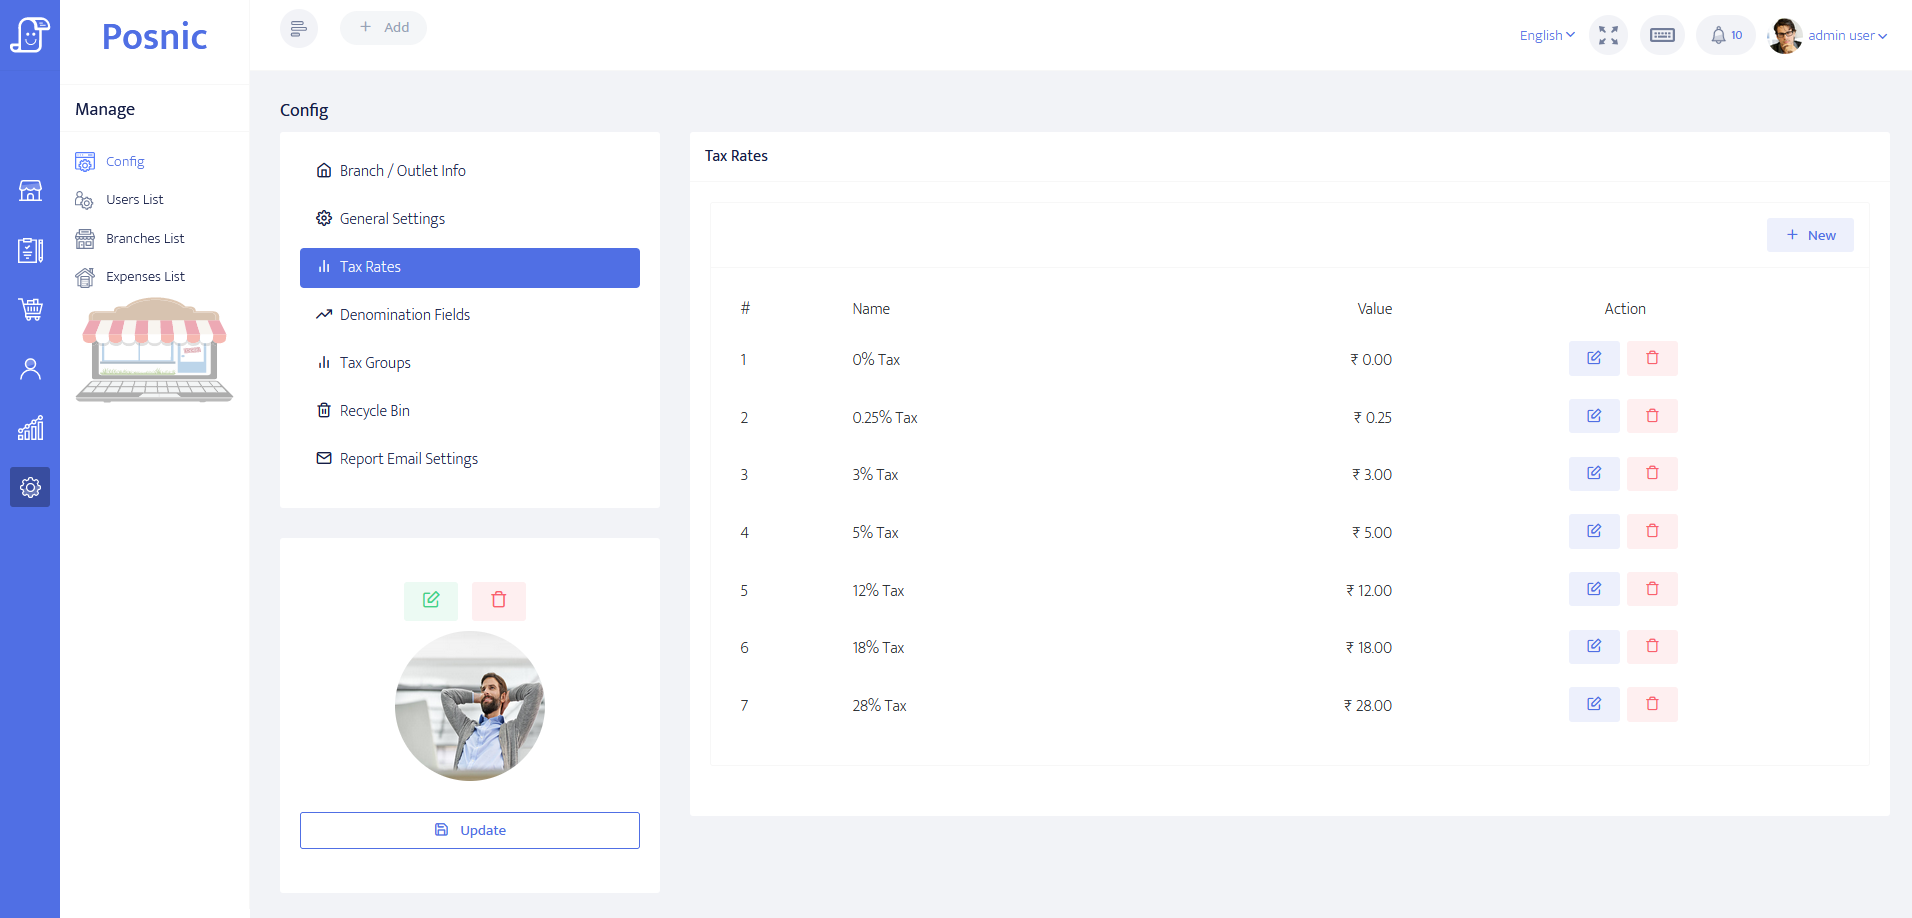
Tax Rates
You can add the tax rate option. At the same time, you can edit or delete the options.The common settings will list the tax rate option.
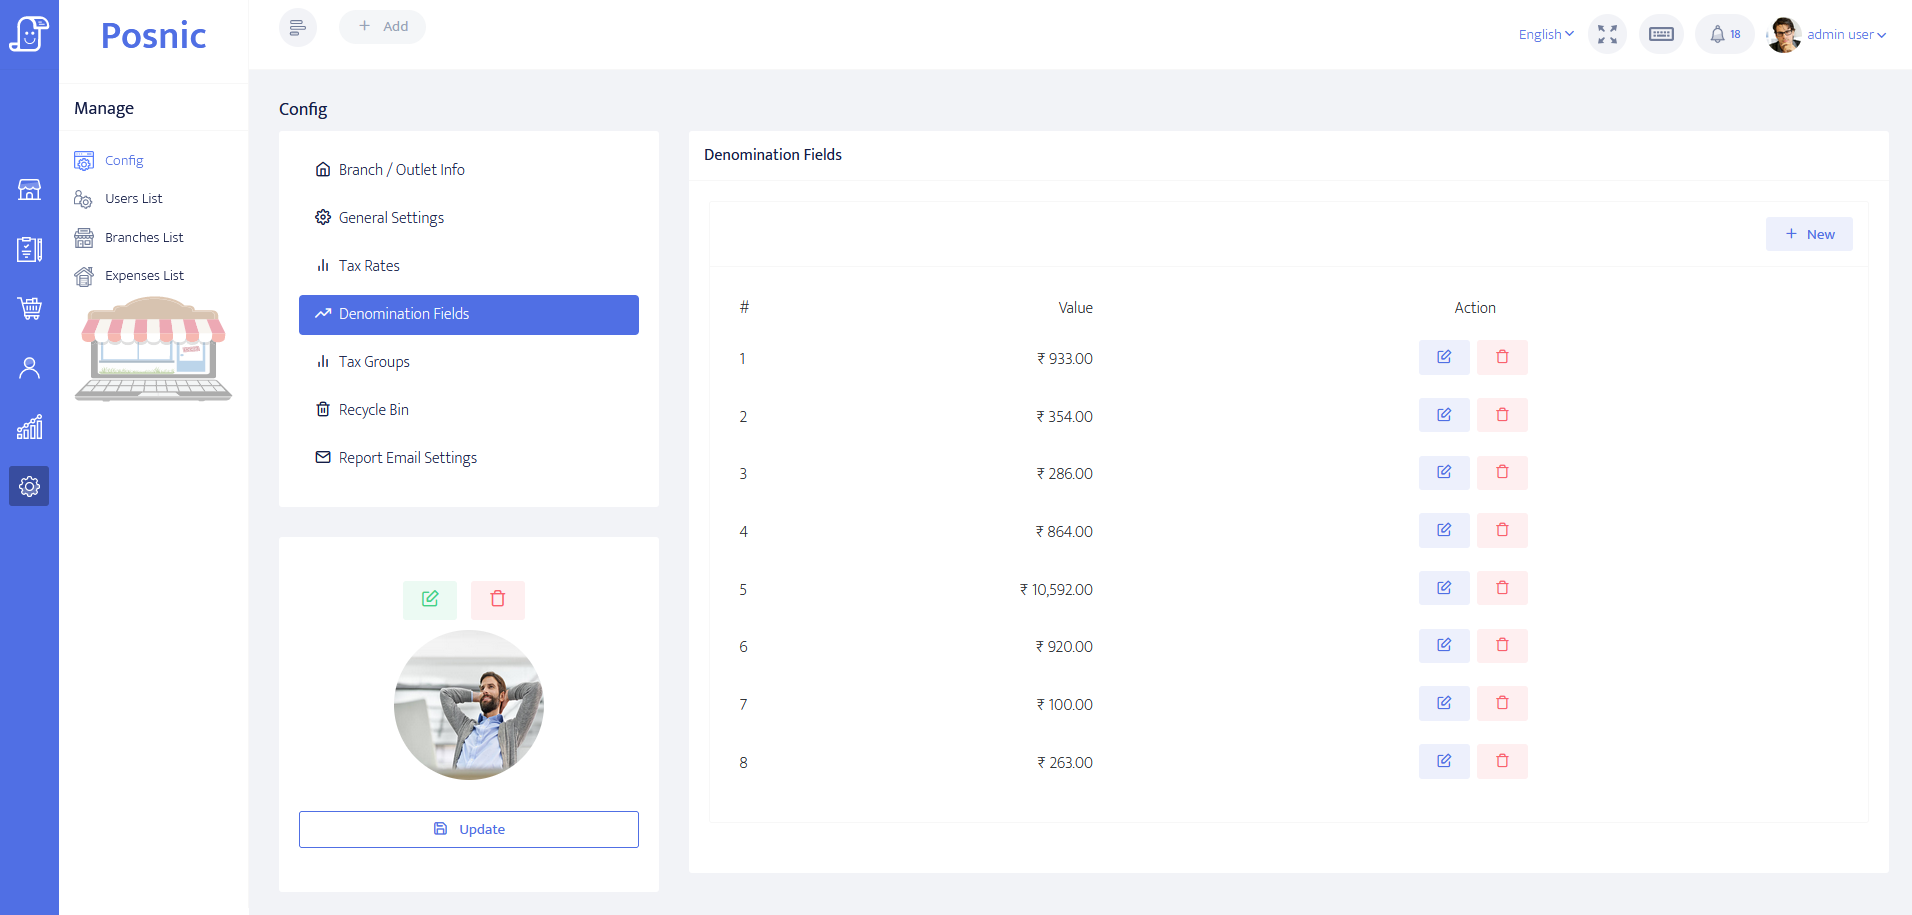
Denomination Fields
Utilize this segmentation field for the purpose of segmenting the sales transaction.
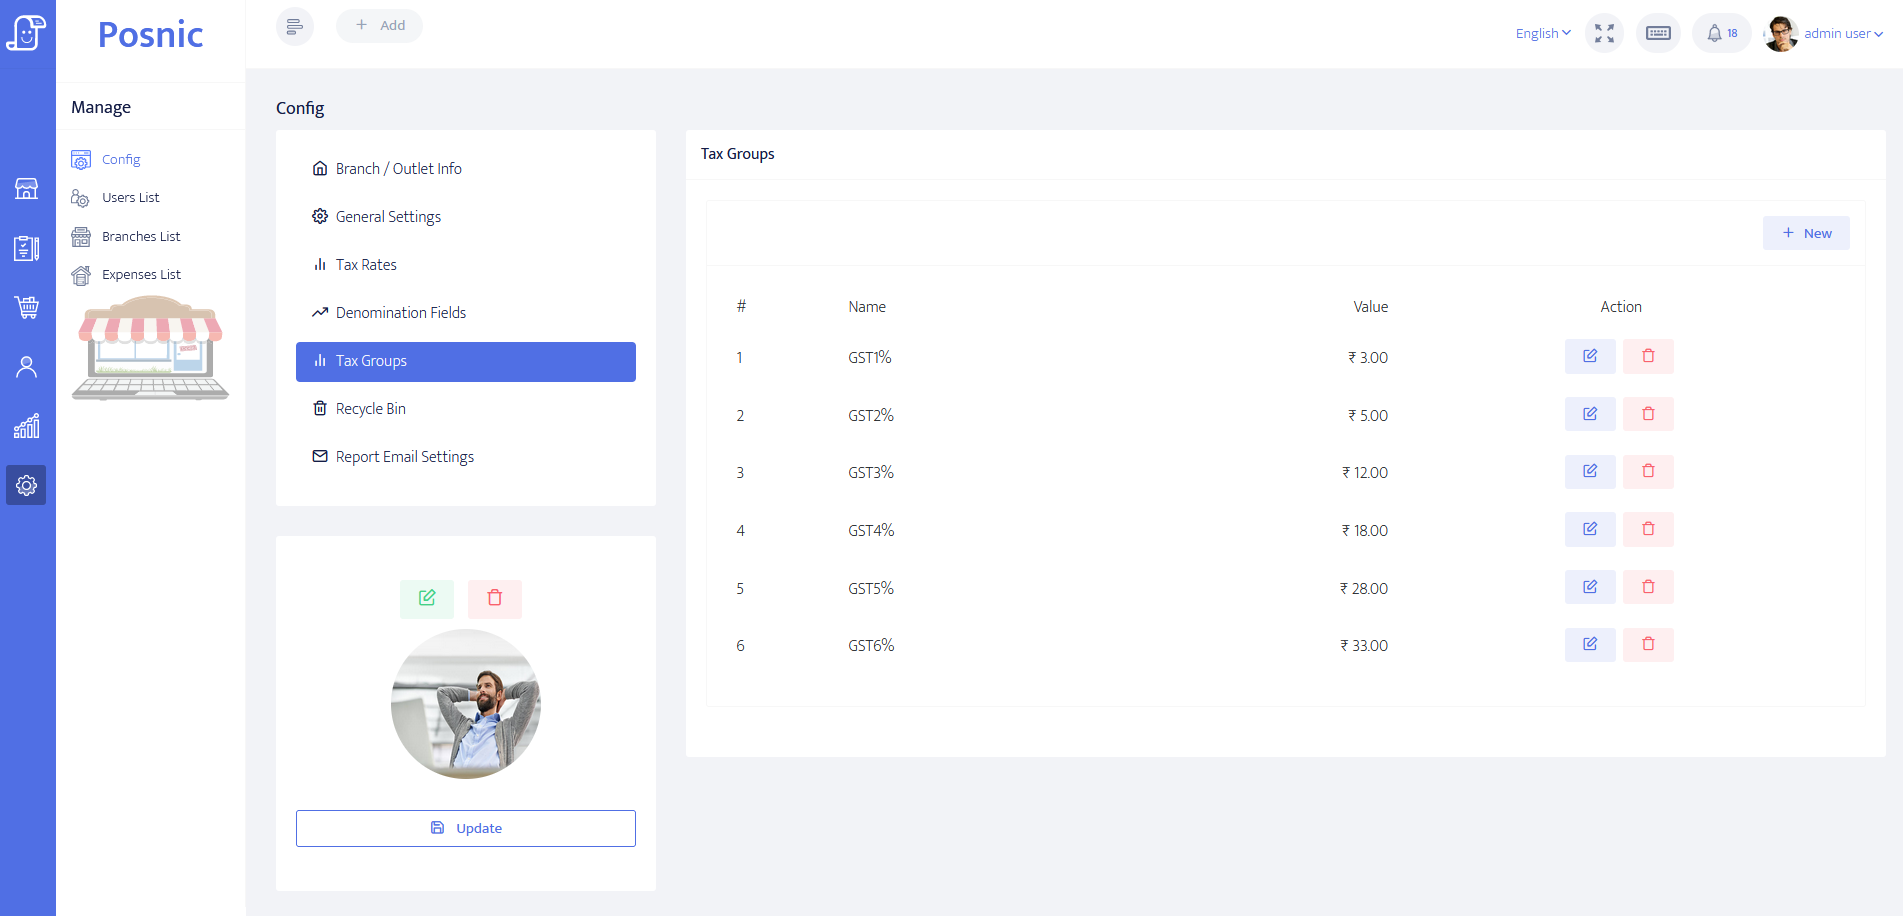
Tax Groups
You can create tax groups to collect multiple sets of taxes under a single collection of taxes. This option is available under standard settings.
Recycle Bin
If you delete sales, Purchases, Expenses, Categories, Users, Branches, Customers, Suppliers, Items, and Inventory in your business, you can restore them as single or bulk details.

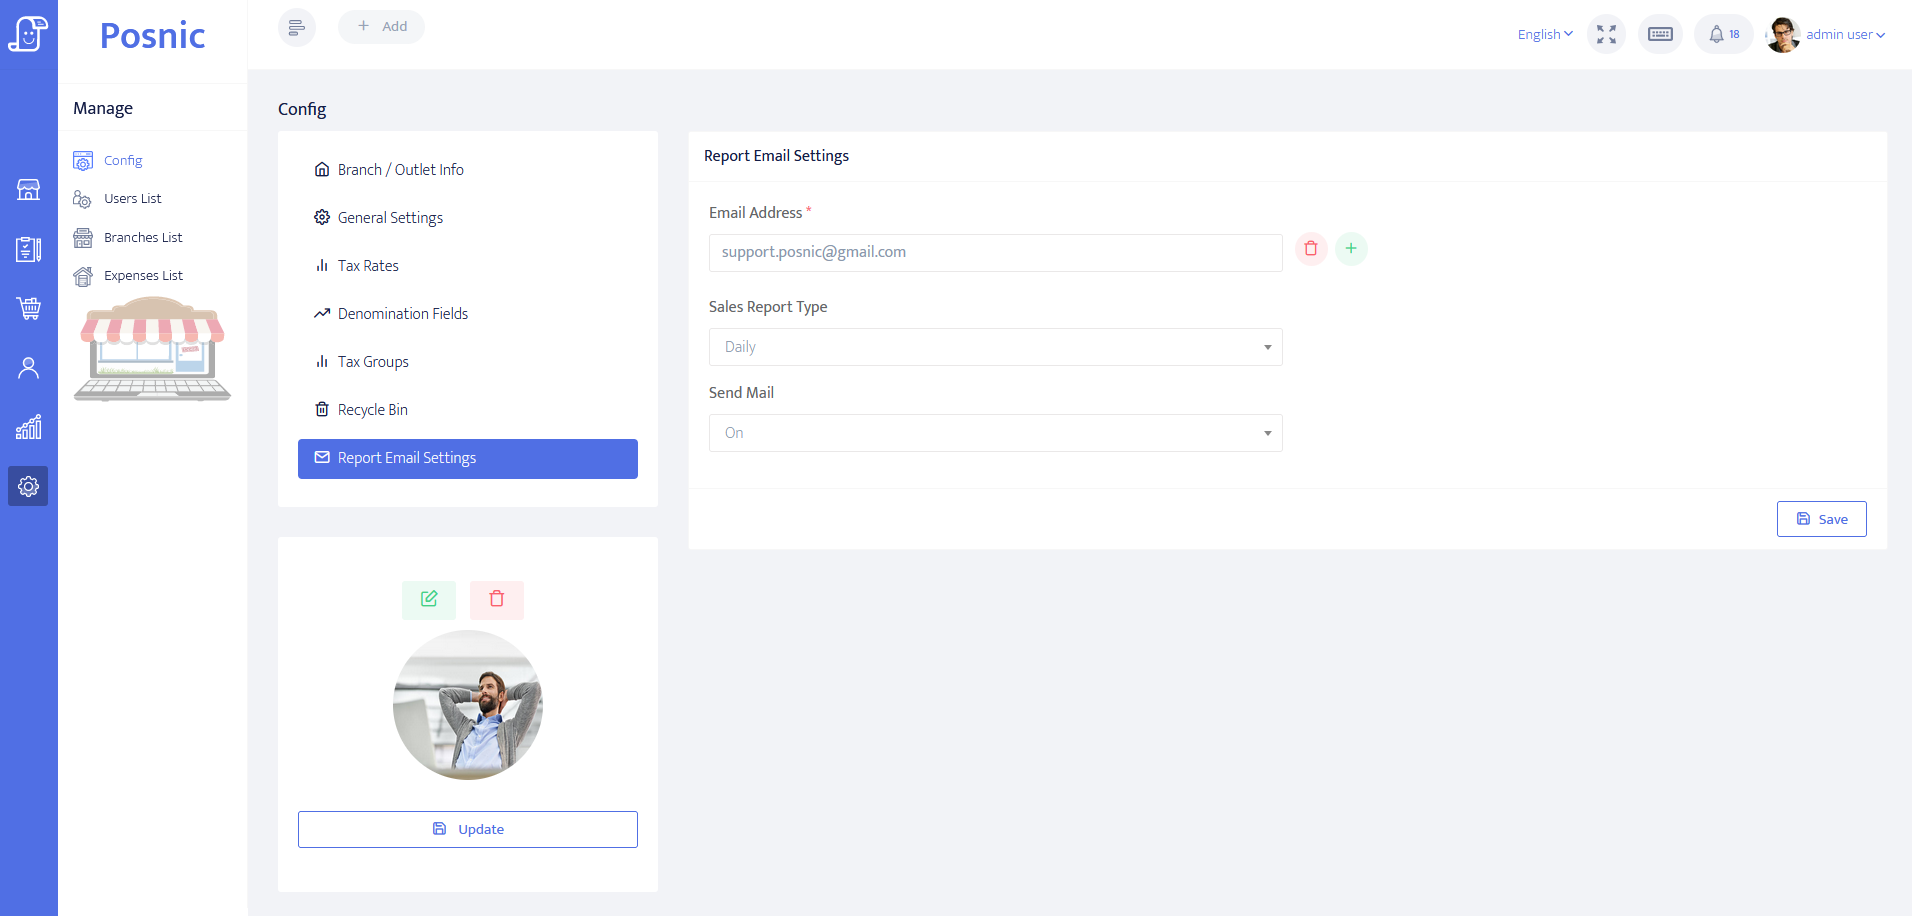
Email Settings
You can use this option to receive daily reports of your business activities via email, and automatically generate weekly, monthly, and yearly summaries.
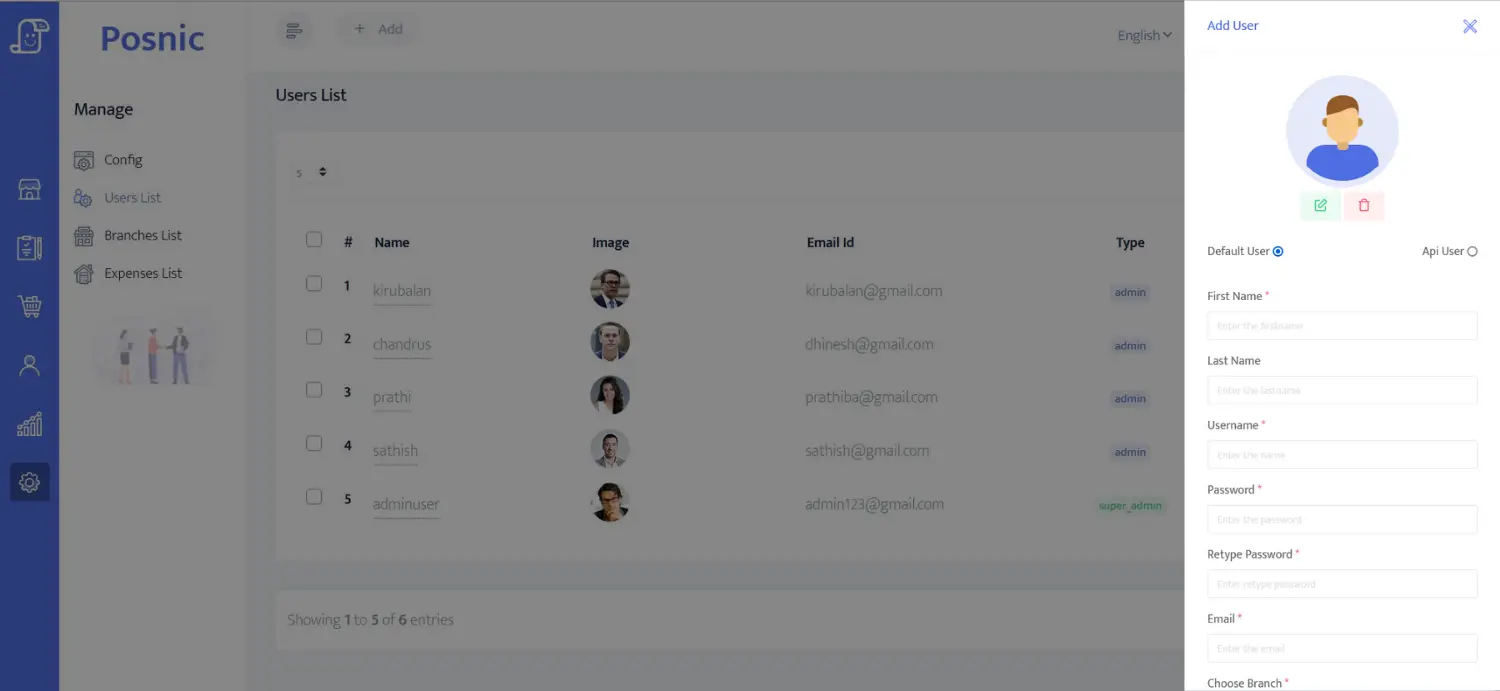
- Add page : To add a new user, click the New button in the user list and then enter the user details. The same username and mail id willnot be accepted.
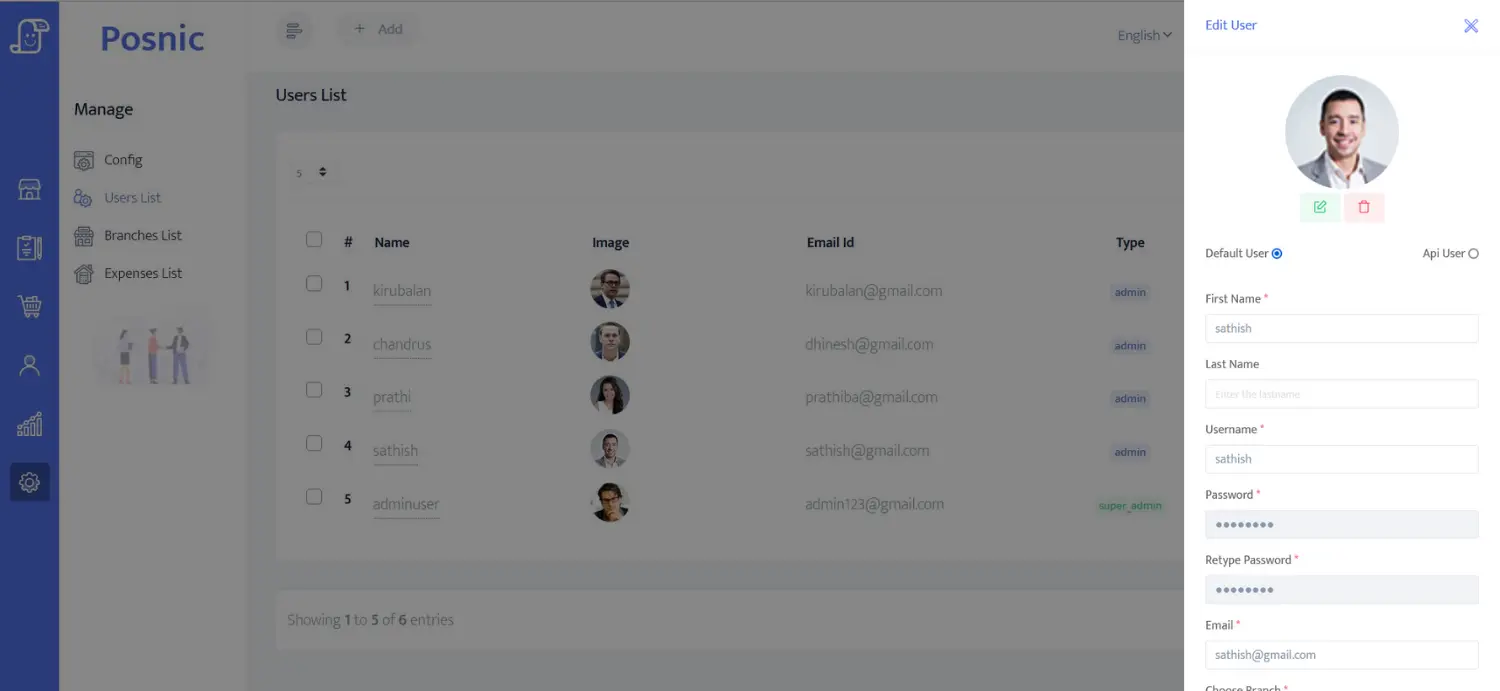
- Edit page : If you click the edit button in the user list, you can edit the user details after the edit user model is displayed. After editing click the update button.
- History : To view user details, click the manage bar on the left and select the user history option. It can view, edit, access, and delete user details.
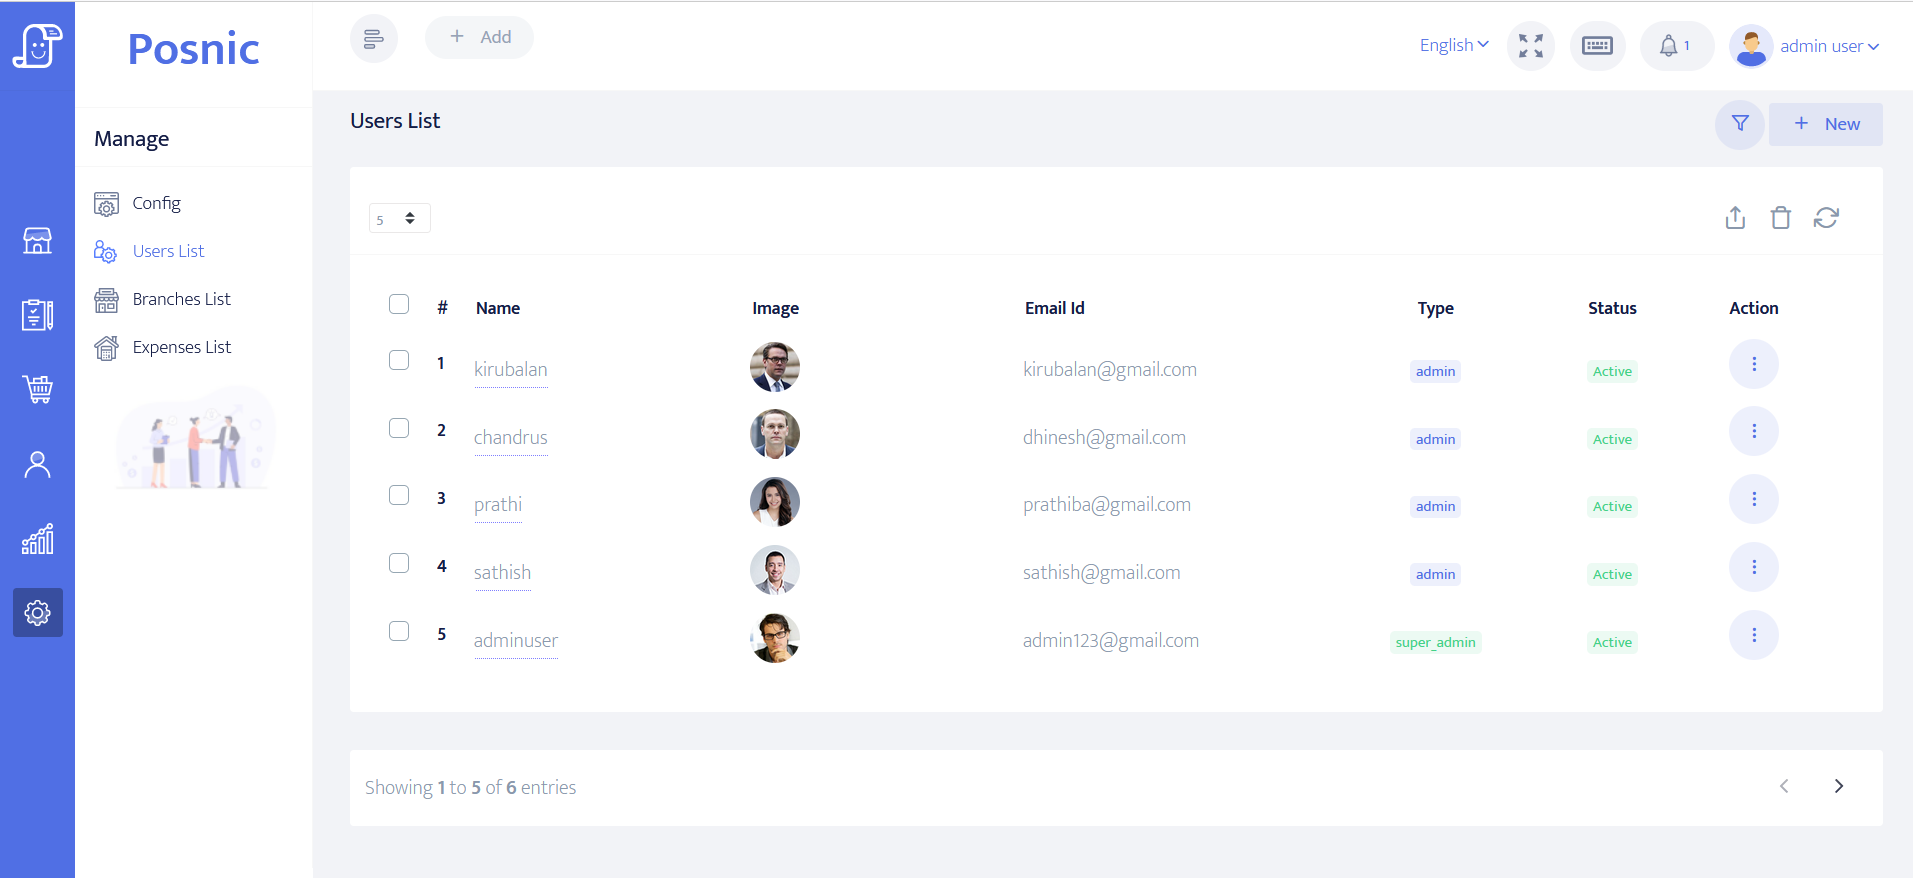
- Details : To select the view option, the user has to click on the opportunity and select the view button.
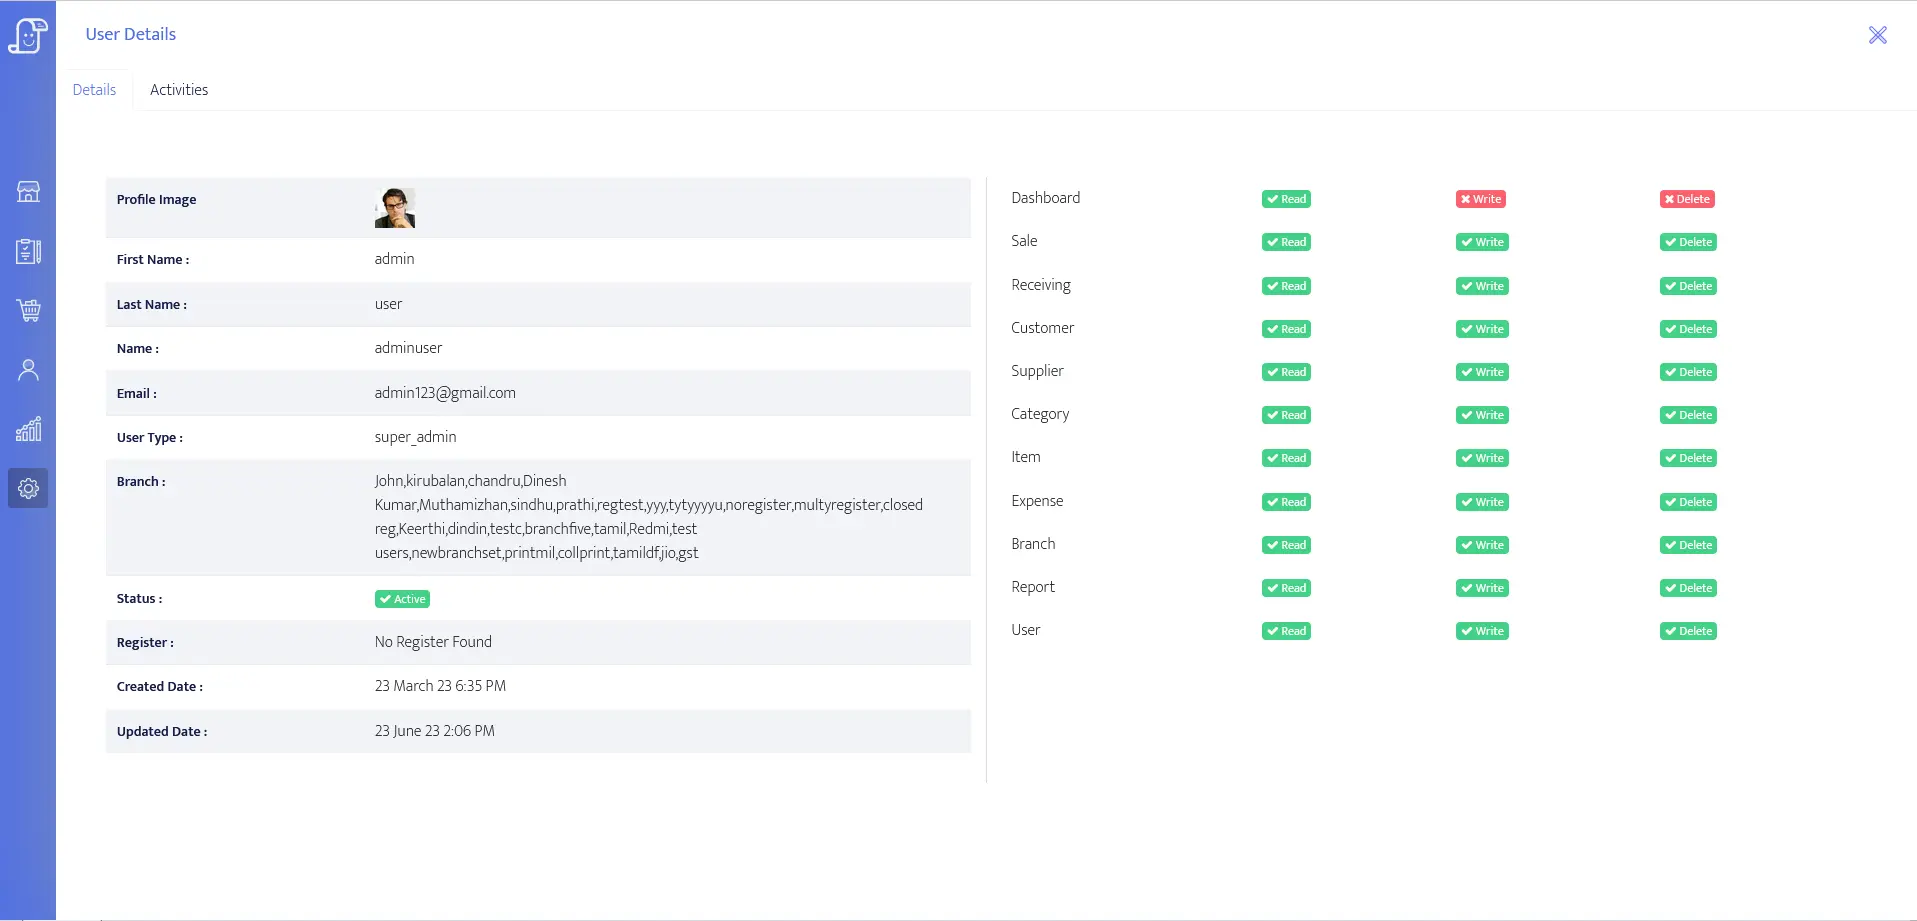
- Activities : This section displays the sales made by the user along with their details.

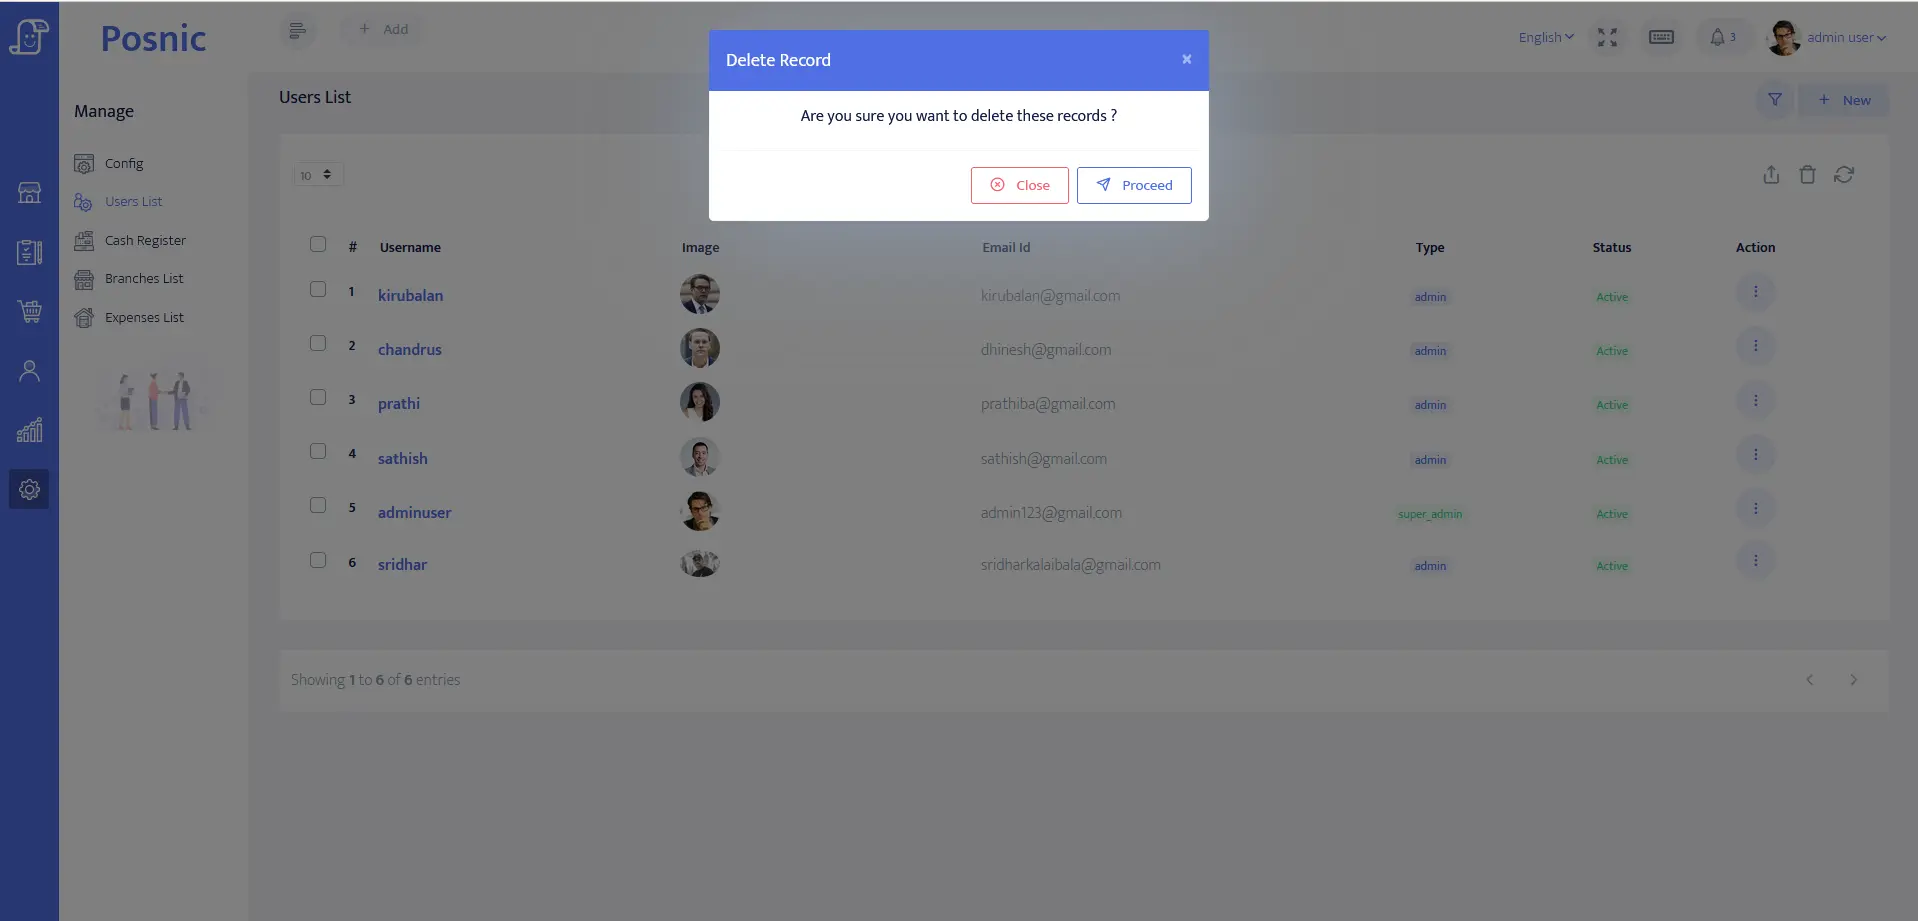
- Delete page : Deleting user details is possible by clicking the delete button in the user option.
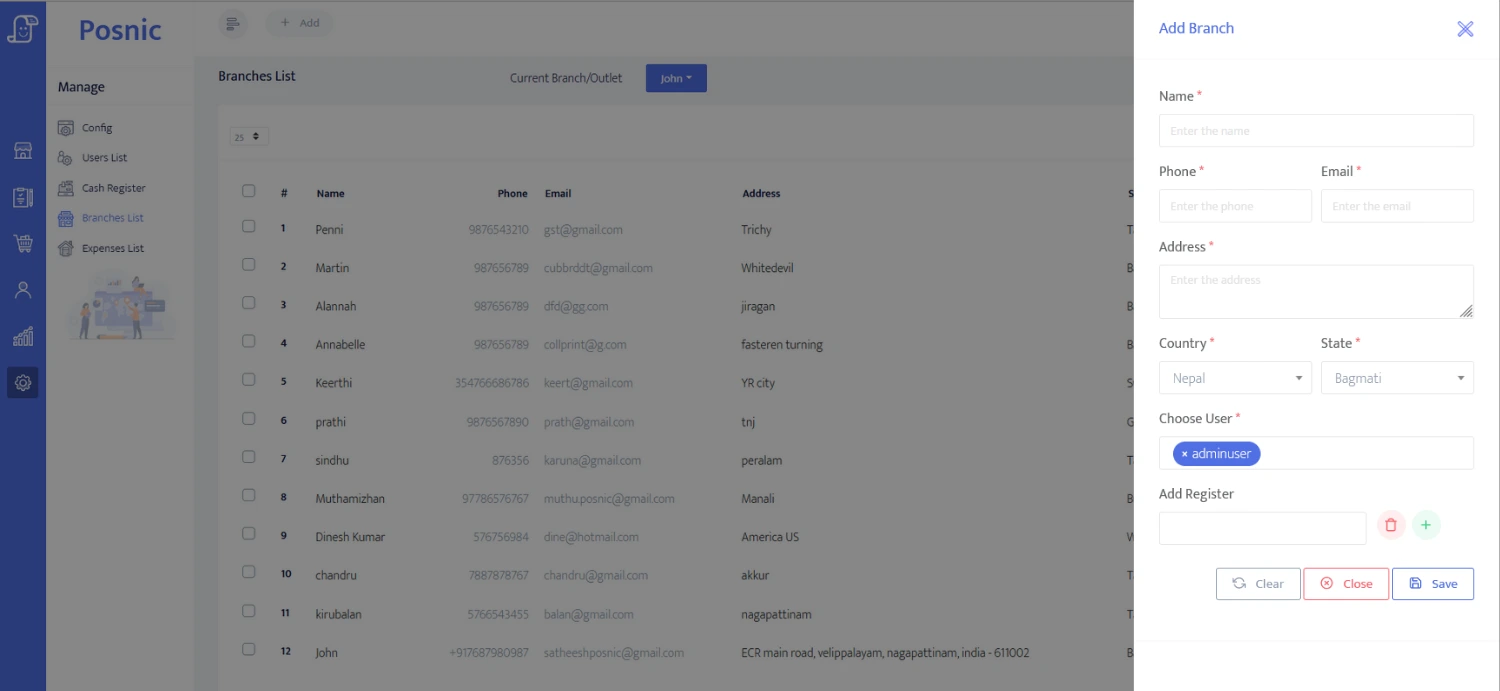
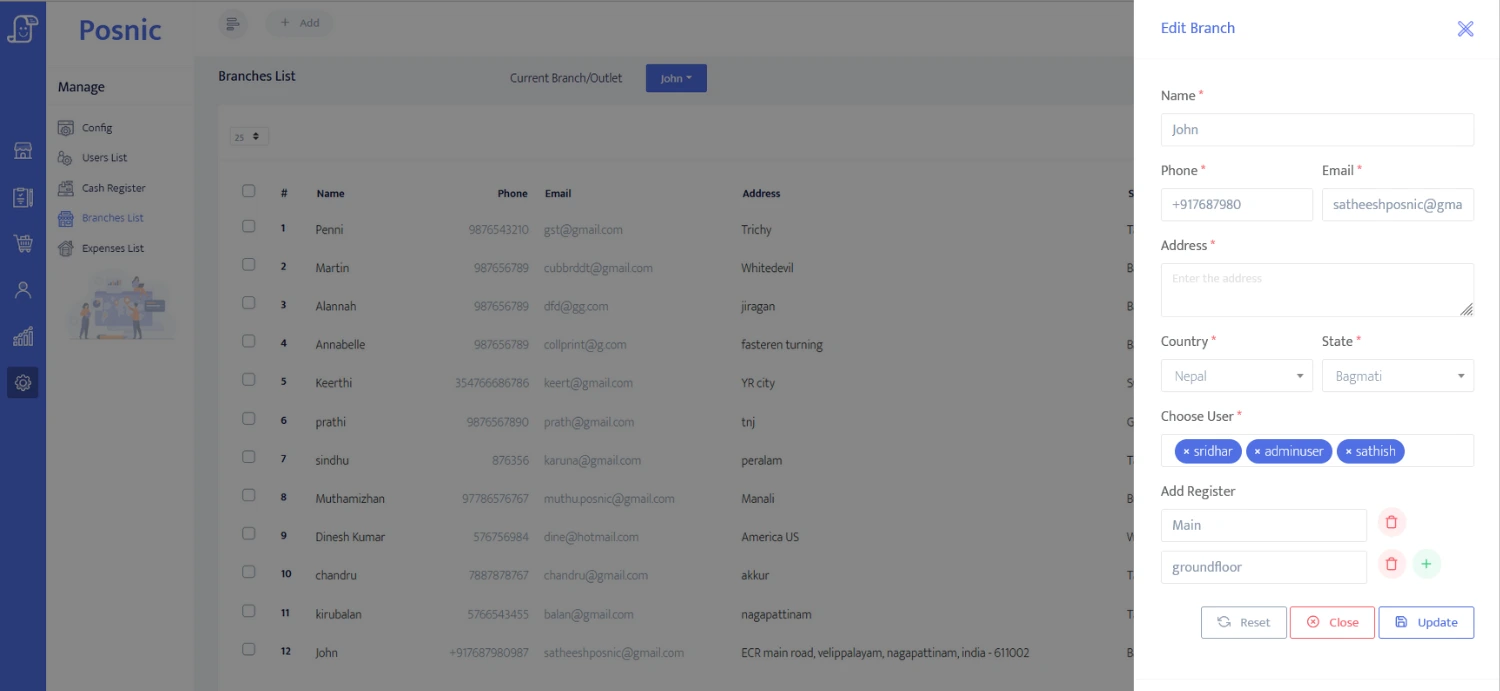
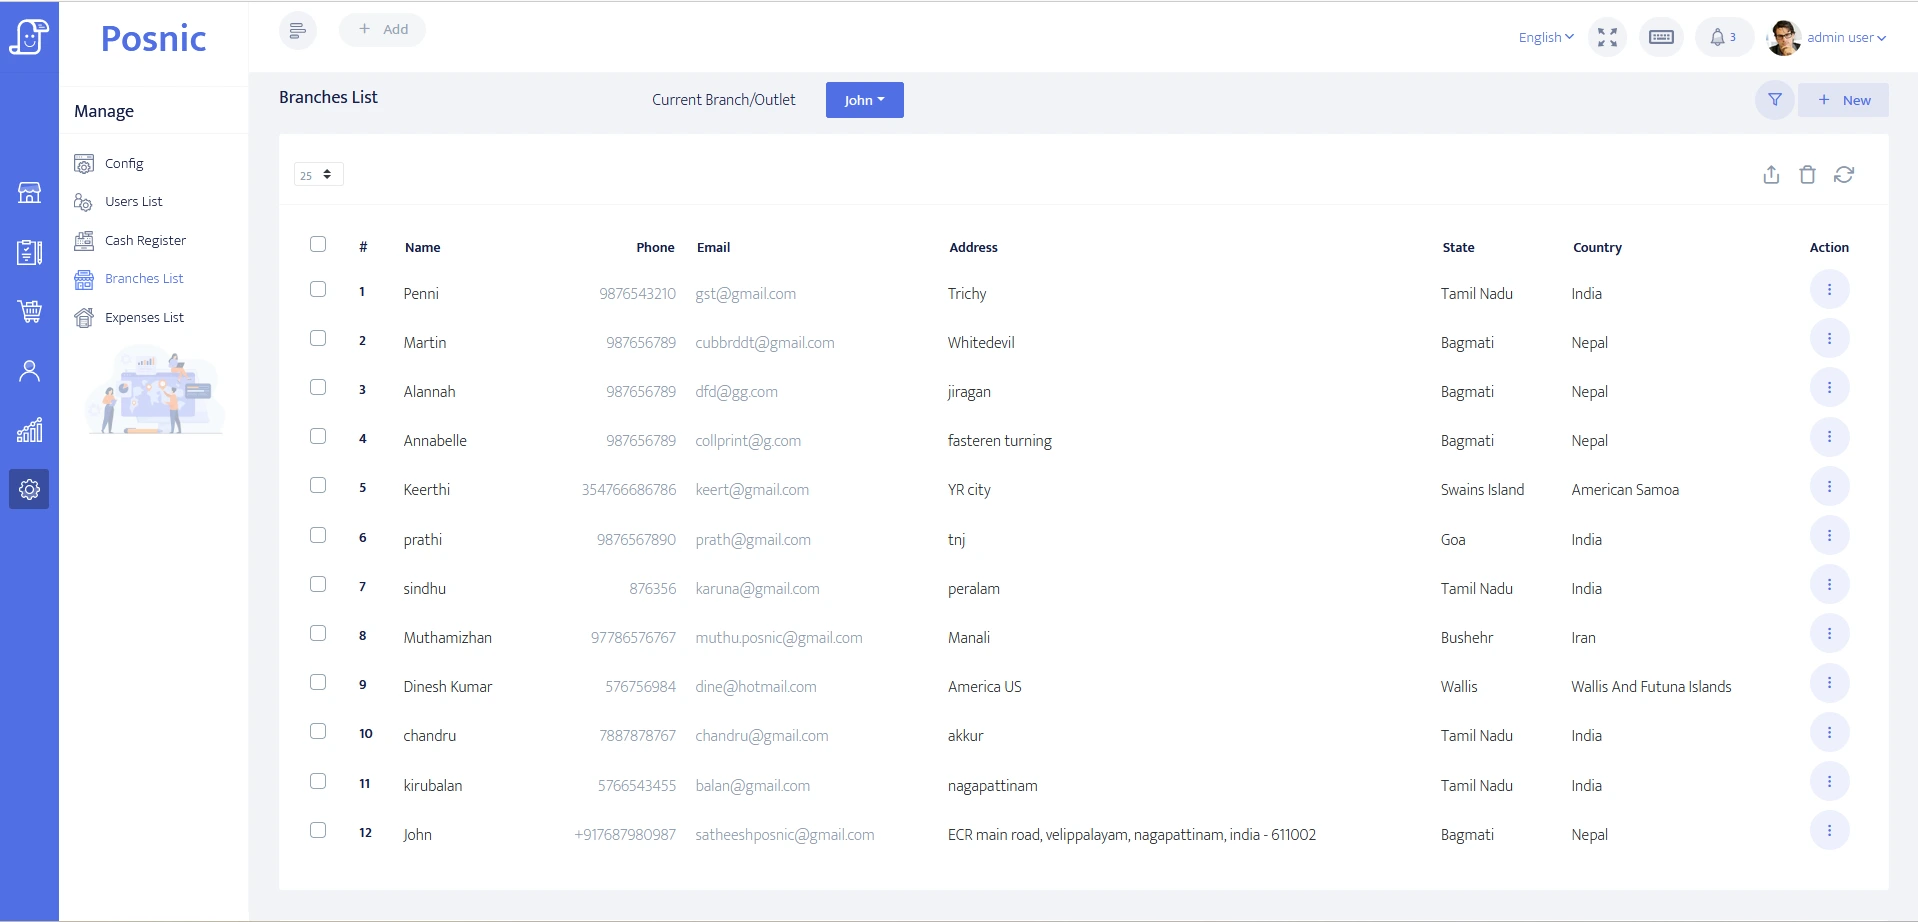
- Add page : If you want to create a new branch, click on the new button in the branch list, fill in details like branch id, name, phone, email, and address, and select customer and supplier city.
- Edit page : If you click the edit button in the branch option, you can edit branch details after the edit branch model is displayed. Finally, click the update button.
- Action : In the right side of the branch list has the view, edit and delete button in the option. To see the detailed view of the branch click on view button.
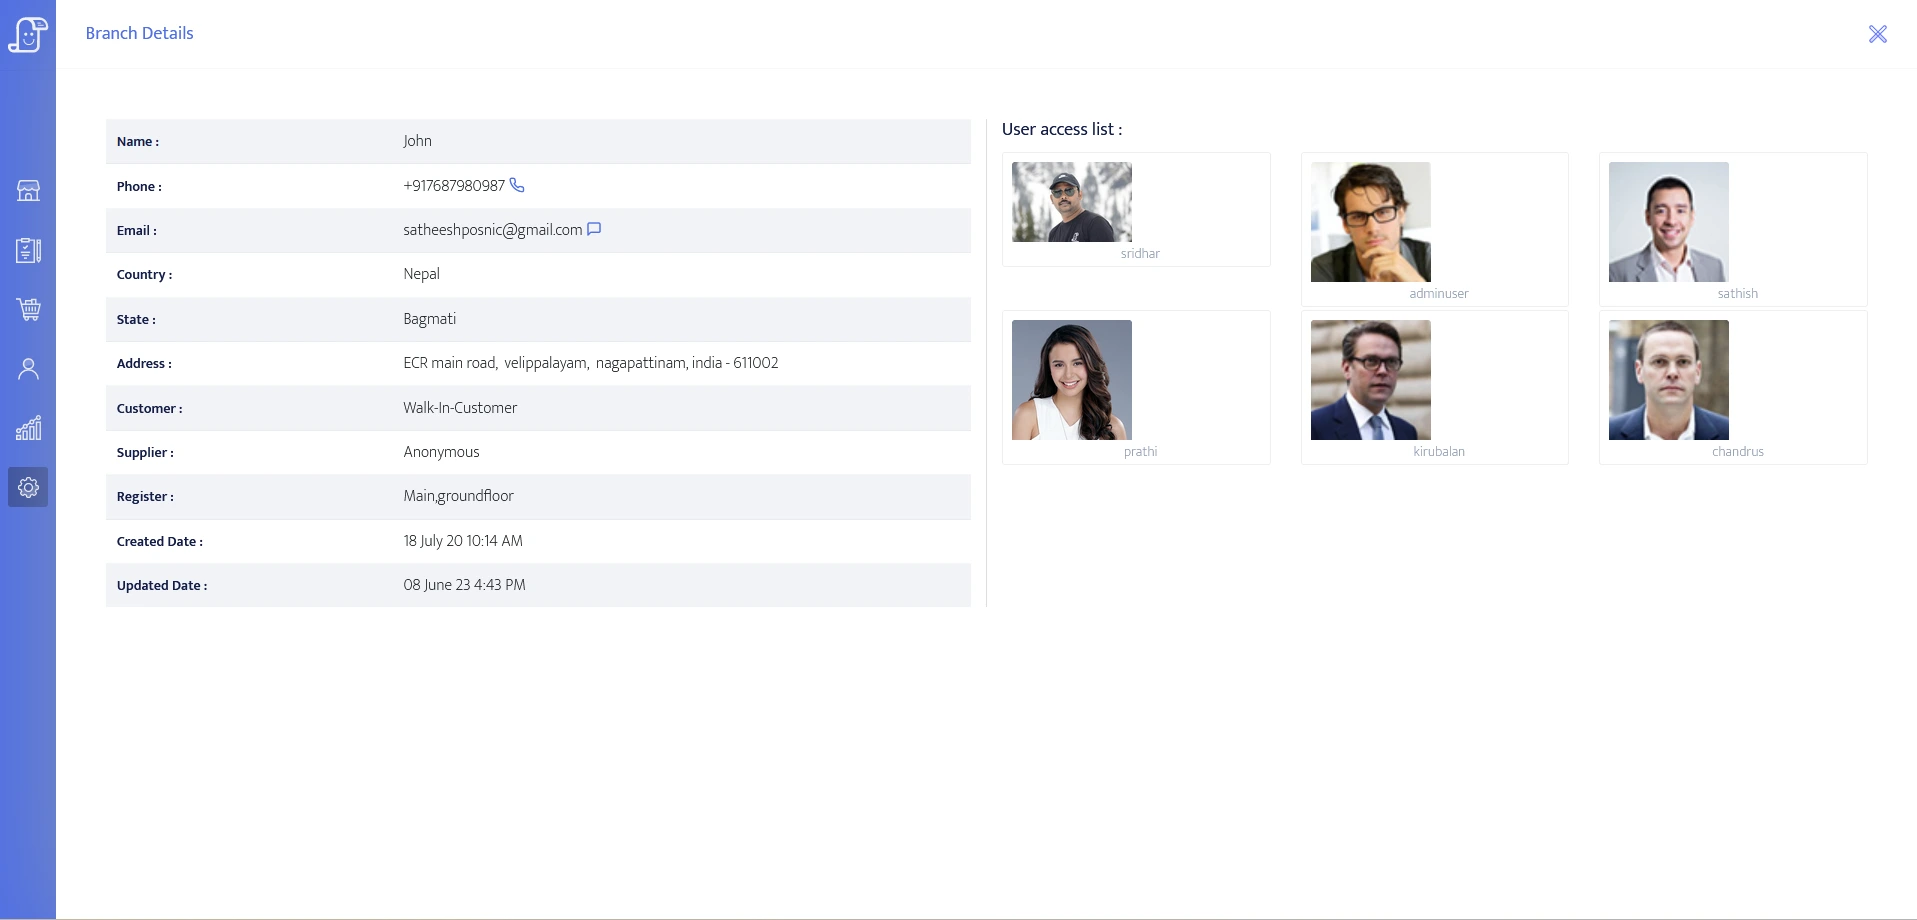
- Details : On clicking the view button, it displays the detailed view of the branch.
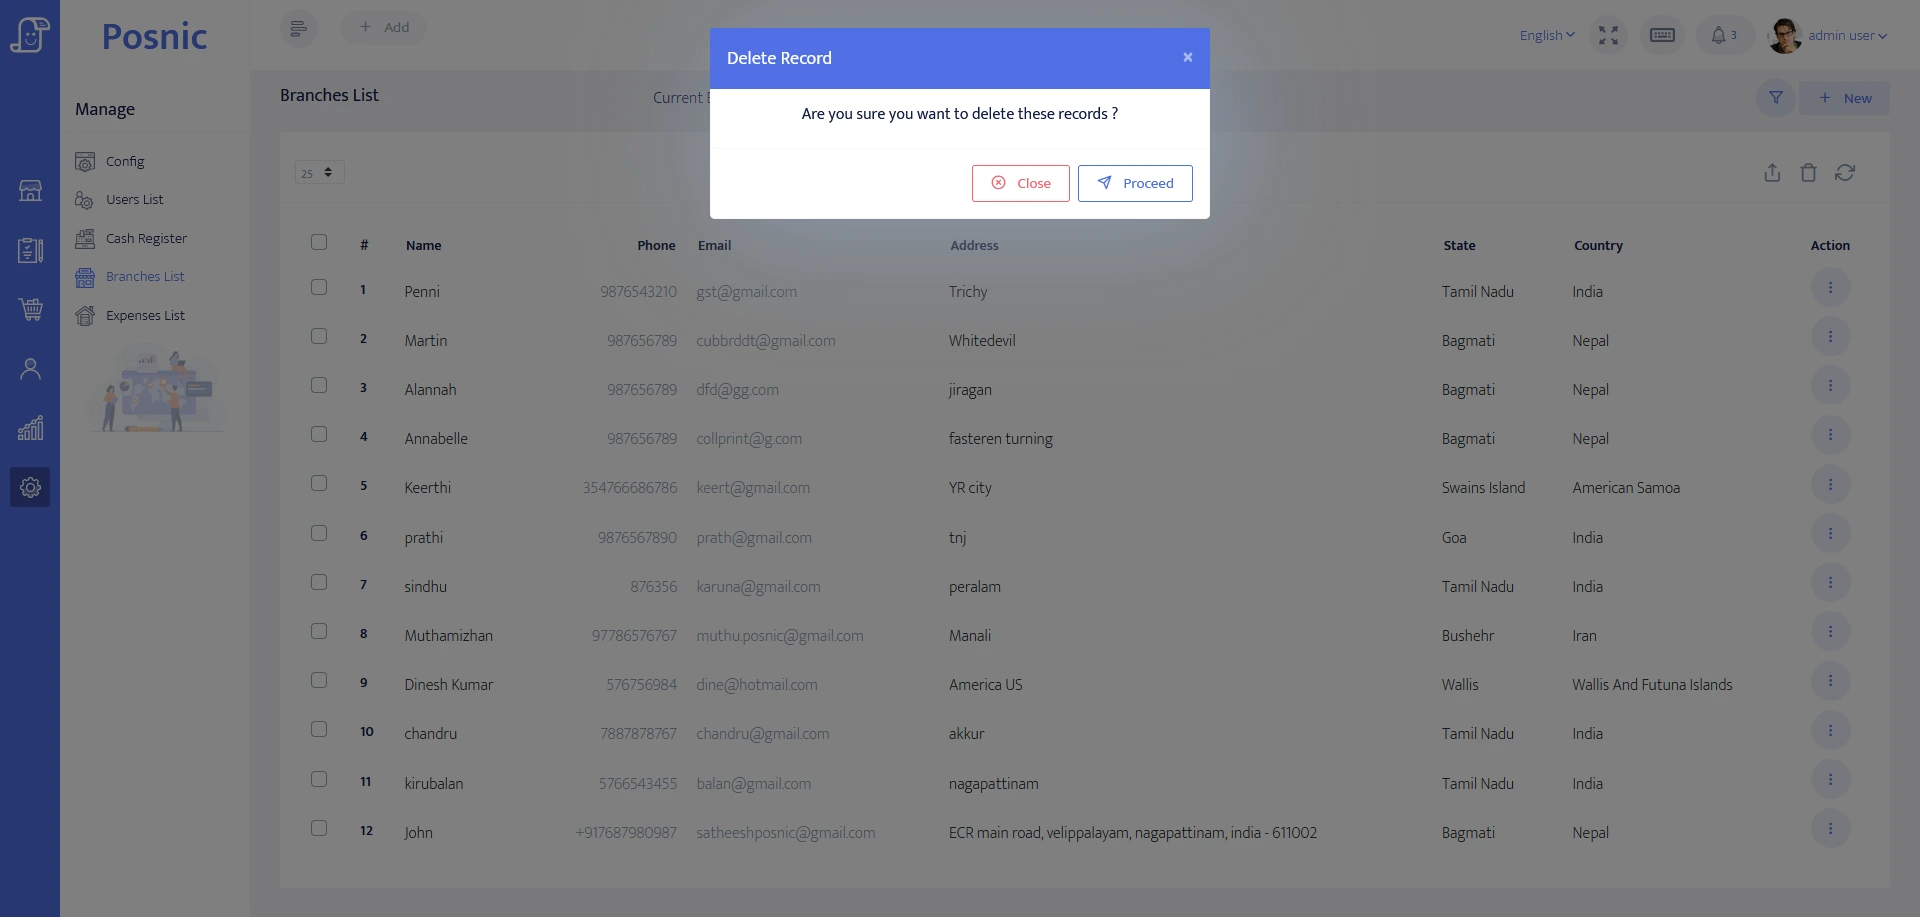
- Delete page : All the branch details will be deleted if you click the delete button in the branch option.
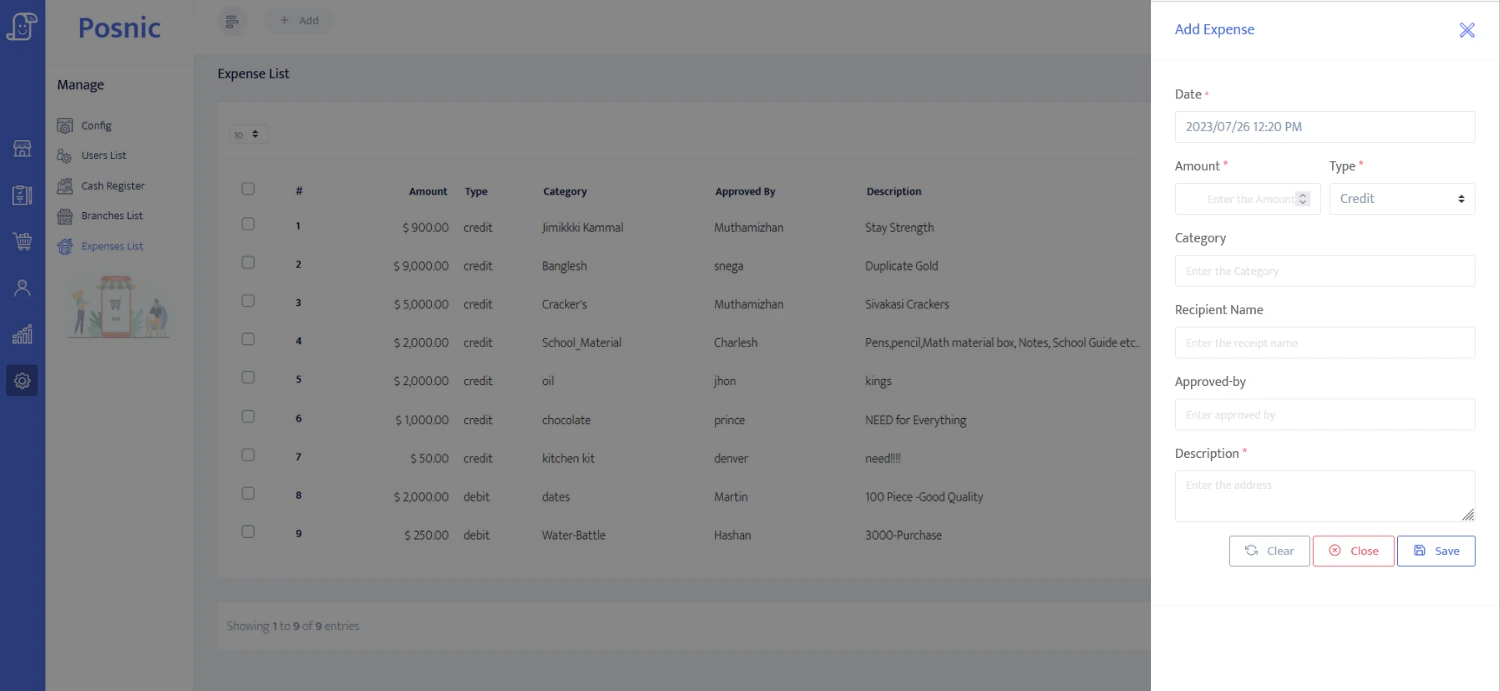
- Add page : If you want to create a new expense, you need to click on the new button in the expense history, enter the expense details, and then click the save button.
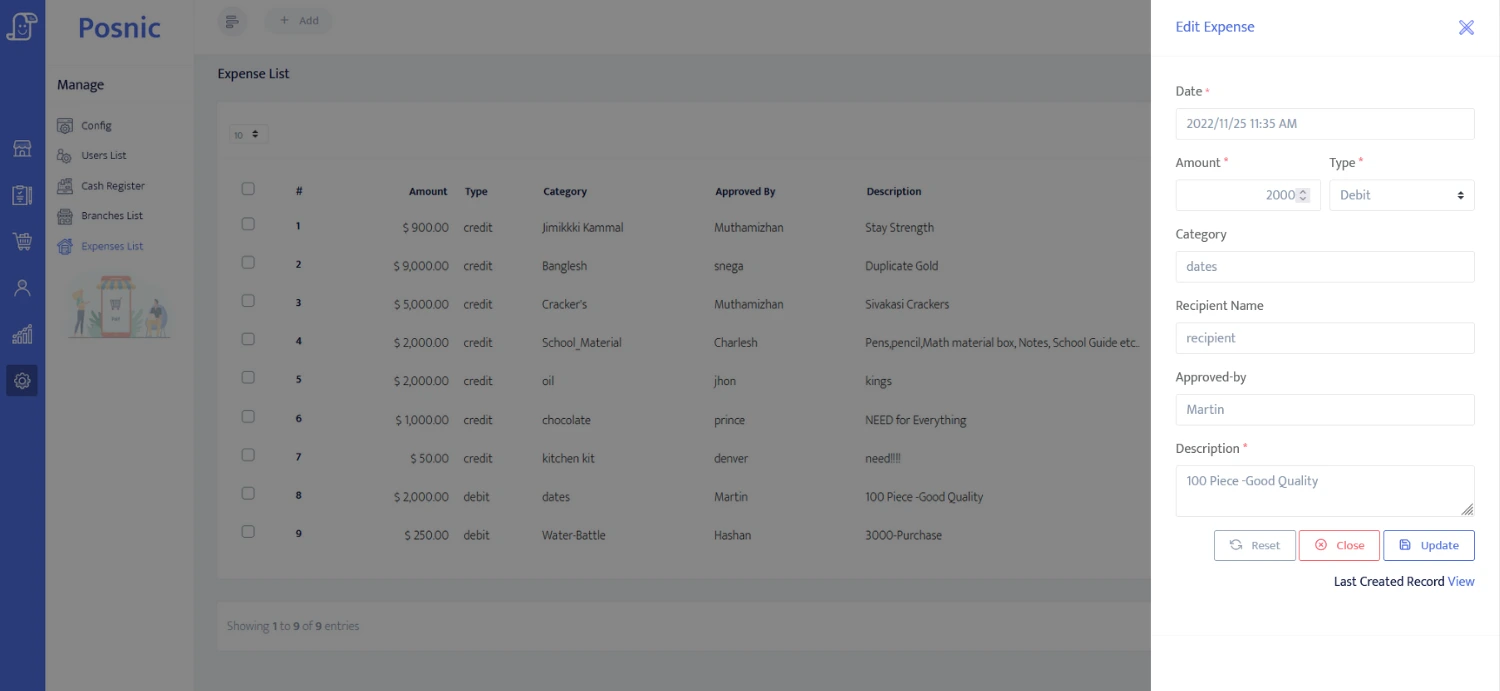
- Edit page : To edit expense click on edit button in the expense option. Then you can edit the expense details and click on the update button.
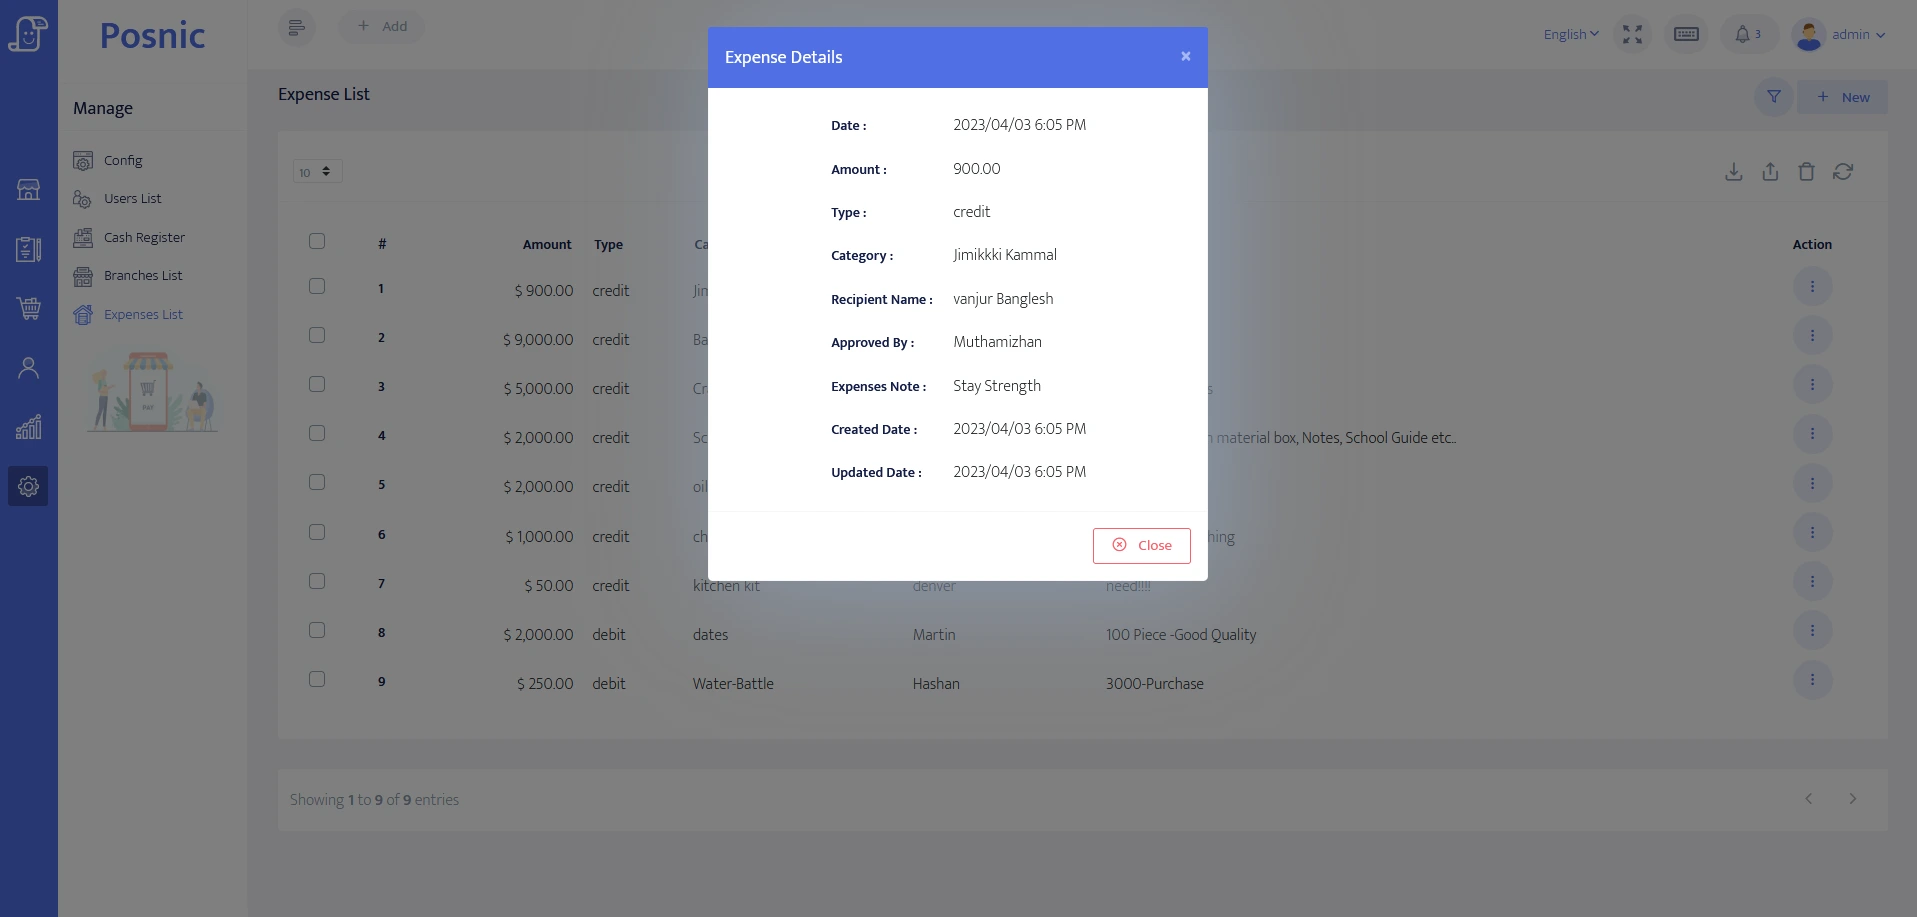
- History : In the right side of the expense list has the view,edit and delete button in the option.To see the detailed view of the expense click on voew button.

- View : To view the expense details click on the expense option and select the view button.
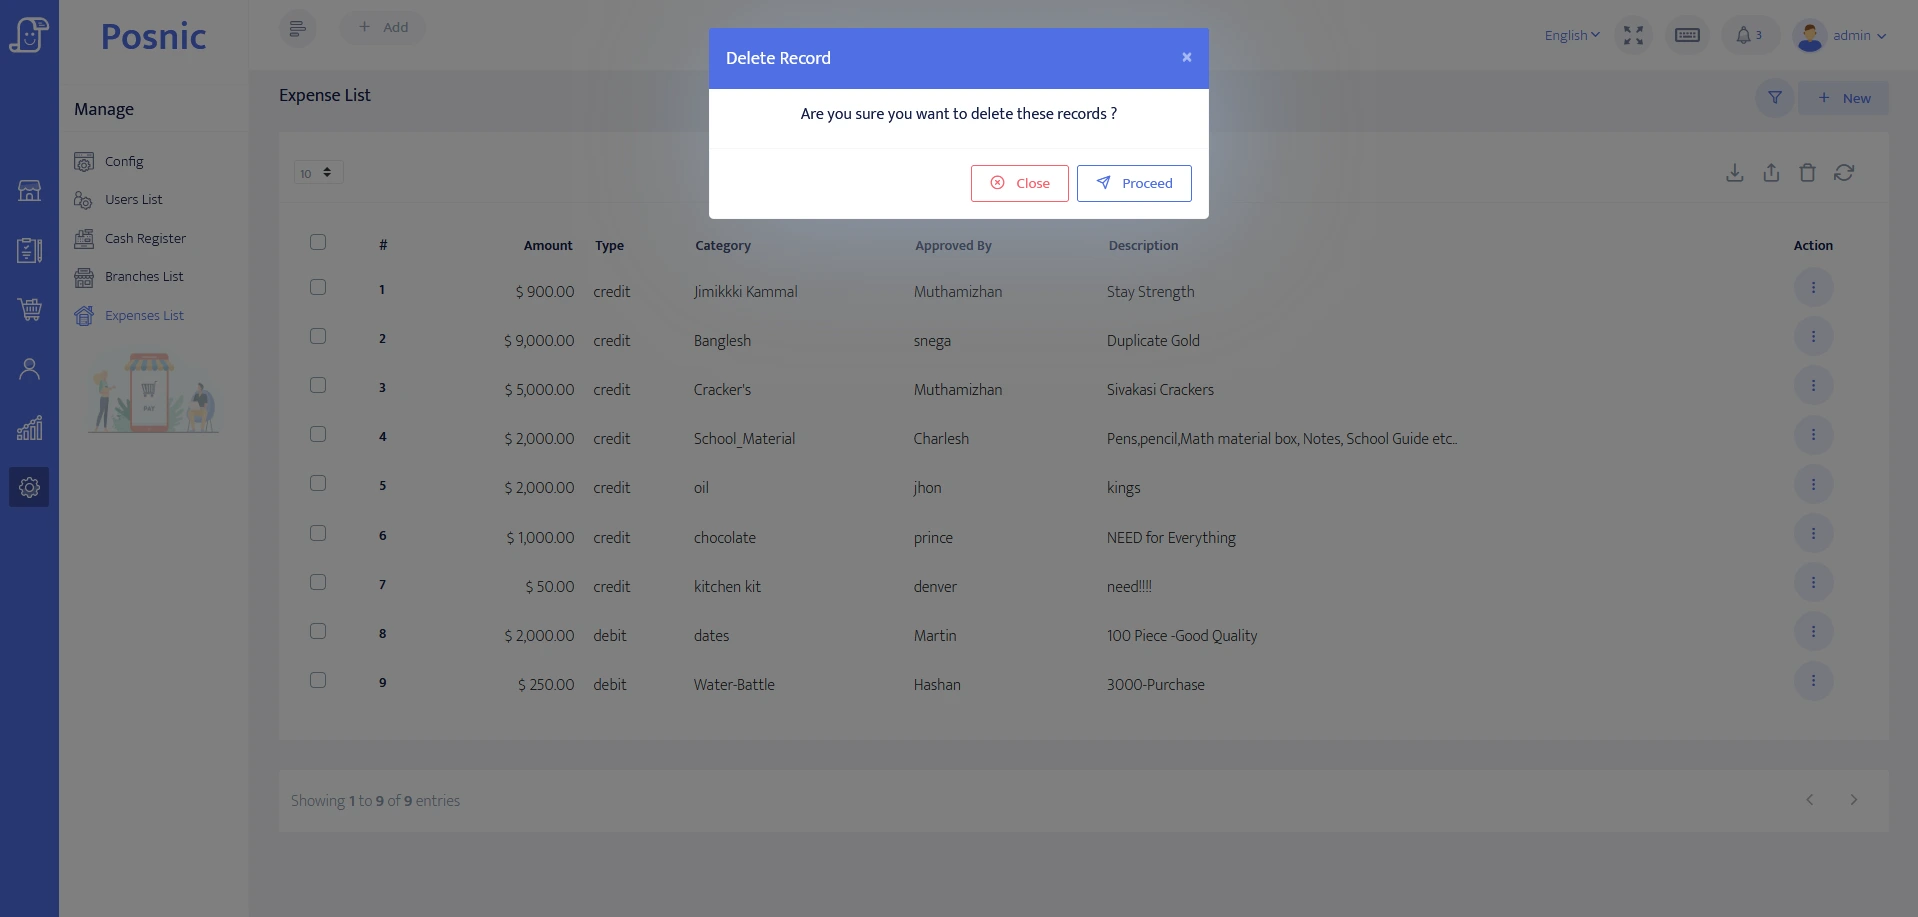
- Delete page : If you click on the delete button in the expense option, it will remove the expense details.
General
- First, you must enter your created username or email id and password to log in to PosnicPro.
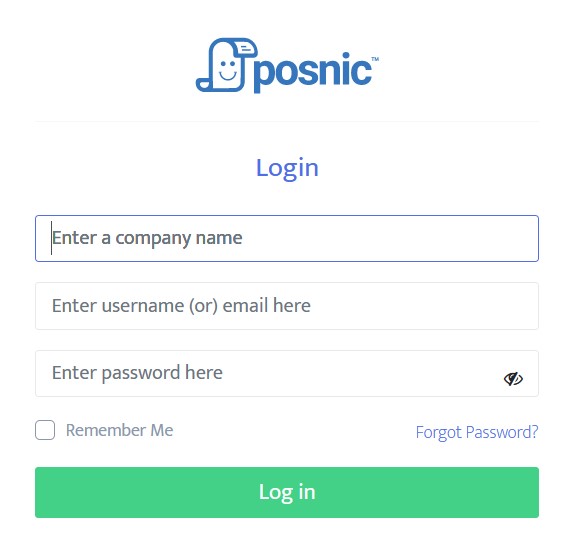
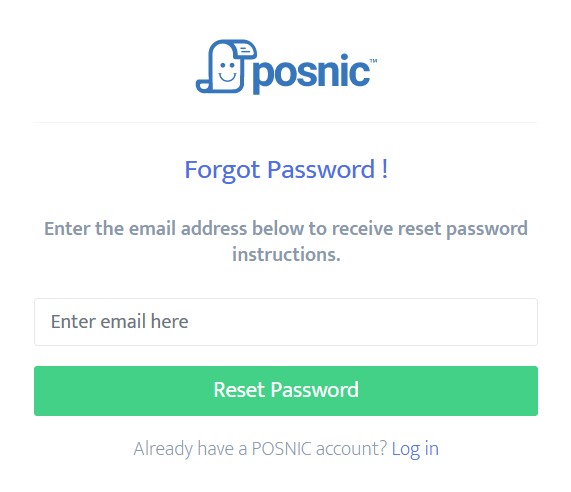
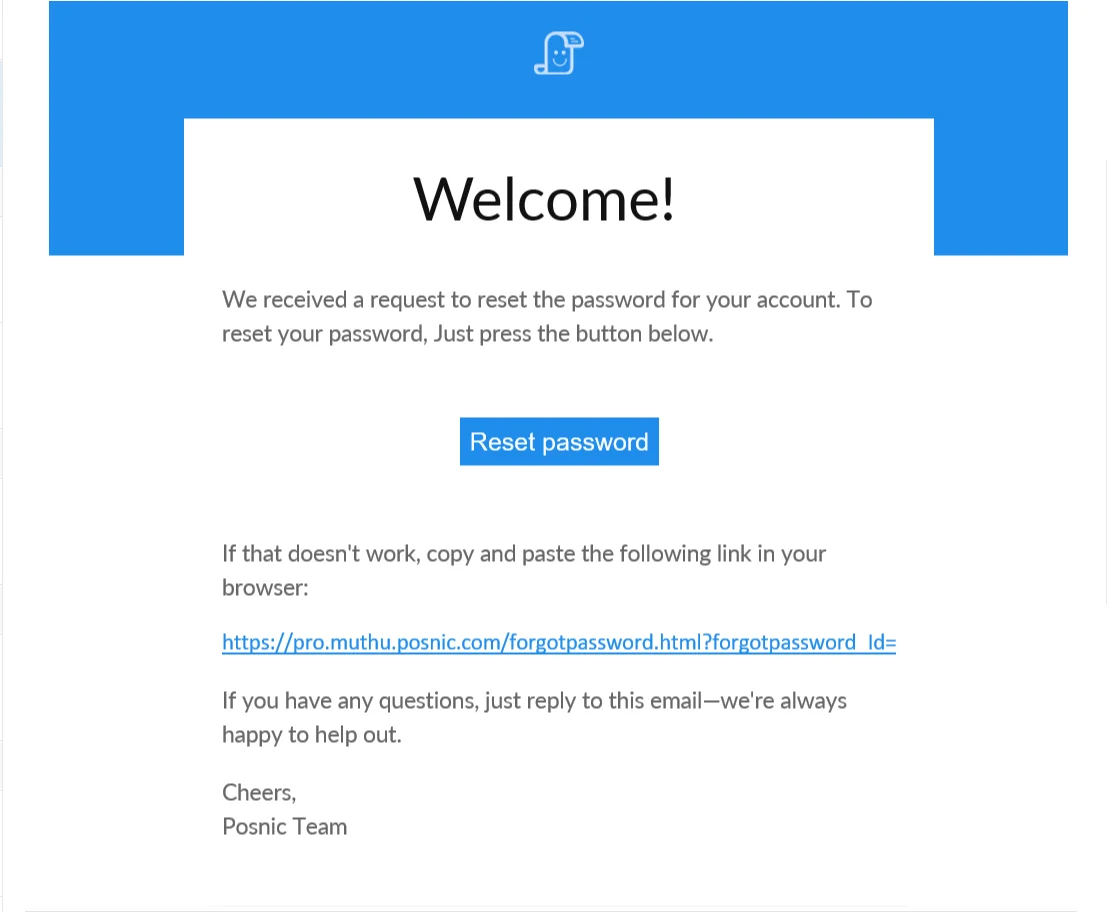
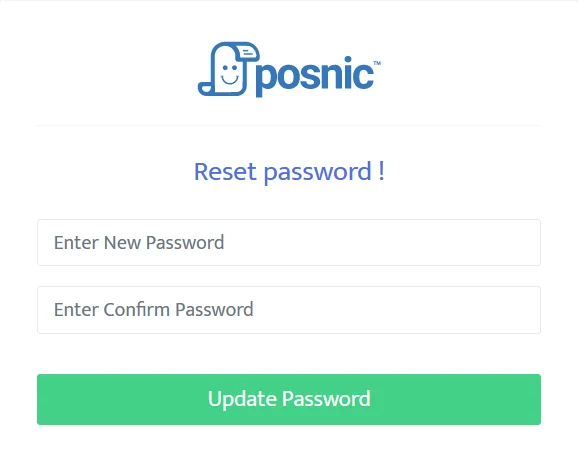
This is how you can reset your forgotten password using this option. Follow the steps below.
- Step 1 : First, click on the Forget Password option. Then enter the mail ID given during installation and click the Forget Password button.
- Step 2 : A link from our server will be sent to your email address, where you must select the Reset password button.
- Step 3 : Enter the new password in the change password list and select the update password button.
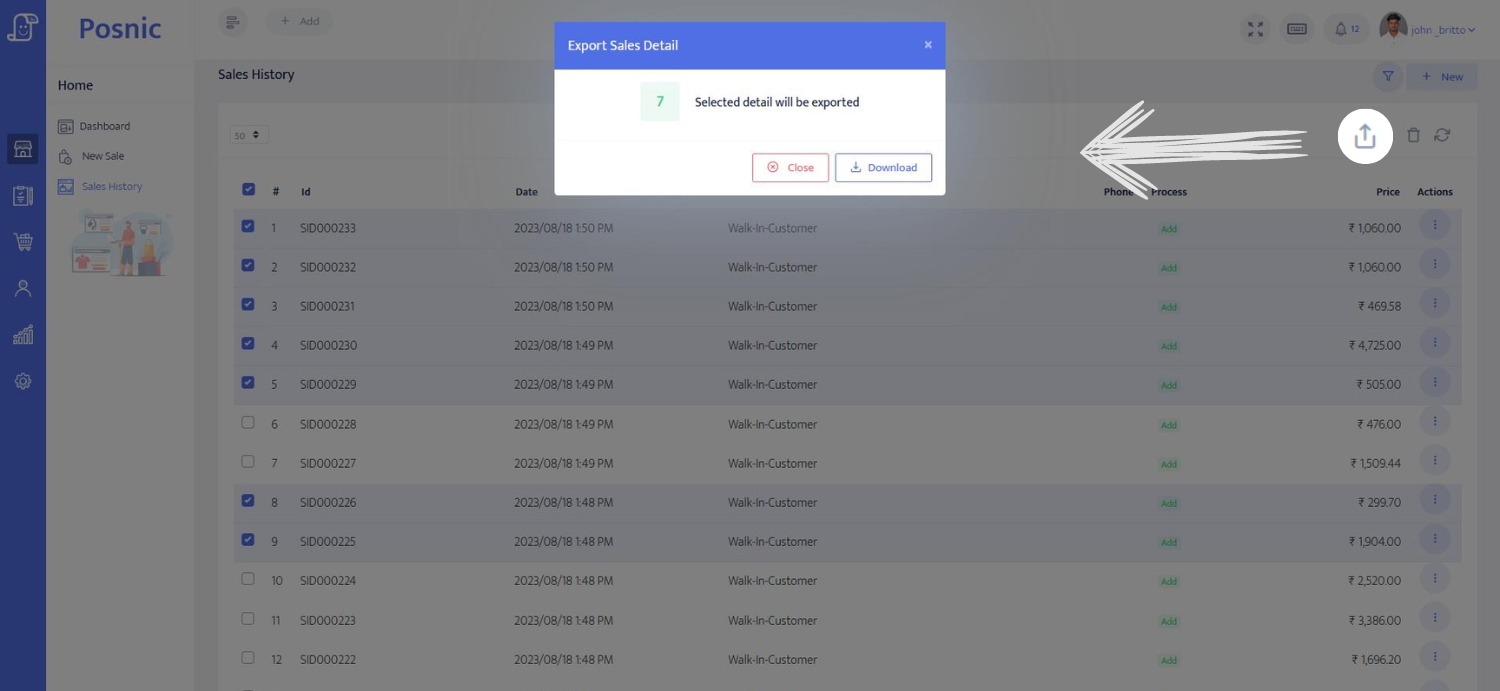
- You can export /download the sales, receiving, customer, supplier, category, item, user, and branch report files in .csv format.
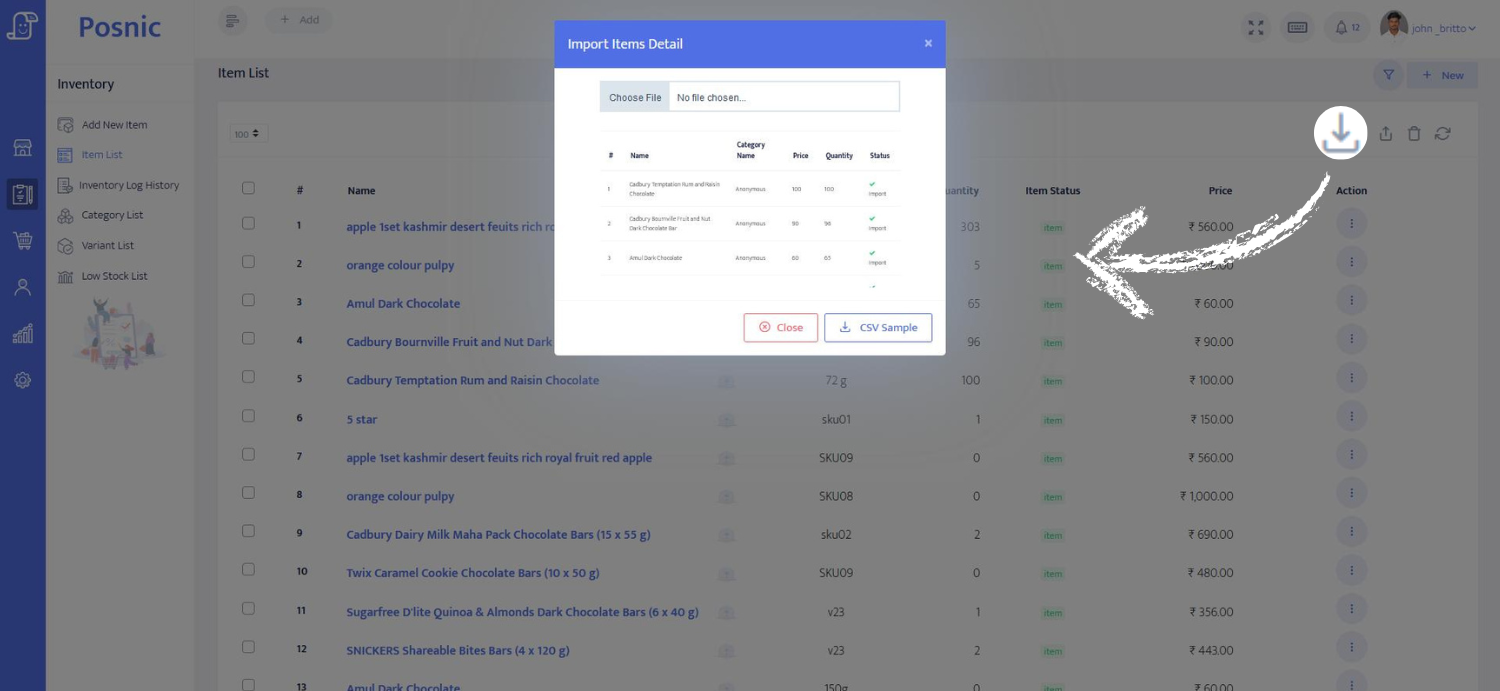
- You can import the customer, supplier, category, item, and expenses report file in xl format.
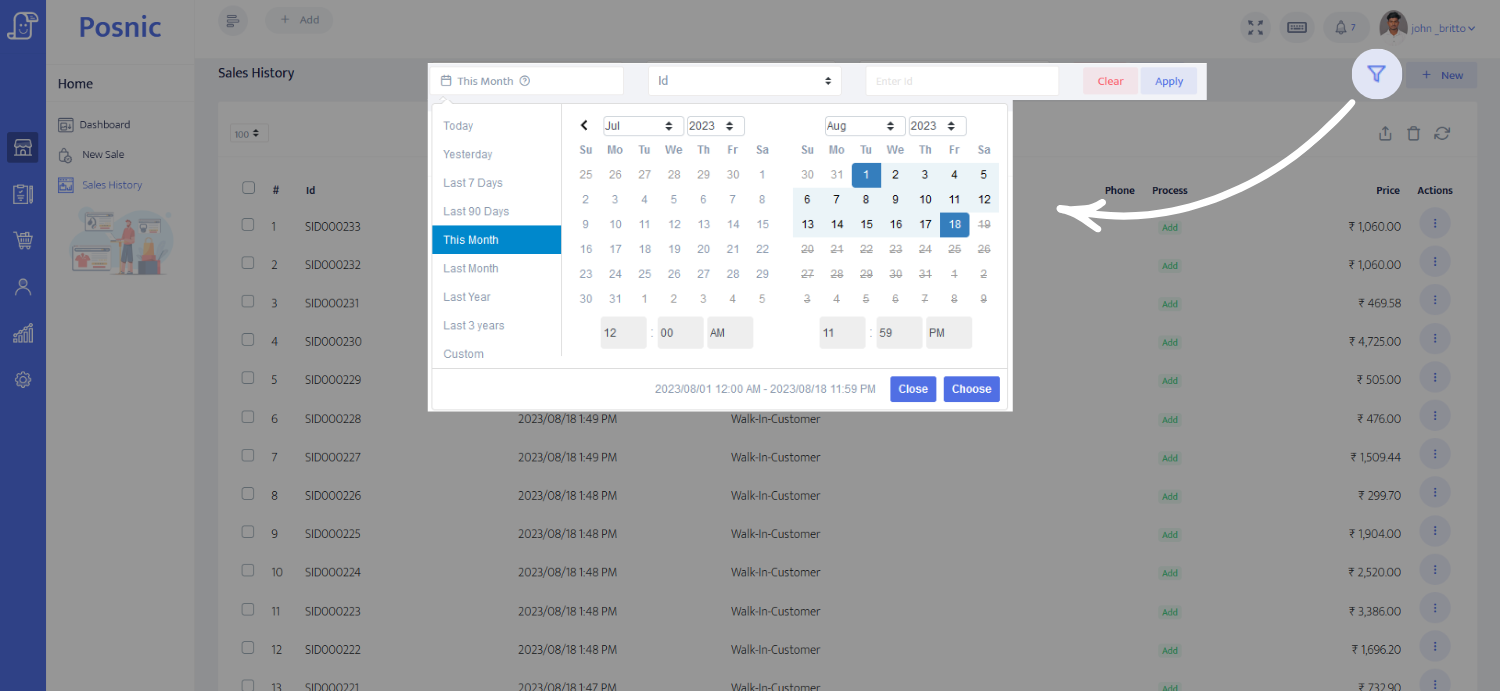
- You can filter the document by selecting the date, name, id, or branch. Whatever detail you want, you can get it using the filter.
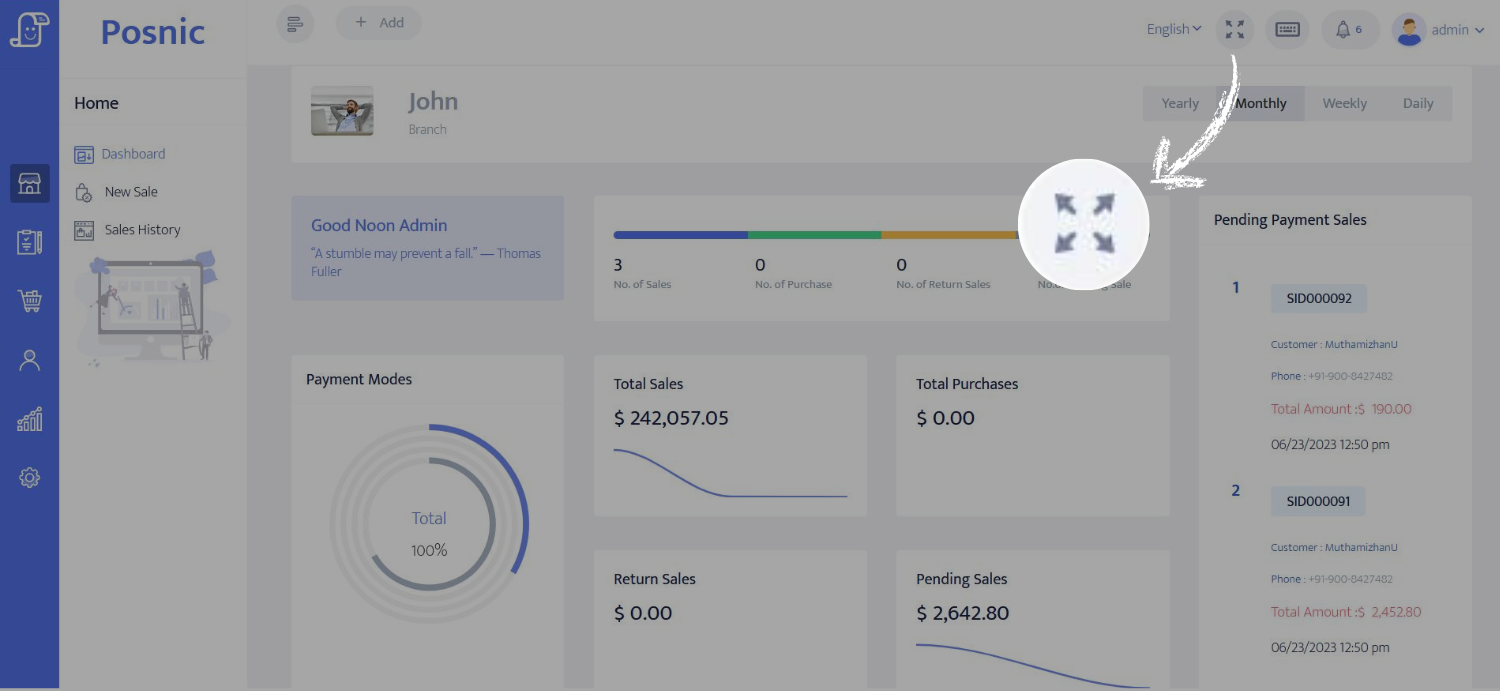
- Here you can use full-screen options.
- Here you can change your password easily.